Tkuhn Posted December 12, 2017 Author Report Share Posted December 12, 2017 1 minute ago, YoungCR said: Never seen the insides of a wire tuck, great work! Thank you! Although not too sure many people do tucks on e46s, atleast that I've seen haha. I'll be doing Nicks as well, but I can gaurentee not many people go this in depth either lol. nick.e46.330i. 1 Quote Link to comment Share on other sites More sharing options...
Jdesign Posted December 12, 2017 Report Share Posted December 12, 2017 Looking good. All those connectors and bulk heads add up quick. Where are you ordering your wiring supplies from? Quote Link to comment Share on other sites More sharing options...
Tkuhn Posted December 13, 2017 Author Report Share Posted December 13, 2017 11 hours ago, Jdesign said: Looking good. All those connectors and bulk heads add up quick. Where are you ordering your wiring supplies from? Wirecare.com ! It's awesome, one stop shop for all my extremely particular wiring needs, even when people are never going to see it lol Jdesign 1 Quote Link to comment Share on other sites More sharing options...
Tkuhn Posted December 24, 2017 Author Report Share Posted December 24, 2017 Quick little update. Got all of the final welds ground down and the bay is ready for filler and sanding. Also was able to wire up and finalize the driver side wiring for the headlight, corner, horn, coolant level and temp sensor. Pleased with the outcome and next will be the passenger side. Earl, Jdesign, DrLeadFoot and 1 other 4 Quote Link to comment Share on other sites More sharing options...
Tkuhn Posted January 15, 2018 Author Report Share Posted January 15, 2018 UPDATE! First off Ill save the boring photos of all the interior wires that were cut and dead ended. Hoping there wont be any issues with removing all the abs, srs, seat wiring and etc. Theoretically there should be no problems and if there are I am confident they can be sorted out. I was able to finish up the wire tuck on the passenger side. Heres both of the harnesses completely removed from the car. With the deutsch connectors both harnesses are easily depinned from where they connect at the fender near the door. Then they are able to be removed completely. The bay is also starting to get closer and closer to the finish line. Welding is completed along with all filler was lair and sanded. Next up is final sanding to prep for paint. Hoping to get started on stripping some of the sound deadening from the interior soon as well so that the interior can get painted then the entire interior harness can get loomed for final installation. Quote Link to comment Share on other sites More sharing options...
Jdesign Posted January 15, 2018 Report Share Posted January 15, 2018 Harnesses and engine bay are looking great! Excited to see paint in that bay! Quote Link to comment Share on other sites More sharing options...
Tkuhn Posted January 15, 2018 Author Report Share Posted January 15, 2018 3 hours ago, Jdesign said: Harnesses and engine bay are looking great! Excited to see paint in that bay! Trust me I'm about ready to also hahahah hopefully in a few weeks if time permits! DrLeadFoot and Jdesign 2 Quote Link to comment Share on other sites More sharing options...
Tkuhn Posted January 28, 2018 Author Report Share Posted January 28, 2018 Have had a few parts come in the past few weeks. Got my chase bays brake bias valve and all the fittings needed to make it work. This kit is normally sold with PTFE lines but Chase hooked it up with all the bulkheads, tube sleves and nuts to get it done the way I have it planned. Picked up some clear corners, red tails, some door trim and some M3 door sills. And last but not least my Street Faction front bash bar came in. I ordered just the basic one because I have a few plans for modifications of my own that the website does not offer. Mocked it up and it fits great, going to have to figure out a different way to mount the bumper because the bar is too long to allow the stock bumper slides to push into the plastic mounts. I believe I have a solution to this and I will share it if it works out lol. Rekpoint and Jdesign 2 Quote Link to comment Share on other sites More sharing options...
Tkuhn Posted April 1, 2018 Author Report Share Posted April 1, 2018 Holy shit I have been slacking on the updates. Lots of parts have come in and things are slowly coming together. So here we go. The bay is painted. Once the car was back to my shop I dropped the rear end out of the car along with the fuel tank. With that came some bad news. One of the subframe mounts was ripped out and another loose and plenty of cracks lol. So with the help of a good friend we were able to replace the torn area. and get the confor reinforcement kit welded in and then opened up the upper areas inside the chassis where the tops of the mounts were. We then created a tubing brace that connects all 4 of the subframe mounting points to the rear bar which was welded in to support the rear strut towers that was plated in preparation of the rear true coil set up. I have alot more progress to share and will upload more when i get a chance! Jdesign, B C, Ryan... and 1 other 4 Quote Link to comment Share on other sites More sharing options...
jc43089 Posted April 2, 2018 Report Share Posted April 2, 2018 Seems sturdy now! Tkuhn 1 Quote Link to comment Share on other sites More sharing options...
Tkuhn Posted April 4, 2018 Author Report Share Posted April 4, 2018 Continued update! Busted out the brake lines for in the bay. Obviously the abs/dsc has been deleted. SO with that being said I used a custom kit that Chase at ChaseBays got me hooked up with. Everything was done with 3/16" nickle copper brake line. I love the way this stuff shines up. All the photos are of before polishing. I was able to hide the brakeline that runs from the master to the right front and keep it out of the engine bay, I was also able to get the left front line to stay inside of the compartment on the driver side rather than run out of the compartment and through the fender well. And then the lines were ran from the bulkheads to the original mounting spots where the softlines will connect. Also made sure to route them so that the added angle of the MG Solutions maxx angle kit doesnt hit them. Oh and i previously cleaned out the wheel wells and sprayed in some new 3m rubberized undercoating. Now that the rear end is all reinforced and braced I was able to get the subframe cleaned up, old bushings out and installed the new condor subframe bushings and diff bushings. Also got some fun parts in for the rear end. MG Solutions upper and lower rear arms. Stance XR1 rear true coils (also have XR1s for the front) Ill save the boring photos but the front knuckles are cleaned up and re-sprayed black along with starting to clean up and re-paint the used MG Solutions maxx angle steering kit that i pulled off my 330i. Lots of parts came in including motorsports hardware stud conversion for the car, m54 fuel filter, upper and lower bushings for the rear trailing arms, new wheel bearings for all 4 corners. Fuel lines to replace the m54tu ones (completely different), oil adapter fitting for the oil filter housing to put a gauge into the system, Parts Shop Maxx engine vitals gauge (coolant temp and oil pressure configuration), some split loom for the interior harnesses, CSF aluminum radiator, and a few other odds and ends. So i mocked up the new radiator and front end to fab up a bit of protection for the radiator. Also cut the stock tow hook thread mounts off the front and rear bumper mounts with plans to weld them up to the bash bars using the stock locations (still needs to be done) Ordered N54 exhaust studs and new oem exhaust manifold nuts and got them installed as well. And last weekend was able to drop in the engine and trans! Before popping the trans on I threw in a new clutch fork and throwout bearing. Last year when i put this engine and trans into the 330i I had replaced the fork pivot pin with the stainless steel one from condor as well as replaced the clutch. The flywheel was just machined when i installed those parts last summer. The clutch and flywheel looked great still so no need to replace them. While i was at the trans i replaced the whopped out shift carrier bushing with a new condor one and then installed a new turner motorsport rear shift bushing. More progress to come! its crunch time and I am hoping to have the car done by the end of April with a few weeks to get some miles on it before Automotion. ChrisO and Ryan... 2 Quote Link to comment Share on other sites More sharing options...
B C Posted April 4, 2018 Report Share Posted April 4, 2018 You guys are experts. I want to throw my car away after visiting this thread SteelBlue 1 Quote Link to comment Share on other sites More sharing options...
Tkuhn Posted April 4, 2018 Author Report Share Posted April 4, 2018 1 minute ago, snap said: You guys are experts. I want to throw my car away after visiting this thread Hahahaha were no experts. Honestly im just putting alot of the things I learned from building my civic over the past 8 years into this car. Like keeping in mind to do things right the first time so theres no reason for me to redo things over and over haha. And im not even going as in depth with everything that I would like, but id rather have the car done to drive, enjoy and get some more seat time. Its extremely hard for me to not touch everything and make it over perfect in my eyes lol, in time the car will become more is my hopes! Jdesign 1 Quote Link to comment Share on other sites More sharing options...
Jdesign Posted April 4, 2018 Report Share Posted April 4, 2018 Looking killer man!! Those brake lines are nice!!! What is the reason behind using the copper nickle lines and not steel? Quote Link to comment Share on other sites More sharing options...
Tkuhn Posted April 4, 2018 Author Report Share Posted April 4, 2018 4 hours ago, Jdesign said: Looking killer man!! Those brake lines are nice!!! What is the reason behind using the copper nickle lines and not steel? Thanks!! And honestly they are easier to work with. But they also hand polish really well. Quote Link to comment Share on other sites More sharing options...
patsbimmer1 Posted April 5, 2018 Report Share Posted April 5, 2018 20 hours ago, Jdesign said: Looking killer man!! Those brake lines are nice!!! What is the reason behind using the copper nickle lines and not steel? The big upside is that it won't rust and fail catastrophically like steel lines will. Not to be confused with straight copper lines which can't stand up to automotive brake pressures. NiCopp is pretty neat stuff! Tkuhn 1 Quote Link to comment Share on other sites More sharing options...
jc43089 Posted April 5, 2018 Report Share Posted April 5, 2018 Sometimes it's called "Cunifer" it is excellent to work with, won't corrode, and is only marginally more expensive. I think Volvo has been using it since the 70's. Try it once and you will never use steel again. Quote Link to comment Share on other sites More sharing options...
straight6pwr Posted April 5, 2018 Report Share Posted April 5, 2018 mmm wire tuck! looks great. Tkuhn 1 Quote Link to comment Share on other sites More sharing options...
Jdesign Posted April 5, 2018 Report Share Posted April 5, 2018 21 hours ago, Tkuhn said: Thanks!! And honestly they are easier to work with. But they also hand polish really well. 5 hours ago, patsbimmer1 said: The big upside is that it won't rust and fail catastrophically like steel lines will. Not to be confused with straight copper lines which can't stand up to automotive brake pressures. NiCopp is pretty neat stuff! 5 hours ago, jc43089 said: Sometimes it's called "Cunifer" it is excellent to work with, won't corrode, and is only marginally more expensive. I think Volvo has been using it since the 70's. Try it once and you will never use steel again. Well I know what Im using when I redo my brakes! Tkuhn 1 Quote Link to comment Share on other sites More sharing options...
YoungCR Posted April 6, 2018 Report Share Posted April 6, 2018 Buy what you need on amazon, it’s $25 for 25ft vs $48 at the parts stores. Nickel Copper is great to work with. Jdesign 1 Quote Link to comment Share on other sites More sharing options...
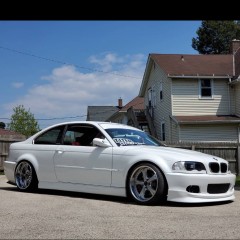
AsparagusMike Posted April 6, 2018 Report Share Posted April 6, 2018 Copper nickel... Great! I did however have a challenge with them once in a while going crooked on me when I was making a flare just because they are quite a bit softer then steel. Although, when they are tightened down they slightly crush to make a good seal so I'm not really sure how big of a deal it is if the hole is slightly not centered. Beautiful engine bay by the way, Cars looking great! Tkuhn 1 Quote Link to comment Share on other sites More sharing options...
jc43089 Posted April 6, 2018 Report Share Posted April 6, 2018 Hey I just realized you are using -AN bulkheads etc. What 37 degree flare tool are you using and do you like it? I'm looking to get one for doing the same thing, I am making a fuel return line for my van because it doesn't have one among other things. Jdesign 1 Quote Link to comment Share on other sites More sharing options...
Tkuhn Posted April 7, 2018 Author Report Share Posted April 7, 2018 On 4/6/2018 at 6:54 AM, jc43089 said: Hey I just realized you are using -AN bulkheads etc. What 37 degree flare tool are you using and do you like it? I'm looking to get one for doing the same thing, I am making a fuel return line for my van because it doesn't have one among other things. I have the rigid one. You can get it through home depo online, it's awesome. I use it on brake lines, fuel lines, and all the air ride set ups I've done. Haven't done stainless yet tho. jc43089 1 Quote Link to comment Share on other sites More sharing options...
Jdesign Posted April 9, 2018 Report Share Posted April 9, 2018 This guy? Quote Link to comment Share on other sites More sharing options...
Tkuhn Posted April 9, 2018 Author Report Share Posted April 9, 2018 @Jdesign yep that's the one! Quote Link to comment Share on other sites More sharing options...
Recommended Posts
Join the conversation
You can post now and register later. If you have an account, sign in now to post with your account.