

m42b32
-
Posts
2440 -
Joined
-
Last visited
-
Days Won
85
Reputation Activity
-

 m42b32 reacted to KaiserRolls in ‘91 E30
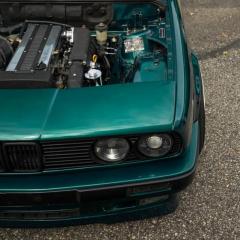
Probably have around 5hrs of drive time on this thing -have been letting VE analyze do it’s thing after adjusting the afr targets/idleVE/rescaling the tables.
I had the valve cover off just to double check the cam stuff, good to go there, but I have developed the smallest oil leak from the valve cover on the passenger side rear of the cover, true to bmw form
-
m42b32 reacted to HipMF in chit chat thread
Went out to Jefferson swap meet/car show for something to do. Really strange being at a swap meet after a few years away. It's It's own sort of culture I guess... Turnout wasn't great because of the weather. The only thing I bothered to take a picture of was this barn-find Camero. It looked it had been fixed up just enough to get running and driving, but left as-is otherwise.
-
-
m42b32 reacted to KaiserRolls in ‘91 E30
Changed the oil/filter on this as I was just using some cheapo 10w-30 as a way to get the storage crud knocked out of this thing. Filter looked as expected as this engine has been sitting for almost 3 years under a trash bag & I’ve messed around with the cams in and out a ton, new lifters, etc etc. no big magnetic chunks- just dirt/old crud.
pulling the valve cover off to double check the torque on the cam caps and other miscellaneous hardware in the head after a few heat cycles - once that is good to go just going to button everything back up and get it bolt checked for a local autox in early May.
-
m42b32 reacted to gilber33 in Non-BMW Stuff on a BMW Forum
They are 15x7 in front and 15x7.5 in the rear. The 16" RS definitely come with a premium. But I've always like 15s on the car better.
Had the car out for its first test drive and it was pissing transmission fluid. Engine and transmission had to come back out. It ended up being my fault - I put the input shaft seal cover on about 90* off which just so happened to line up the fluid return hole on the transmission to be lined up with an open hole on the cover. So it literally was pouring out. Fixed that. Drove it around this weekend some. Realized I forgot to tighten up the nut on the driveshaft where it splits. Sooooooo one more fucking time on the lift to do that, but then it should be all set!
Other notes:
This winter I also made rear speaker boxes and front door tweeter pods and fitted in Focal component speakers in the front and rear. I installed an Infiniti Basslink Mini under the front seat. The sound system is now fantastic and sounds like what I've always been chasing.
Interior is exceeding my expectations. I love them. The seats are so comfortable. Also finished the e-brake handle boot.
Also able to test my H1 LED high beam kits. Since the caps on the euro smilies can't really accommodate the larger LED bulbs or the wiring, I wanted to make these since I don't have my US Ellipsoids anymore. I am not disappointed with the performances of the MLED projector and LED high beams.
Made a stop at Fermentorium in Cedarburg with our youngest while the older two and my wife were at a birthday part. After Fermentorium, I used the e30 to pick them up and continue on to Sahale in Grafton. What a family car.
-
m42b32 reacted to DrLeadFoot in SCHLEPN | The E39 540itA Story
I bit the bullet and had Partee Racing do the bottom end as well. Shipped the heads back to Partee Racing for them to assemble the motor. High compression pistons, Arrow rods, all new everything. Almost ready to throw it into the wagon!
-
m42b32 reacted to DrLeadFoot in Chapter GMW | E30 LS1 (starting on post #1427)
Got spotted on the freeway. E30 - 1, G80 M3 - 0.
-
m42b32 reacted to gilber33 in Non-BMW Stuff on a BMW Forum
Caps are indeed purple. Had some made to match the interior.
-
m42b32 reacted to KaiserRolls in ‘91 E30
IAT bung welded up
new AEM filter that isn’t a cone shape so it fits better
wired up the MS3 pigtails for the WBo2 signal and the IAT. Dropped the 2017 battery in the car and hooked up the MS3 to the laptop. Before turning the key I removed the fuel pump relay. Key on and we’re live
i bought this MS3 back in like 2017, so needless to say I had to update stuff a few times ha. Firmware updates wiped some oem temp sensor calibrations so had to re-enter the coolant temp, IAT was no big deal as I’m using a GM sensor and would’ve changed it anyway.
-Calibrated TPS, changed to GM IAT, added values for stock CTS, switched to wbo2
I was going to continue on, but the battery voltage was dropping fairly fast, so I wanted to get a few cranks in to get some oil moved around. It quickly dropped to around 7 volts and wouldn’t really take a charge. Bought a new agm battery a day later, have that on the tender for now. Pulled the oil filter cap off and it was full of oil, will probably do some more priming before putting the fuel pump relay back in. Can probably remove the stock O2 relay now too
next up is to jump into the reqfuel & injector settings as I’m running some EV14 380cc (36lb) injectors - when I bought them 3 years ago 380cc was the smallest they offered, now they offer 315cc (30lb)
after that’s adjusted can probably attempt a first start. Once it’s idling I can then verify/set base timing. Bought a LS(?) plug wire to use as an extension to go from coil pack to spark plug so I can grab cyl1 signal.
assuming that goes smoothly I can drop the radiator in and get PS/coolant bled and go for a first drive
-
m42b32 reacted to KaiserRolls in ‘91 E30
All the MS3 stuff is good to go after some help on injector dead time voltage curves from a friend, figured I’d burn it to the ecu & then wanted to see if it would start. This was the first time I put the fuel pump relay back in
didn’t let it run too long without the radiator, just wanted to see if it would hold idle. It was in warm up enrichment so the idle was pretty high, but should be enough to verify base timing and then toss the radiator in and get everything bled.
IMG_6467.MOV
-
m42b32 reacted to gilber33 in Non-BMW Stuff on a BMW Forum
Near spring update.
Interior almost done:
New wheels on after being circle jerked by a "racing shop" that fucked up the seals multiple while mounting them. Eventually took them to Big Bear Tire in Oconomowoc to have them dismounted. I did the seals myself, and now all is good. They're awesome BTW. The guy who did the tires has an e30 touring.
The shop's attempt at fixing damaged seals and the seal that was about ready to start leaking.
My job at cleaning all the sealant and resealing them. Pretty damn good if I say so myself.
After removing the transmission to replace the input shaft seal, I was having issues the starting pinion gear not engaging the ring gear. It was hitting the side of the ring gear instead of engaging it. Dropped the engine and it ended up being the metal plate must have gotten slightly bent that it wasn't allowing the starter bolts to line up with the holes in the transmission. That's all fixed. Bench tested the starter on the engine before putting it back in.
Revised my retrofit adapters and now have them for Morimoto's MLED 2.0 and the Micro D2S.
That's all. Hopefully getting close to this winter's projects and I can get the car out and start driving it.
-
m42b32 reacted to AsparagusMike in the one and only e30 s52 engine swap
So as far the head I decided on leaving it fairly stock. As for right now I don't have plans of revving past 7k so it should be safe just running the stock valve train. The head I'm using was originally from a M50 vanos. The only difference between the head from a s52 and a M50 non vanos were the springs and retainers. I kept the springs matched with the cams I was running which was from the s52 so I needed to swap those over. I went ahead and installed all new valve stem seals at the same time.
Made myself a little tool for spring removal and installation. Not quite as nice as some of the ones you can buy out there but it did the job well.
Once that was complete I began reinstalling the intake and exhaust studs. For the exhaust side I reused the N54 studs from the previous motor for ease of installation. After inspecting all the holes I noticed one of them was missing half the threads in it, wonderful. So out came the Heli-coil kit.
Springs and new valve stem seals were in. Studs were all installed. Time to go on the motor.
For the head gasket I went with a stock thickness 87 mm Athena cut ring headgasket. I tapped in some new dowels and then test fitted the gasket first to make sure everything cleared and all the cut rings fitted properly.
Everything checked out good on the HG so before installing the head I popped it back off and ran a small bead of the right stuff gasket maker around the entire timing cover area. Most say it is only necessary to dab a little where the cover meets with the block but I feared since there was only M6 bolts compressing the head down in this area there was still a chance it could possibly still leak. I should also note that before installing the head I made sure all the pistons were all shifted to as close to the center of the bore as I could to avoid any valves coming into contact when the cams are installed.
Once the head was on I threaded in the rest of the arp studs using the moly lube provided and torqued them in three equal steps to 75 ft lbs.
Trays and lifters were about ready to go in and then I noticed this in some of the bores on the exhaust tray .
Some light scoring in these areas is typically normal but this was far beyond that which pretty much made them scrap metal now. Unfortunately the cam trays that I got with the M52 were different. One of them was for a M52 but the other was from a M50 non vanos head so that wasn't gonna work out either. Thankfully after some research I found that M52 and S52's actually use identical cam trays so I took a trip out to the local junk yard and luckily found an untouched M52 from a 98 528i with trays and caps that ended up being in great shape!
Since they were pretty heavily varnished I dropped them off at a local machine shop to run through a hot tank.
With those back and cleaned up I went through my two sets of lifters from the M52 and S52. The lifters from the S52 worked well for me in the last motor but they were also pretty scored up similar to the cam trays they were in and I was unsure about the ones from the M52 and how many miles were on them. So, instead of trying to clean those up and risking some of them still causing issues I resorted to just purchasing all new ones.
Sprayed all the new lifters down with some break cleaner and compressed air to remove the protective oil that they came covered in.
Before Sliding them in to the trays I dunked each lifter in some break in oil and compressed the inner piston a few times with my fingers tell the piston felt a little softer to compress. This was done to prime them with a little oil so they weren't dry on first start. After rubbing a little assembly oil in each bore of the trays I popped them all in.
I didn't snap any pics of the next part but the install of the trays and cams went smoothly. I dropped some assembly lube on all of the lifter tops as well as on the cam caps and bearing locations on the trays.
I then began installing all the upper timing components. When I was torquing down the four bolts that held the upper timing chain guide into place I was finishing up torquing down the last bolt on the back side to 10 NM when I felt that wonderful feeling of it come back lose again when I was just about torqued. Backed the bolt back out of the hole with broken pieces of threads attached to it. Out came the Heli-coil kit, again.
Covered and taped off all areas of the motor leaving only the hole exposed. While drilling and tapping the hole I had help with holding a vacuum right next to the hole to suck up any metal shavings.
New insert was installed and I got back to installing the timing components. This time everything was torqued down to the proper spec with no issue.
When installing the front cam sprockets a new upper timing chain was used. With everything timed correctly I got the vanos unit installed with a fresh oem gasket. Once that was all completed and all bolts were torqued down to spec I spun the motor around 720 degrees to make sure everything spun smoothly and nothing was interfering with each other.
Onto installing the valve cover and getting this thing closed up.
After the timing was complete I did start installing a lot of the outer parts and accessories as well.
Two things I added from the old setup included an upgrade to my crankcase breathing setup. The single oem port I was using on the old setup I felt was just not gonna be adequate enough so I purchased the catch can kit offered by SLG. The kit is pretty slick and comes with all the drill bits and taps needed for modifying the cover and plugging the factory hole as well as all the necessary AN fittings to install for the new catch can lines.
The other addition was the ignition coils. On the old setup I ran the original 20 year old obd1 coil packs. For the most part they worked just fine but they started showing their age when during an auto-x event they got heat soaked and caused the engine to misfire. Of course I didn't wanna run into that issue again so I either had to get a new set of oem ones or try something else. New set of coils would set me back close to $600 so I looked around to see what else was out there. Well sure enough I noticed quite a few other boosted e36 guys running coils out of a b58. I then came across a company called Tunertech that actually designed a full swap kit with custom brackets to fit the coils in the e36 valve covers and the necessary pigtails to splice into the harness to run em. The main advantages of running these coils were that they produce stronger spark energy over stock, allow you to run a looser spark plug gap resulting in smoother idle and the cost of the coils come in at around half the cost of the stock ones. Because of these advantages I figured it was worth the try. One other thing I really liked was the fact that these brackets position the coils away from the down pipe so I don't have to worry about any wires burning over time.
Up next:
Clean and prepare clutch, flywheel, and trans
Wiring for ignition coils
Re fabrication to the down pipe for new turbo
-
m42b32 reacted to KaiserRolls in ‘91 E30
This is where I stopped over the weekend. Heater core/expansion tank lines are in. Most of the wiring harness is in.
since I’m going with MS3, I don’t need to use the factory O2, MAF, or IAT wiring- I still left them in the harness just in case, but tucked them out of the way.
wideband O2 is routed, just needs to be wired. IAT wiring is most likely next up
-
m42b32 reacted to KaiserRolls in ‘91 E30
Car is on the ground after like 14 months on jackstands lol - slapped the driveshaft/exhaust/heat shields back in, got the front suspension in and torqued. Bled the brakes/clutch and thankfully had no leaks after I remade all the lines when I ditched the abs. Shouldnt reeeeaally need to get back under the car anymore other than to hook up the wideband
the press was able to straighten out the bend in the skid plate pretty easily
Tomorrow going to start on the wiring in the engine bay/wideband/possibly IAT sensor.
-
m42b32 reacted to KaiserRolls in ‘91 E30
@Rekpoint stopped by and we got to work. Instead of just blasting away at the crank bolt with an impact I figured I’d pick up a torque wrench that went to 300ftlbs - still needed a way to hold the crank as I don’t have that tool.
the Amish-Inspired crank hub holder was born.
in case it isn’t obvious I don’t own a hole saw. Drilled out what I could with a step bit and went after the rest with a die grinder lol
Glen was the leverage and this stupid thing worked lol. Right around the last bit of torque, the end started to split but we made it to 300ft lbs lol
Once that was torqued we made pretty quick work of it, still a fan of lifting the engine/trans/y pipe into the car all together vs using a hoist
all jacked up and bolted in
intake isn’t bolted up yet, just wanted to make sure the 45° bend pipe was going to work for the intake - won’t be running a maf with MS3
next up is to make the car a roller again and get it down on the ground so I can get the harness in and connected as well as coolant hoses/radiator/etc etc
-
m42b32 reacted to basedspider in 2001 BMW 330i Daily/Project build thread
Oh yeah, its gonna get fully detailed at my work, document/photograph everything, and submit the cost to insurance.
-
m42b32 reacted to basedspider in 2001 BMW 330i Daily/Project build thread
My 1993 R33 GTS25t. Love the car to death, does massive burnouts.
Update for everyone: Sorry, with the lack of BMW and how ridiculously busy I've been recently its been hard to keep an eye on this thread. The car is still missing because when Chief Dumbass Cory Billstrom got arrested the car proceeded to change multiple hands and only god knows where it is now. The detective did his due diligence and interviewed anyone that was roughly connected and obviously anyone not obligated to talk, didnt talk. The car was last known to be in the area beginning of January so chances of it getting returned are extremely slim, and if it would be returned I am very sure it would not be in the same condition it was in when it left. The guy that stole it (Executive Chief Dumbass Chris Lamb) fessed up to everything and even admitted to doing over 130mph in it. The only reason I am upset about that is because that is faster than I ever went in it lmao.
I get to go to court multiple times over the next few months over this bullshit, so so excited. Hoping to scrape up some cash for an E36 325/328 to replace it, E36 M3 prices have gotten a bit ridiculous lol.
-
m42b32 reacted to retoropak in Helmut the e21
Electrical work is progressing well. I decided to abandon the Littlefuse integrated fusebox and build my own using TE fuseboxes. It allowed me to bus the power to the components the way I wanted.
I left the original rear harness and terminated it with the 20 pin deutsch connector. It will connect to the front harness.
Body harness is 90% complete. Almost everything under the hood is done. I am still adding some wires under dashboard for gauge power, glovebox lights or radio power and finishing up some grounds. It should be ready this week.
I get the set of cheapo rock auto parts e28 axles , brake discs and some pagid brake pads. I also got the gasket set for the m42.
I got a set of cheapest VAG coils of amazon to see how they fit. I think i will whip something to retain the coils. Once that thing moves out of garage under it own power and suspension aligns I will replace all el cheapo parts with something of better quality.
I spent some bucks on the Radium FPR and it fits beautifully with the nuke fuel rail.
Next:
Finish the fuel system: I got PTFE lines and fpr AND now its time for Flex fuel sensor and some AN fittings
Finish the steering: I ordered woodward u-joints and will need to whip a steering shaft. I still have to mount the column in final position. And lastly will need to sort the tie rod situation. I am thinking shorted e90 inners and e36 outers?
Engine: I have a second m42 which was sitting (covered) outside for almost 3 years. Damn squirrel lived in that thing for two years before I chased her out of there and sprayed 2 cans of pb blaster into the motor. It made very interesting, kind of crunchy noises when turning so I am pretty sure that it will work great. I got a gasket set for it and I am ready to dingleberry the shit out of the cylinders if needed and re-ring the pistons.
Who knows maybe it will make it to the Vintage
Beginning of the new fusebox
New fusebox
And the guts : power first
And the outputs
Radlok for incoming power: This thing is well........... very rad. Possibly best power connector I've seen so far
Finished product with chassis harness attached. Still need to shrink the boots but first will need to test and verify all circuits. I already found horn connected to the radiator fan output and vice versa. Hooooooonk you overheated
FPR. works really well with Nuke rail. Looks like this part was meant for m42 with my manifold
Chinesium coils
-
m42b32 reacted to KaiserRolls in ‘91 E30
Popped the front main in, installed the damper (still need to torque that, which basically means set the impact to max and send it home) engine is on the subframe now, m20 FW on with arp hardware, new spec clutch/pressure plate,TOB/PB, clutch pivot pin with grease fitting, trans put on, new control arms, bushings, etc etc
@Rekpointis stopping by to help toss this thing in
side note, this hikfab plate has probably saved me from purchasing around 70 oil pans
it did pick up a slight bend, but I’m going to toss it in the press to see if I can’t straighten it back out a bit
also, say no to brass pivot pins lol. This maybe had like 4k miles on it - was previously running a south bend stg3 street clutch/pp
-
 m42b32 got a reaction from Jdesign in FuturisticConcept Art BMW E36 with a V8 on a bottom dollar budget
I was watching this video and all the sudden a very recognizable e36 made an appearance at ~20 seconds in!
-
 m42b32 got a reaction from YoungCR in FuturisticConcept Art BMW E36 with a V8 on a bottom dollar budget
I was watching this video and all the sudden a very recognizable e36 made an appearance at ~20 seconds in!
-
 m42b32 got a reaction from Rekpoint in FuturisticConcept Art BMW E36 with a V8 on a bottom dollar budget
I was watching this video and all the sudden a very recognizable e36 made an appearance at ~20 seconds in!
-
 m42b32 got a reaction from P_Roloff in FuturisticConcept Art BMW E36 with a V8 on a bottom dollar budget
I was watching this video and all the sudden a very recognizable e36 made an appearance at ~20 seconds in!
-
m42b32 reacted to pynacl in 2002 E46 M3 // Build Thread
Small change - I swapped all the interior lights to LED a while back and just never really liked it. Feel like it modernized the car in a way that didn’t feel right. I’m an idiot and threw away all the original bulbs, so I recently had to go through realoem and gather each bulb part number to buy them through FCP. Feel like the standard bulbs just fit the car better and pair nicely against the cinnamon interior.
Heres a few crappy pics of LED vs standard
-
m42b32 reacted to AsparagusMike in the one and only e30 s52 engine swap
Got the crankshaft back from the machine shop. They got .010 removed from the thrust services and the thrust bearings fit much better now! With that figured out I got to measuring all my main bearing clearances.
All seven mains came in at .002 clearance which was right within spec so I was good to get things lubed up and installed permanently.
So something that I did with the last rebuild which I decided to change up this time was involving the arp main studs. Straight from arp when you receive their set of main studs they end up being too short and the nut only engages about halfway. On the first rebuild I dropped small 1/4" ball bearings in the holes to raise the studs and be able to bottom them out. I wanted to look into this a little further then I had and see what arp actually recommends to solve this issue. Two options... Back the stud out tell you get full thread engagement or ditch the washers. After reading through what a lot of others have done it seemed the option used with the most success was just ditching the washers. So I did just that. Torqued them all down and followed the proper torque procedure and checked my crank end play with a dial indicator which came in right at .003, right within spec.
With that complete I moved on to assembling the connecting rods and pistons. For this setup I chose JE for my pistons and got them in a lowered 9:1 compression ratio. I plan to run this on a flex fuel setup so I wanted the extra room for pump gas. As for the connecting rods I chose a set of H beam rods from Molnar technologies. The fit and finish on these are very nice and will fit my power goals nicely.
Time to start dropping them in the block. In the past I've used an adjustable piston ring compressor for piston installs. There is a lot of headaches that come with using one of those and I wanted this to go nice and smoothly so I purchased a ring compressor specific to the bore spec. It was well worth the extra money spent as they made this part of the install a breeze! I also wiped all the cylinders, piston skirts and rings down with some marvel mystery oil prior to install as recommended from JE.
Checked my rod bearing clearances as I went a long and all six came in at .002 which was right in spec.
With that complete I moved on to installing the windage tray and oil pump. I got a new oil pump chain and crank sprocket which paired with the Achilles sprocket really tightened up the chain slack.
New guides and timing chain installed as well.
I got the timing cover installed as well as the rear main seal and all hardware for those torqued to spec.
On the previous motor I had my fair share of oil leaks, especially around the pan gasket area. Unfortunately when I had the baffle and turbo oil drain bung welded on it slightly warped the pan gasket service. I figured this will most likely continue if I used an oem gasket again. Instead I decided to ditch the gasket all together and run a small bead of the right stuff gasket maker. I have used this stuff in the past and it works really really well and should help fill in areas where the services may not sit completely flat.
Next on the list. Start getting the head prepped and ready to be installed!