Jdesign
-
Posts
4316 -
Joined
-
Last visited
-
Days Won
162
Content Type
Profiles
Forums
Events
Gallery
Store
Posts posted by Jdesign
-
-
On 4/14/2022 at 10:59 AM, Jdesign said:
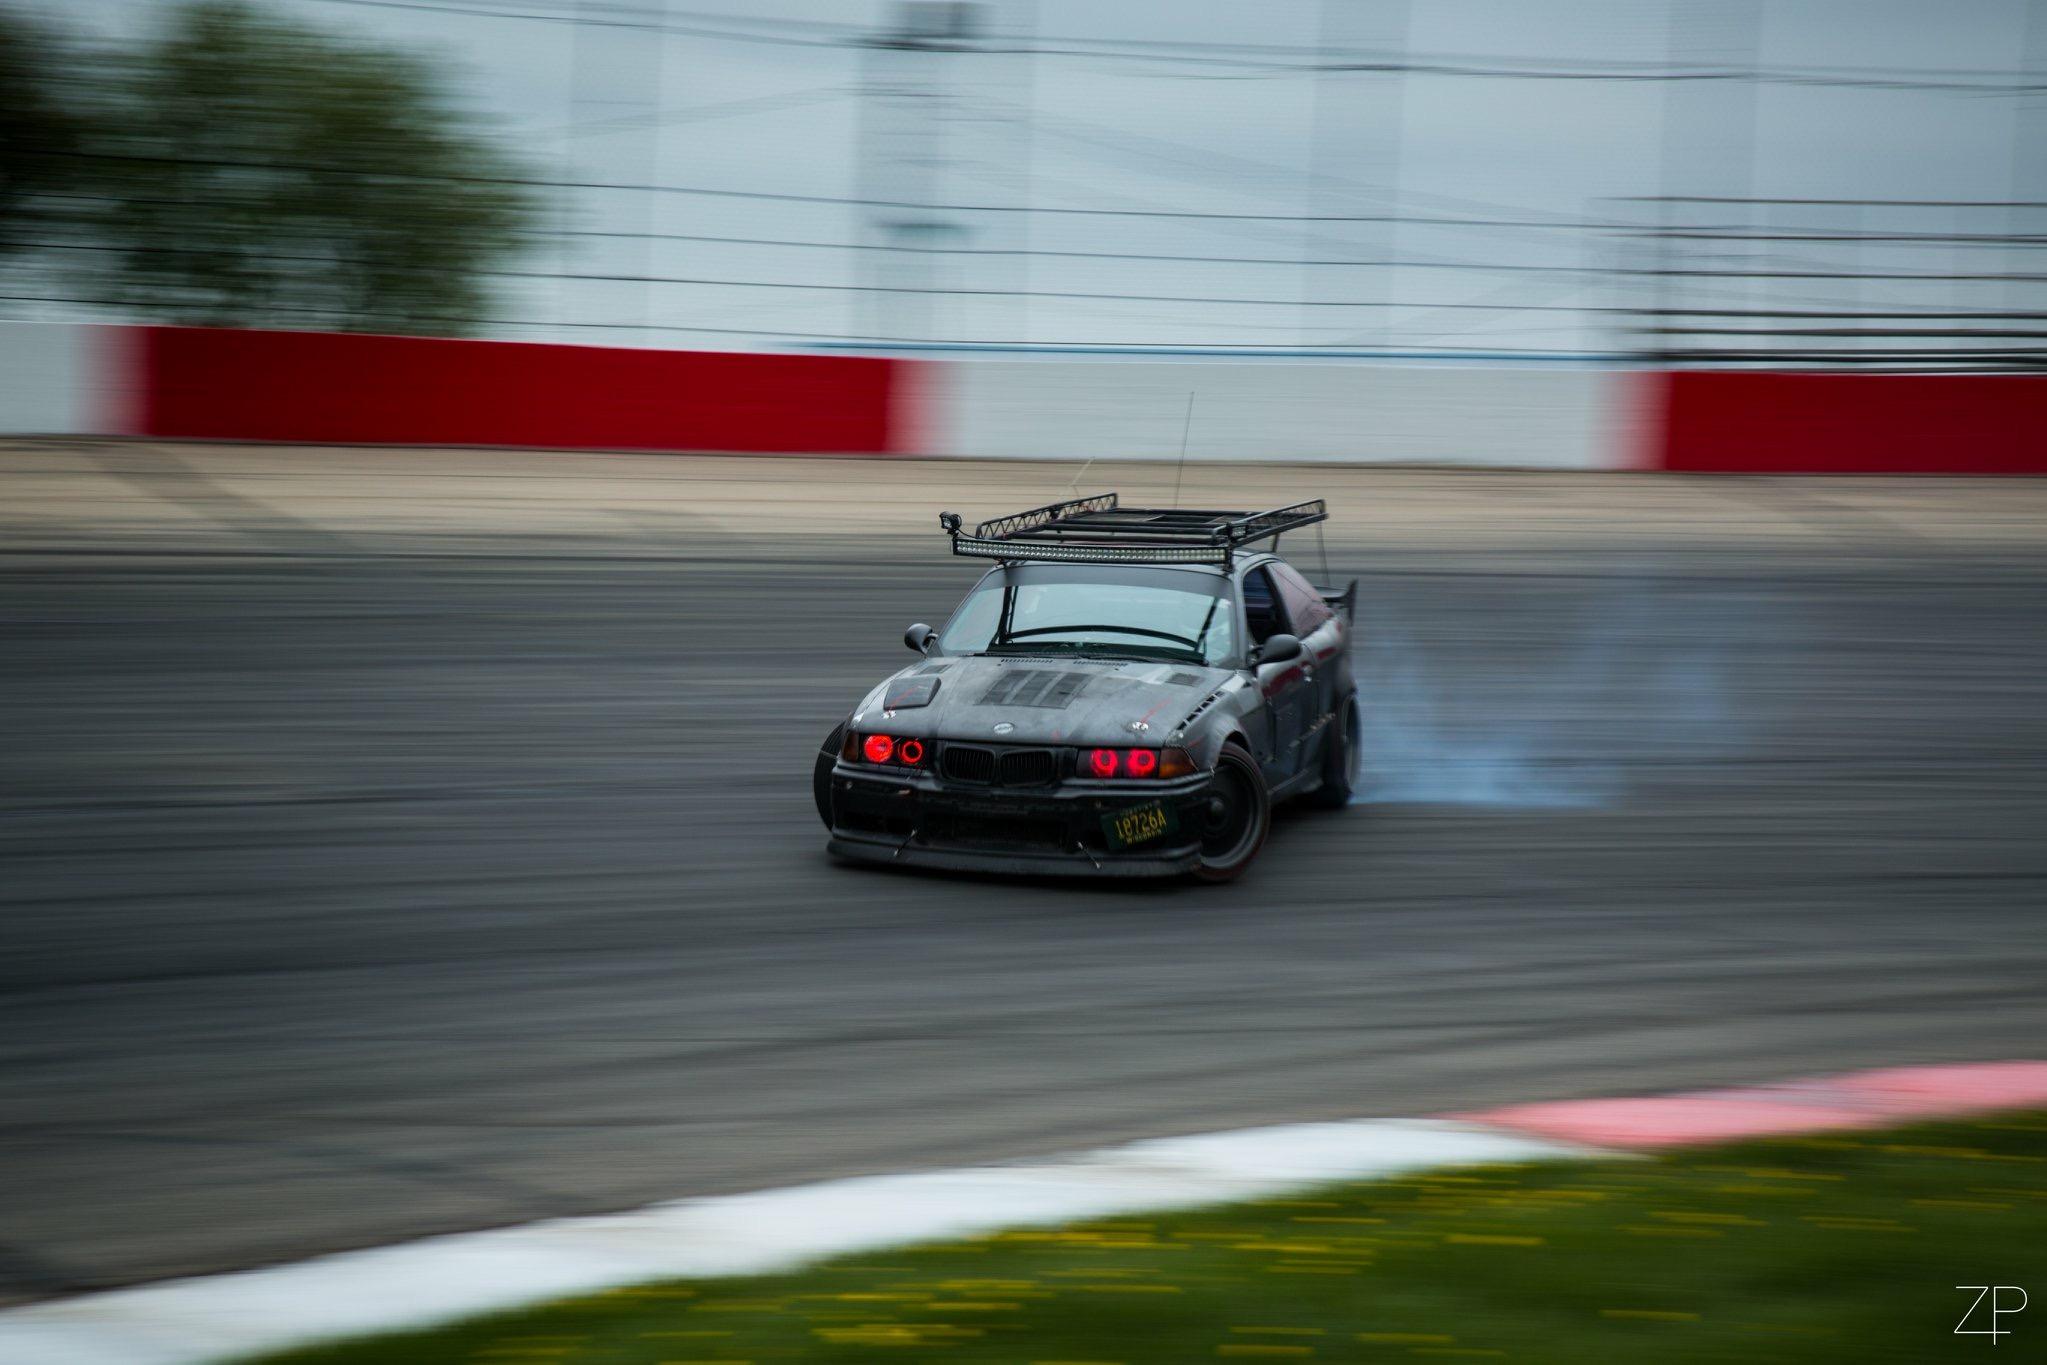
And Finally here is the video for the listing.
The video was tweaked slightly. If you have already watched the previous video I will save you the time, as this will look exactly the same.
-
On 5/4/2022 at 1:47 PM, Bassboy3313 said:
Updates?
Going through the final revisions of the listing with BAT. I will post here once it goes live.
-
On 4/23/2022 at 2:47 PM, SteelBlue said:
Also, my matching shift boot arrived this morning. Think it ties in nicely without being gaudy.
Where did you order from?
-
23 hours ago, wasnt m3 said:
KW coilovers, Ground Control camber/caster plates, lower control arms, TC Kline rear shock mounts, sway bar links and bushings all installed the past week or two. Had some time to do a paint correction yesterday as well as install a paint matched rear wiper delete. Getting closer to being satisfied...for now.

😍💙💦
-
And Finally here is the video for the listing.
- patsbimmer1, P_Roloff and Boris3
-
 3
3
-
Also, as far as documenting things, here are the notes sent to BAT.
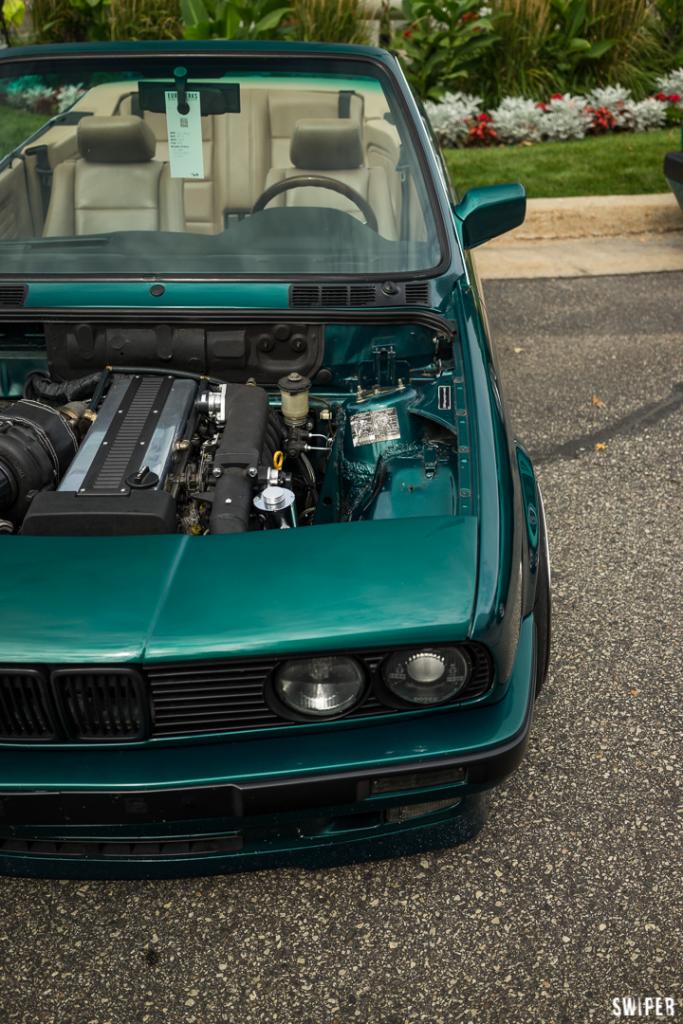
Summary: This 1971 BMW 2002 is finished in Malaga over a saddle leather interior and was purchased by the current owner in 2018. Power comes from a 2.0-liter inline-four paired with a four-speed manual transmission. Additional equipment includes bright grilles and trim, factory working air conditioning, 14” Alpina wheels, and front bucket seats. Service under current ownership is said to have included replacement of the brakes, steering components, valve adjustment & valve cover gasket, as well as a tune-up and all fluids flush. This 2002 is offered with an additional crack-free dash, an owner’s manual, a Haynes service manual, factory steel wheels and hubcaps, and service records dating back to 1990.
History: It was a California car until 2007, at which point the previous owner had it transported to Wisconsin. This was used occasionally for the next 10 years. It sat until June of 2019, when it was purchased in non-running condition. The car was inspected on a lift and has had extensive service to get it back on the road.
Exterior: This round taillight example was factory finished in Malaga Red (021) and was repainted under previous ownership in 2002. Silver-finished 14″ Alpina wheels wear 185/60 Bridgestone Potenza tires and a set of factory steel wheels and hubcaps are included in the sale. Detailed photos of the car’s finish, trunk, rockers, wheel wells, and blemishes can be viewed in the gallery below.
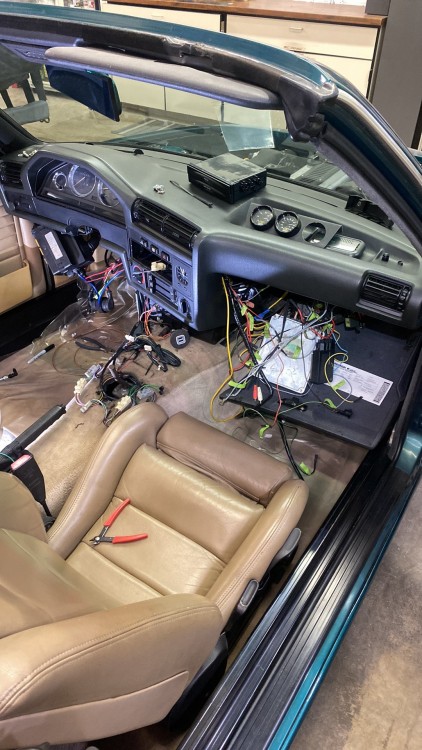
Interior: The cabin features a saddle brown interior with front bucket seats that have been recovered by the previous owner. The rear seat still maintains the factory upholstery although there is a split on the base on the passenger side. An aftermarket stereo has been added to the center console with two 5.25” speakers that are mounted under the dash. The five-digit odometer shows approximately 600 miles, with total mileage unknown. All gauges function as intended. Cracks can be seen in the factory dash under the dash cover, although the seller is including a crack-free dash with the car (see photos).
Drivetrain & Service: The 2.0-liter SOHC M10 inline-four features a factory carburetor with a manual choke. Recent service includes a replacement fuel filter, hoses, all accessory belts, distributor cap and rotor, spark plugs and wires, and a valve adjustment with new valve cover gasket. Recent oil and coolant changes, and replacement of the battery, and the air filter was also performed. The front tie rods, steering rod, ball joints and front wheel bearings have all been replaced during suspension service.
Known Issues: Rust is present on the front lower valance , bubbling is visible on the lower portion of the front fenders, under the passenger-side rocker panel as well as in the spare-tire well. Hazard switch is inoperable. Heater core is bypassed. Rear seat upholstery has a split on seat base. There is an intermittent battery draw so the car is left on a battery tender when not in use.
New Parts:
- New Front pads
- New Front Rotors
- New Outer Tie Rod Ends
- New Valve Cover Gasket
- Adjusted Valves
- New Dizzy cap
- New Dizzy rotor
- New Spark Plugs
- New fuel filter
- New light bulbs
- New AC belt
- New Alternator Belt
- New Air Pump Belt
- New Muffler Hanger
- Fresh Oil Change
-
Well, this car was officially accepted to BAT. I have a few more images I need to take of the car, but I assume it will be out of my hands before the summer is over. If anyone here is truly interested in purchasing this 2002 from me, I am willing to consider a local sale for the right price. Just shoot me a message.
Here's a listing of a similar spec 2002 for reference;
https://bringatrailer.com/listing/1972-bmw-2002-69/
Im sad to see it go as its a great car, but I had my time to enjoy it, and its just another vehicle that just doesn't fit in my ideal automotive stable right now. I am still trying to downsize as I just have too many projects to juggle as one human being, and I am trying to cut back and focus on what's realistic for me.
-
On 4/11/2022 at 8:26 PM, HipMF said:
The importance of physical media?
Threw Spotify a curveball today and it sent it right back at me. Listened to this album a bunch ~10 years ago and promptly forgot about it...
For sure, I dig this a lot!
-
e70 35d FTW!
-
Bummer. On the plus side it sounds like an opportunity to make more power....
-
Welcome back! This month is the month you bring it home. I hope I get to see it in person at the Picnic this year!
-
-
19 hours ago, gilber33 said:
I used the same type of steering joint from Condor (I think you actually sent me the link when I had found the stock one was all bound up) and that came the same way. I had to very carefully remove some material from it so it could slide together. Super annoying for a $300 part.
And SendCutSend is who I have been using for all of my headlight parts. They're awesome and have been so helpful when I had issues exporting DXF files.
I have heard nothing but good things about them!
-
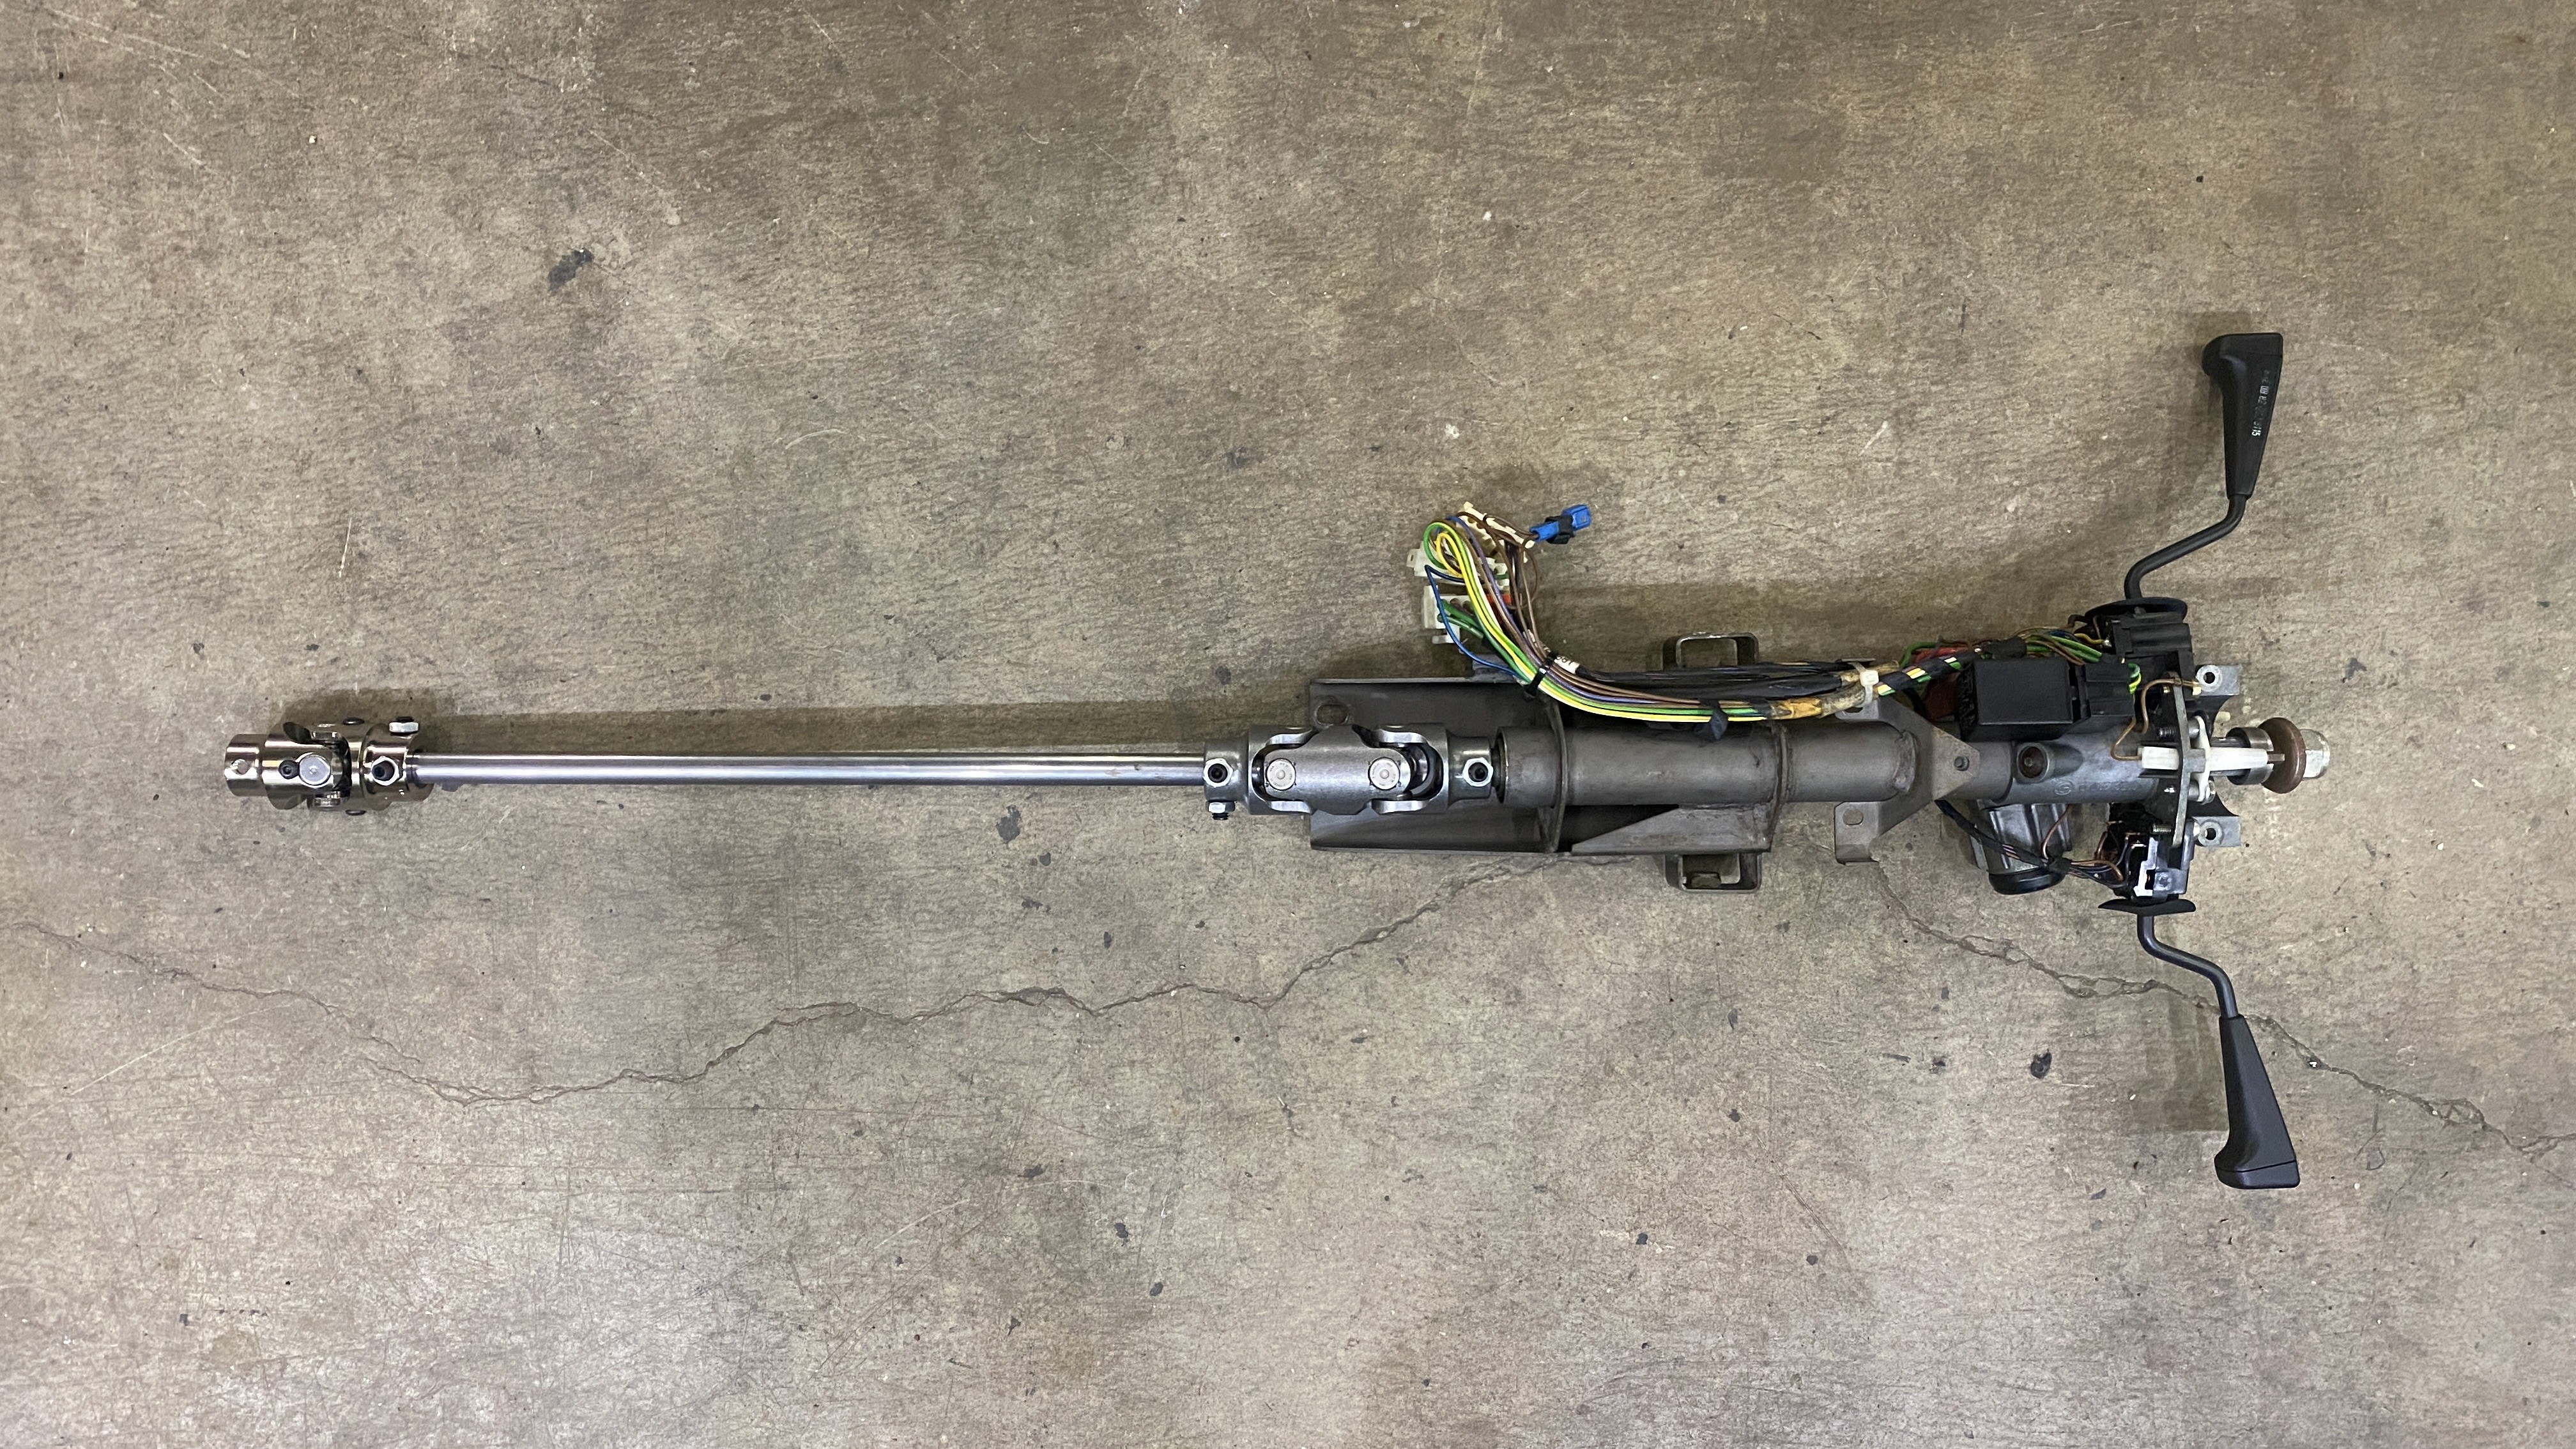
Wel, Ive still been plugging away at this. Lots of issues ordering the right parts, and fabrication to make everything work the way I want. The steering column has proved itself to be one hell of a pain in the ass. Partially my fault, but partially not. The latest issue was that the original shaft i ordered was roughly 4" too short. I knew it was going to be close, but when I placed my order, the option was 16" shaft or 48" which was way more expensive. I happened to find a shaft on ebay that was 48" for the same price as the 16" I bought. It showed up and as I should have expected it was a "oversized" part. apparently the supplier messed up and made a few thousand shafts 1m bigger than 3/4" and thats how the description read, but not the listing title. UGHH
I ended up machining the D shaft down and cut it to length. Here is what I got:

Here is what it should have been:

After that bummer, I kind of hit a dead end for the steering and brakes until I got the column mounted. I needed to make sure the angle was correct, so that once I machined the shaft and cut it down, it was a good fit. This literally took days of cutting, welding, and measuring. I didn't take any pictures, but I will be adding some eventually. Once I get the column in and everything mocked up, I will be cad modeling a new steering column bracket based on my dimensions and getting parts from Sendcutsend to weld it all together. (unless someone has access to a laser or water jet?)
So I started pulling the engine harness. I forgot how simple and easy this harness was. It might look like a mess, but it took me about 20mins to have everything out and on the workbench. I cant wait to build a new harness for this thing.
So once I had the harness out, my main objective was to figure out what Mil-spec firewall plug I would need. I had to figure out how many wires would pass through the plug, and plan for any possible updates as these plugs are expensive. I geeked out and spent a good weeks worth of time reading this site: https://www.rbracing-rsr.com/wiring_ecu.html and researching and ordering materials for building the harness. I HIGHLY recommend reading through that site, as it has tons of information on building high quality wiring harnesses.
Here is some of the stuff I ordered:
- Ty-rap metal tab'd not marring zip ties
- Full 1jz plug kit. this has every connector I need with pins and gaskets
- Kapton antistatic tape in various sizes
- Magnetic polymer magnetic jaws for my vise to use while spinning the leads
- Zip Tie Mounts for laying out the harness
- Nylon coated wire for temp tying wire bundles
- Deutsch DTM 12 Pin Connector for my injector harness ( I plan to upgrade later and this will allow me to without having to rebuild the harness
- 61 way Mil-Spec connector kit with plug/receptacle connectors , shrink boots and shrink boot adapters.
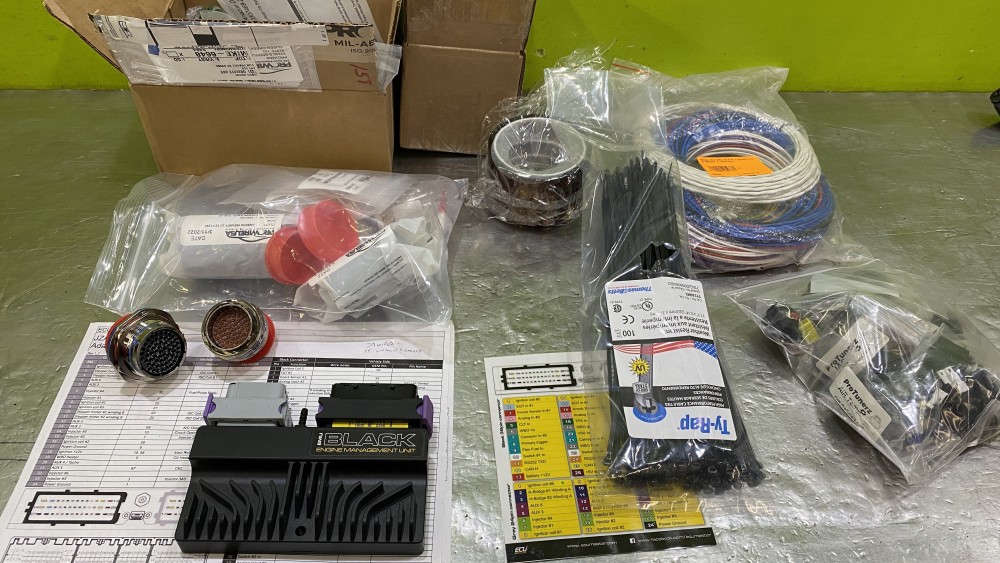
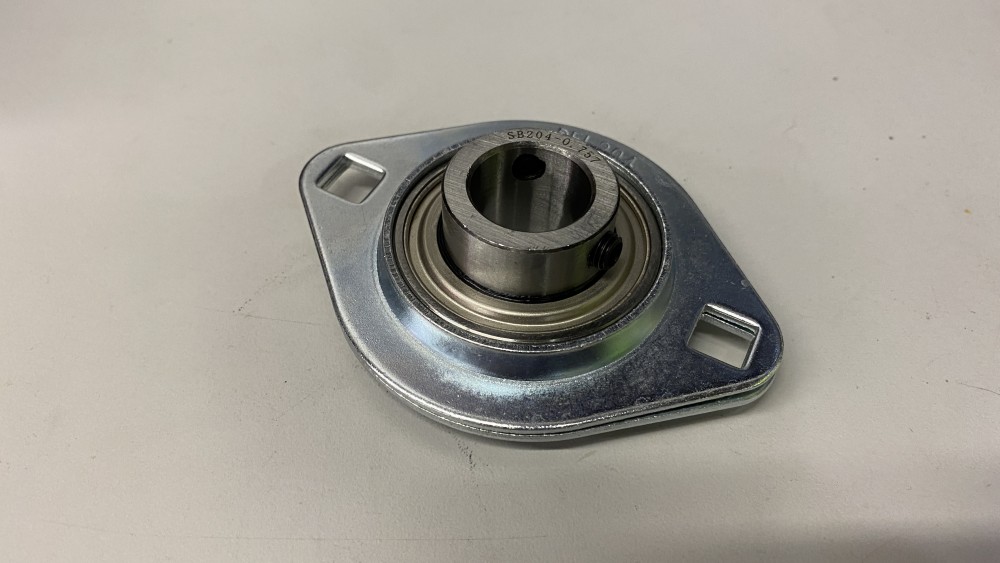
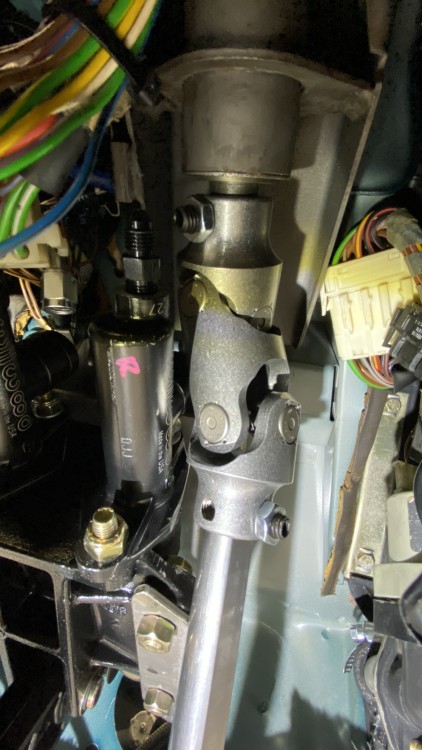
Finally as of today my firewall support bearing for my steering shaft showed up, and it the last part I needed to check the steering off of the list. Due to using dual U-joints for my steering, a support bearing is needed to prevent binding. In addition to that, this will also help seal the hole in the firewall that the shaft passes through.
- Rekpoint, gilber33 and KaiserRolls
-
3
-
Oh man, I haven't seen that in ages. I also never noticed that his lighter had a BMW roundel on it.
In other news, Earl actually asked me about his car this week. I think he might be anticipating some effort towards it this year!
- P_Roloff, KaiserRolls and patsbimmer1
-
3
-
Looks good from this side of the monitor!
-
I have been jamming to KREAM Liquid labs. Pretty awesome mix sets and the drone footage is a cool bonus. Here is their latest:
-
Not sure if it matters, it still sounds cool.
-
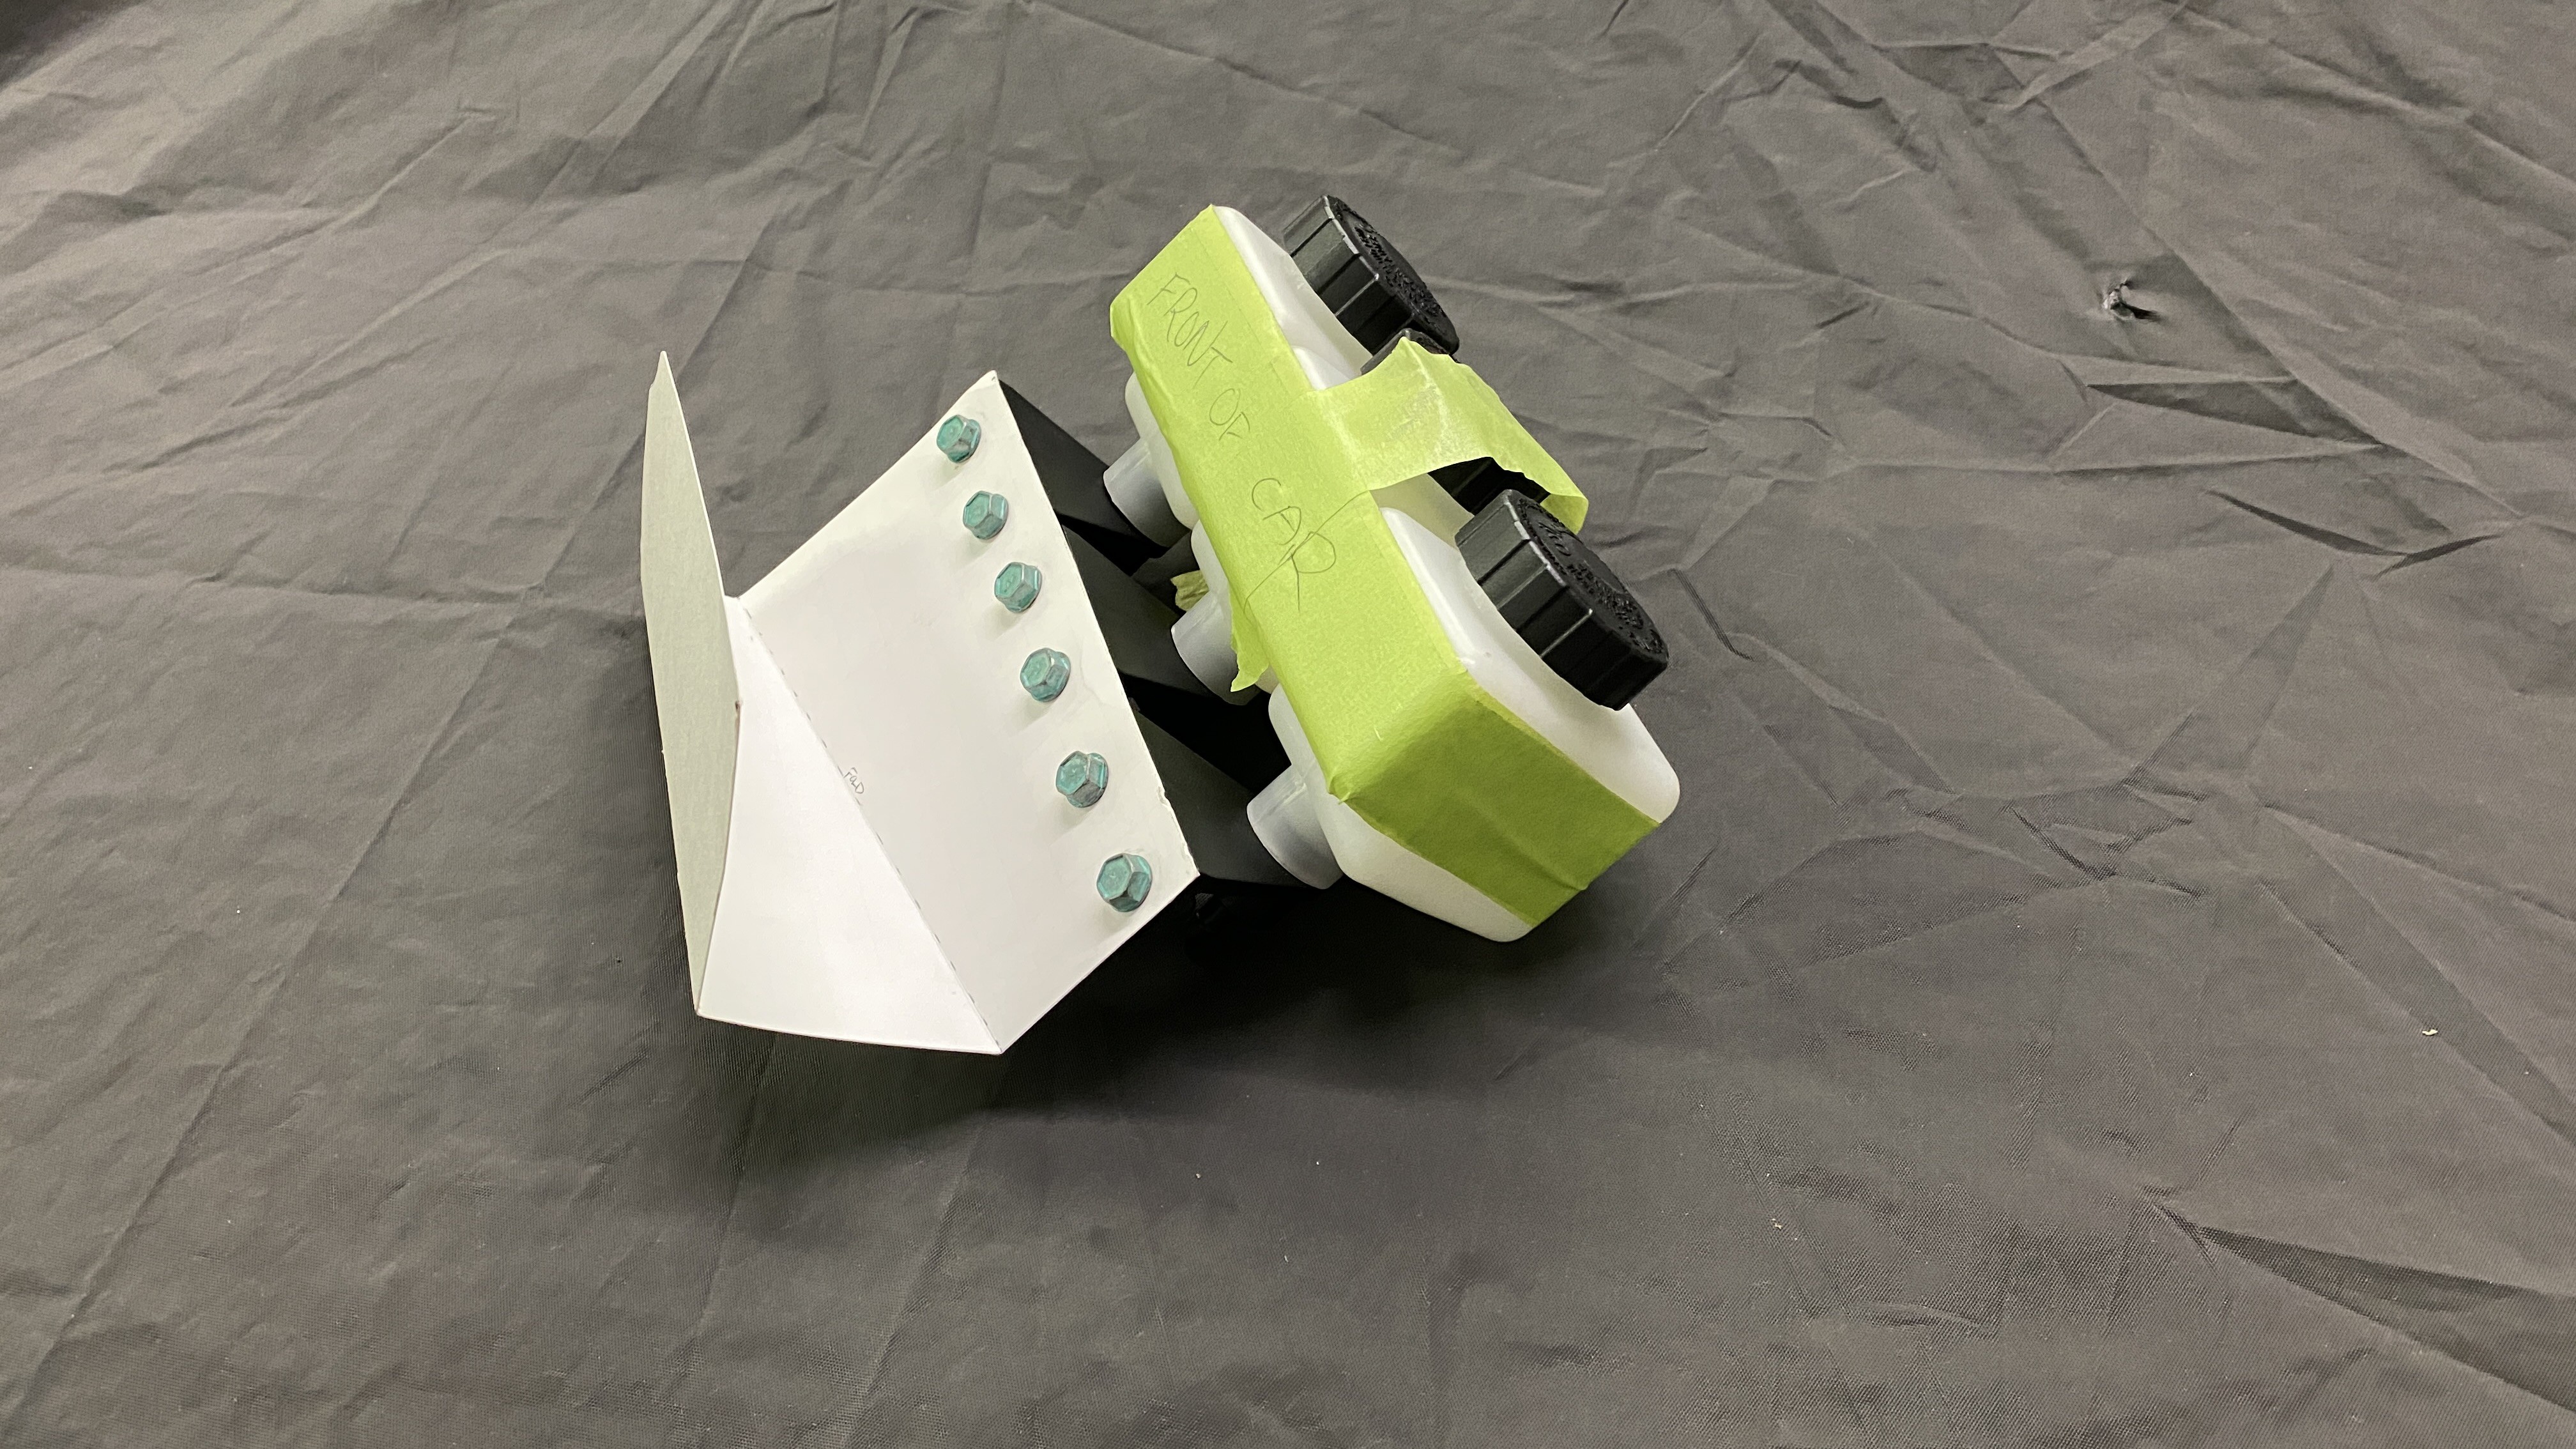
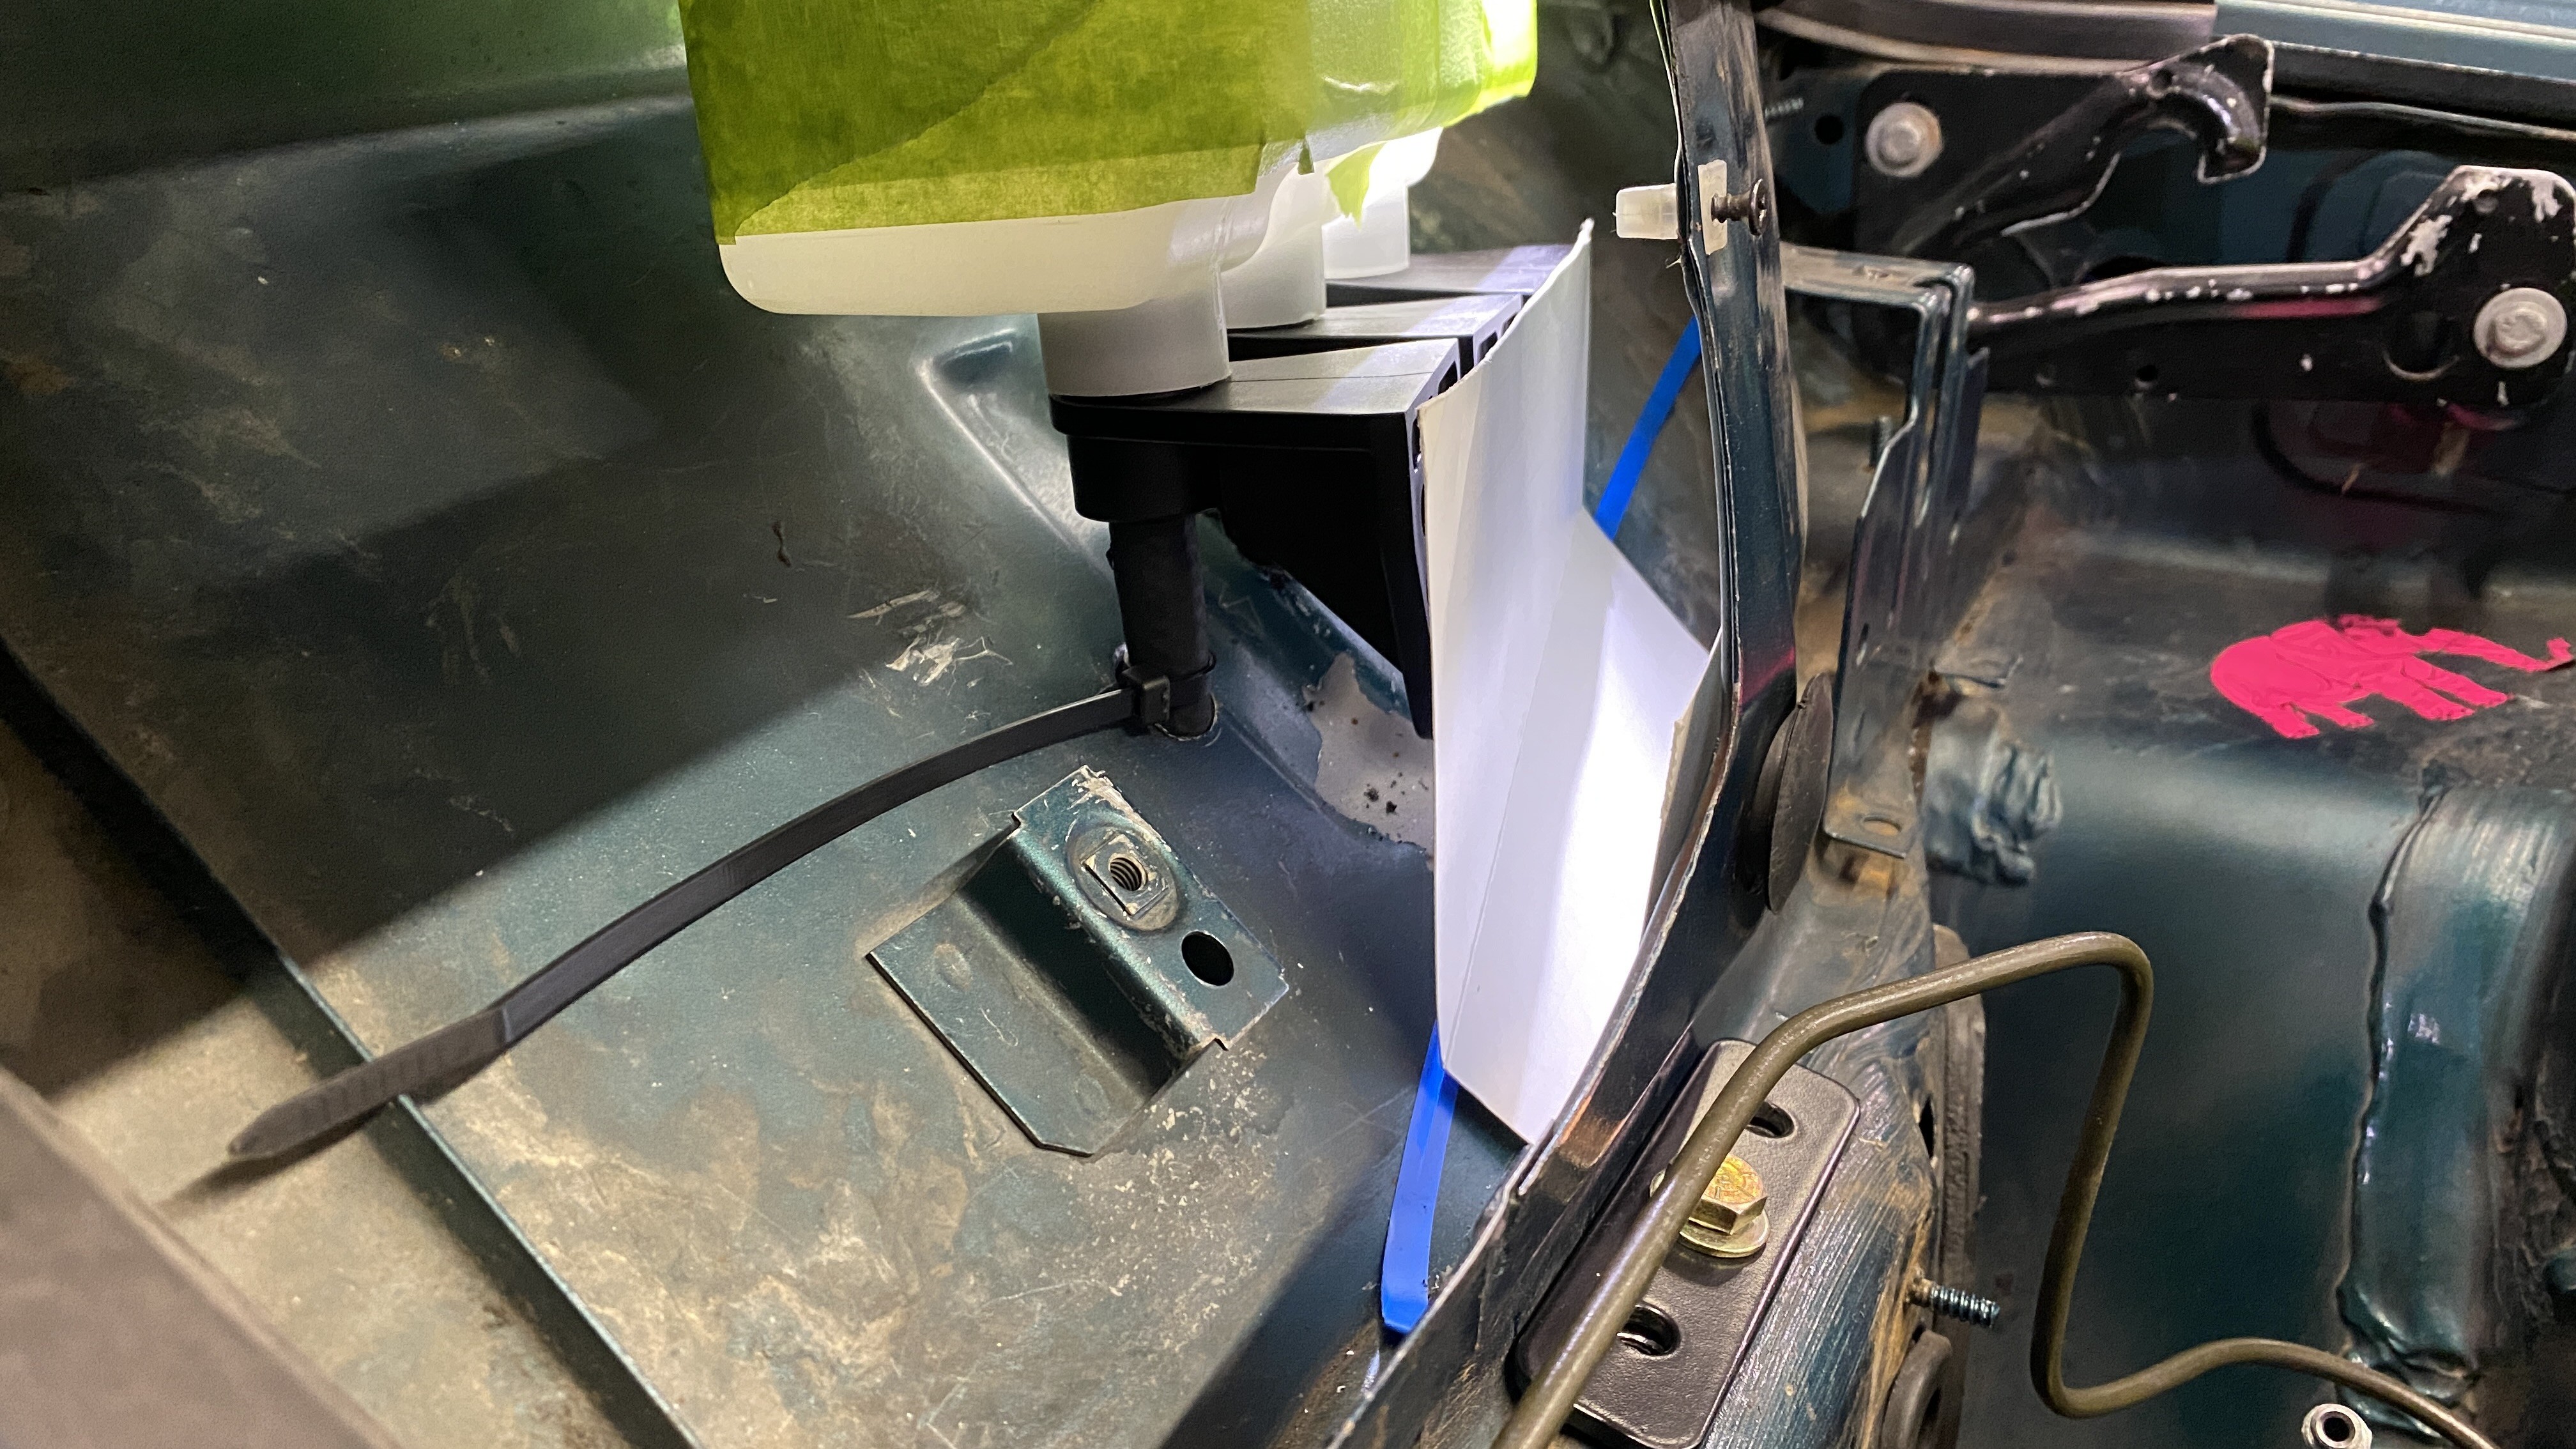
Mocked up a bracket to mount the reservoirs. I drilled the holes in the rain tray, added grommets and ran the lines to the masters. I ran into a small issue that I might be able to solve quickly once I pull everything back out again. The middle reservoir line is right where two layers of sheet metal split, so one side might need to be trimmed from under the dash. I am NOT looking forward to that.
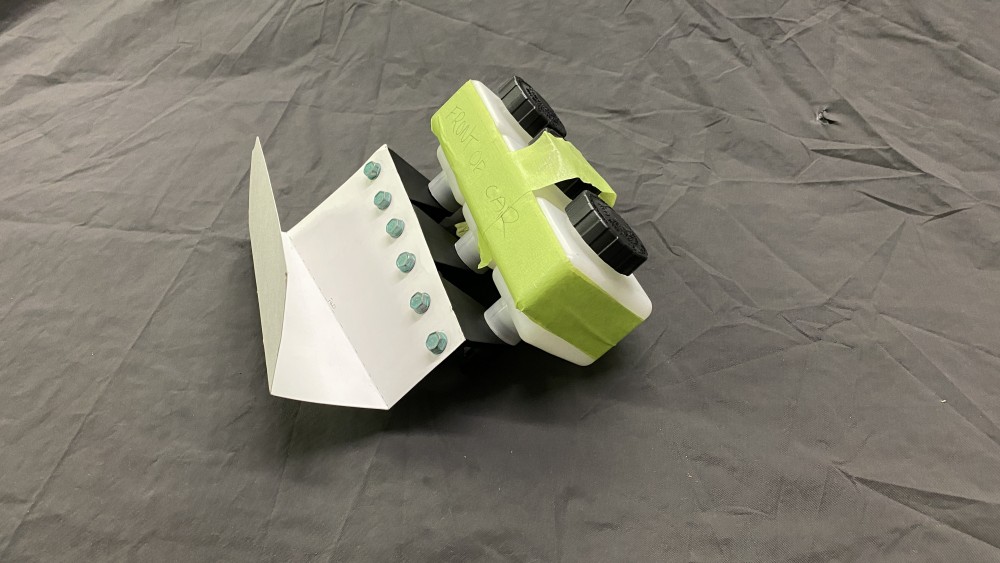

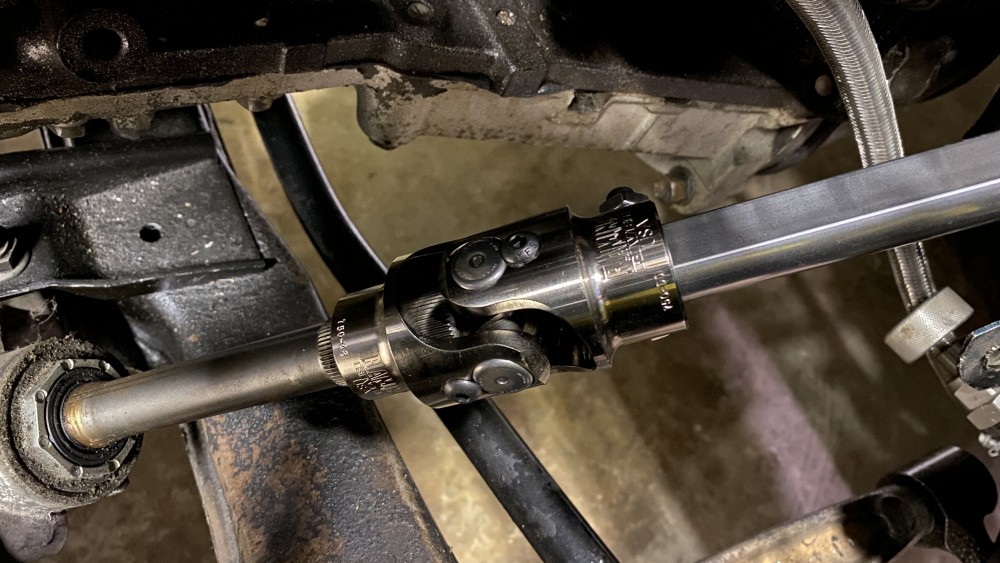
The new joints showed up, and to my surprise, the second time is a charm. Everything fit perfectly! (Minus the fact that my D shaft is about 4" too short, HEH )
Under the dash its REALLY REALLY tight to the master. I actually had to shave the mounting bracket for the pedal box and the master itself to clear, but it looks like its going to work!

Here is the engine bay side of the D shaft and the new U joint to replace the one I made previously. It looks much nicer and is a lower profile than what I had.
I ordered all the lines and fittings for the masters and started to mock all of that up as well. My biggest challenge with that is figuring out where I want to drill more holes for the bulk heads in the firewall. It already kind of looks like swiss cheese, and I figure I will weld all the holes shut once I paint the engine bay, but I rather get it right first than have to revisit it later.
- patsbimmer1 and REKIII
-
2
-
Well, at least the design as a whole (hole?) is cohesive. At first I didn't quite understand the "puff" on the side, but after looking at the back, it makes much more sense (sents?)
-
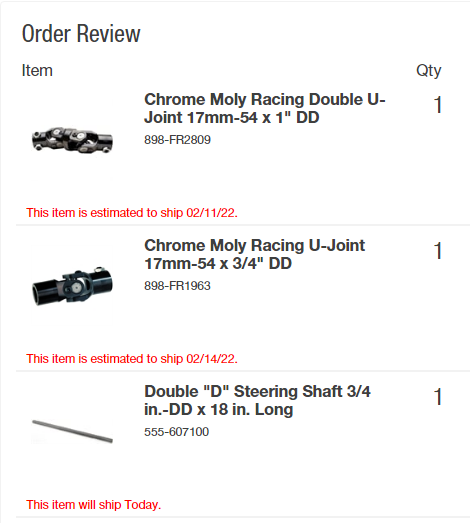
Welp. Parts came, and I’m an idiot ( which is evident) both joints I ordered were wrong. New ones are on the way now. Basically I read the specs off of R3v and just considered them accurate to my car without checking completely.
Here’s a picture of what I got, and sent back.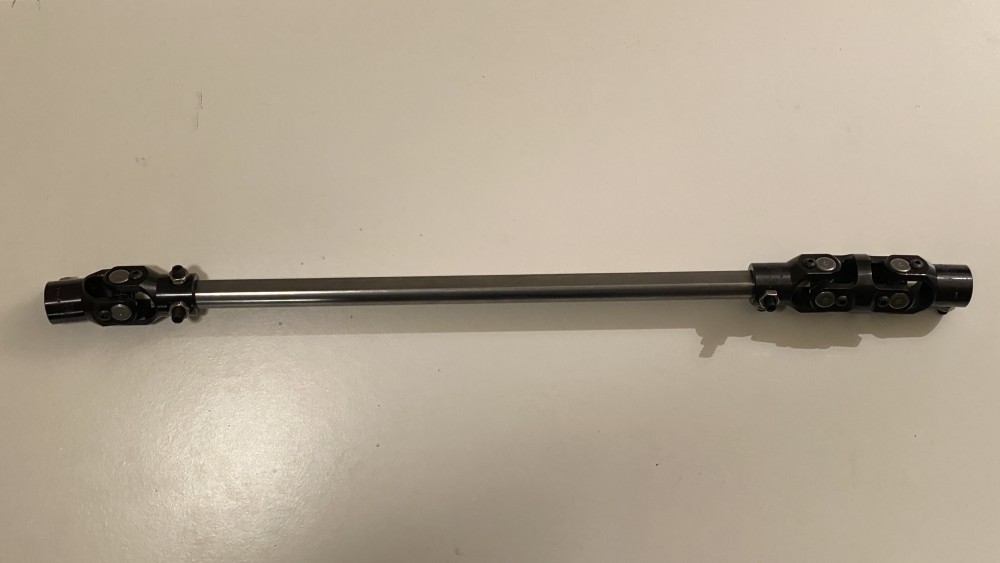
the correct (I think) sizes I ordered as are follows:
3/4” (19mm) -48 spline (z4 rack shaft specs) into a 3/4” D shaft
3/4” D shaft into
Double U (17.5mm)11/16” -36 spline (steering column specs)
——-
In other news, I ordered a replacement for my radio din since I have the Bluetooth amp. I will need to create a surround for it, and texture it to match the dash, but I think it’s a better idea than just a block off plate.

-
Where is that epic sideways pic I saw on FB?
-
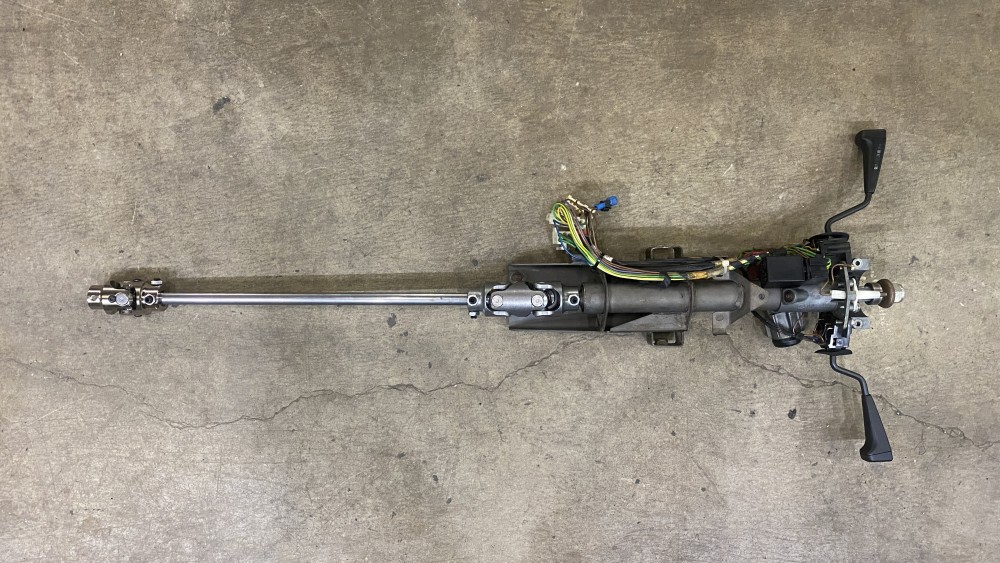
Well I spent most of my saturday trying to sort out my steering column issue. It turns out that none of my current options left me a happy camper. I did get myself an early model non-airbag column but the way it fit was very unfortunate. not only did it put the steering wheel angle back at the bus driver position that I hated, it also pointed the face of the wheel a good 5-10 degrees toward the drivers door. Apparently the hole in the firewall is different on the late model airbag cars.
Here is the two columns side by side

Here you can see how dramatically left the column faces

Here is the bus driver angle

So my plan from here was that it would be easier to make my airbag column work. Below you can see how close one of the masters is to the splines of the column. I drew a line in red that shows where the shaft needs to go. Notice that my line is a "Z" as it not only has to go to the right, it also has to pivot down.
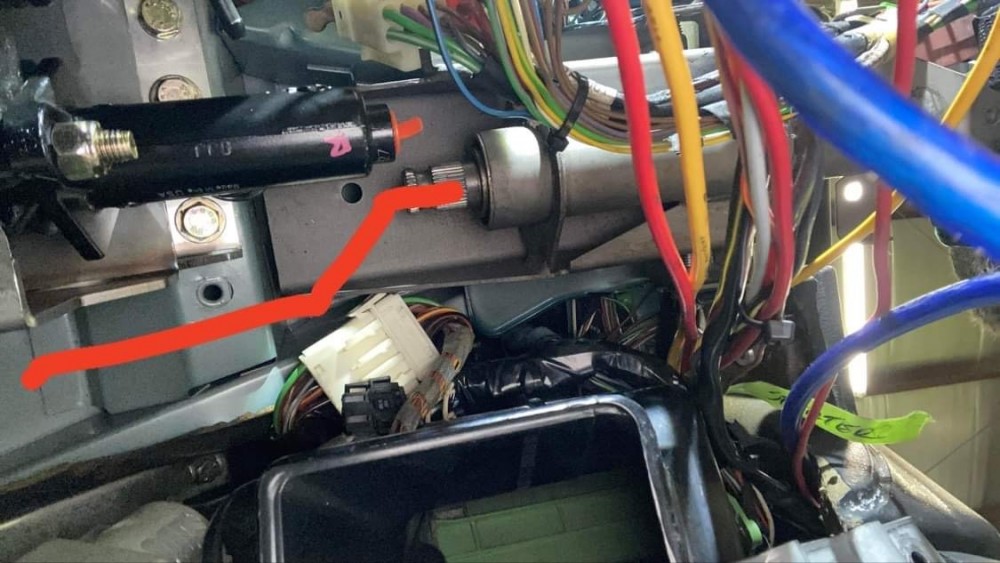
This is my solution; use a flaming river double U joint to make the "Z" and then a D shaft through the firewall and a second U joint to mate it to the Z4 rack. the second part im still not sure I have all the puzzle pieces yet. I previously made an adapter a few pages back in this thread to mate the Z4 to my column, but now I am using a D shaft, I will likely have to make a different adapter. I just ordered everything and will have to figure this out when I have everything in my hands.
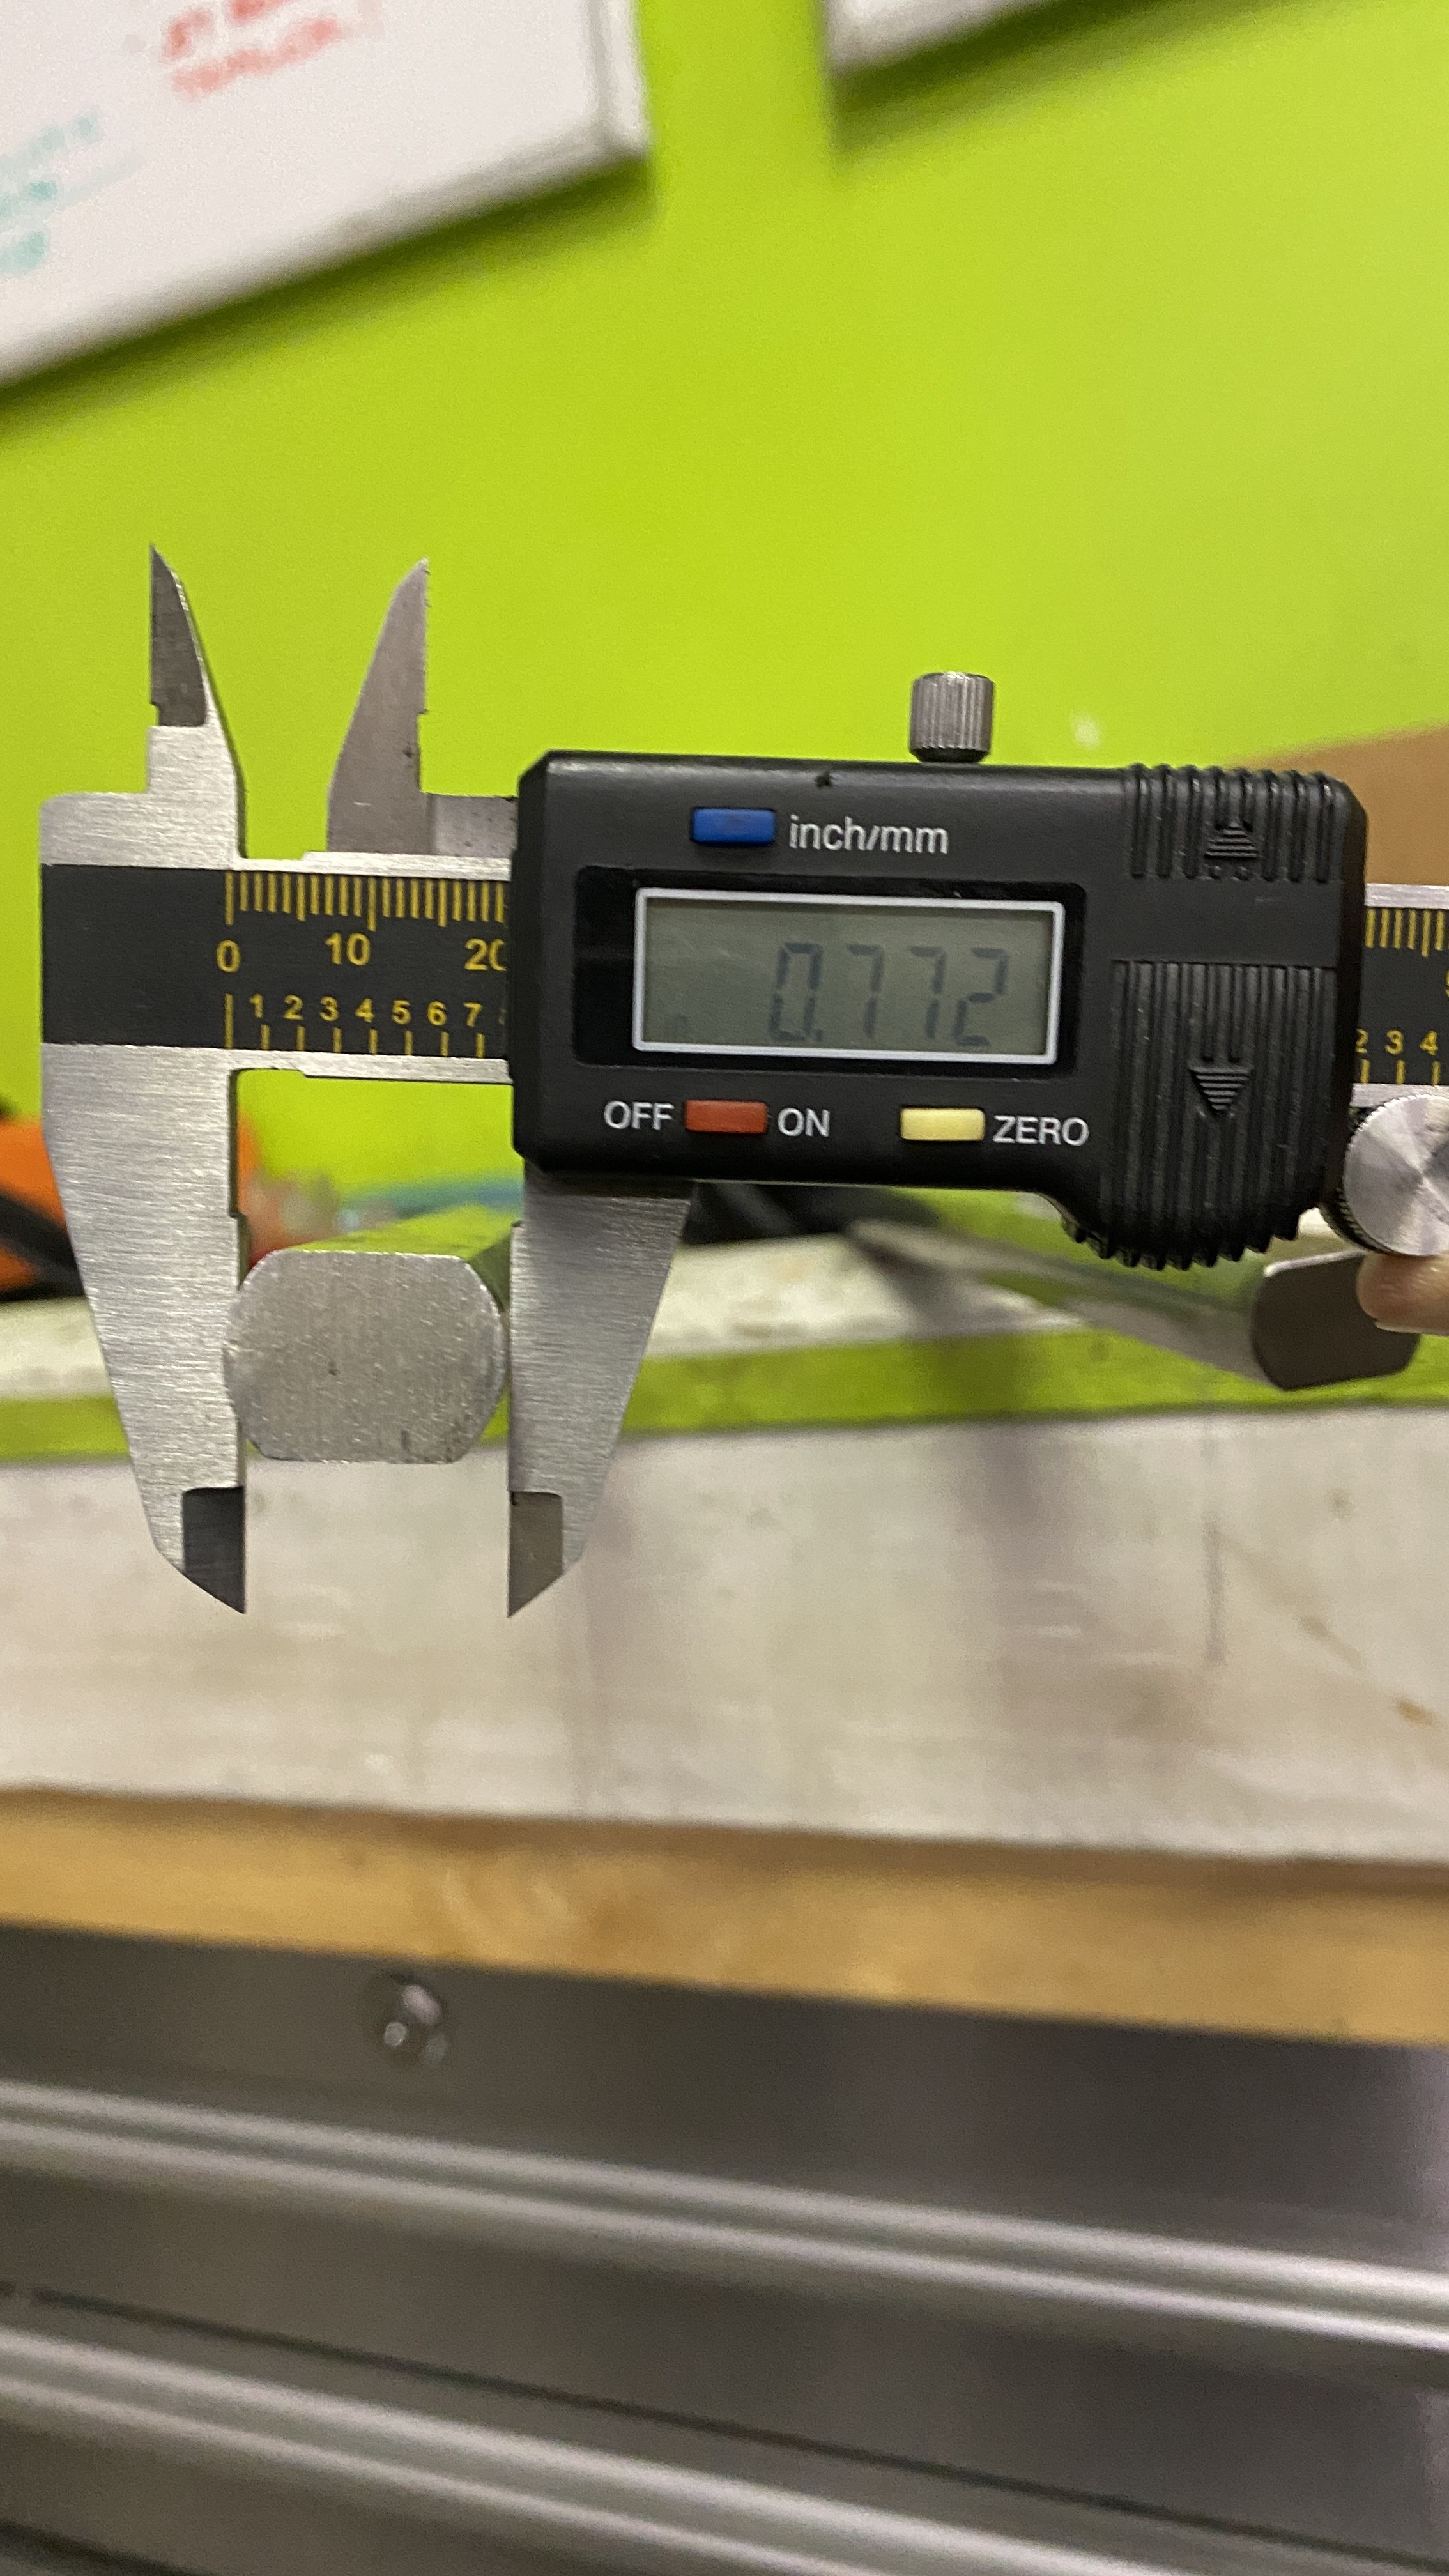
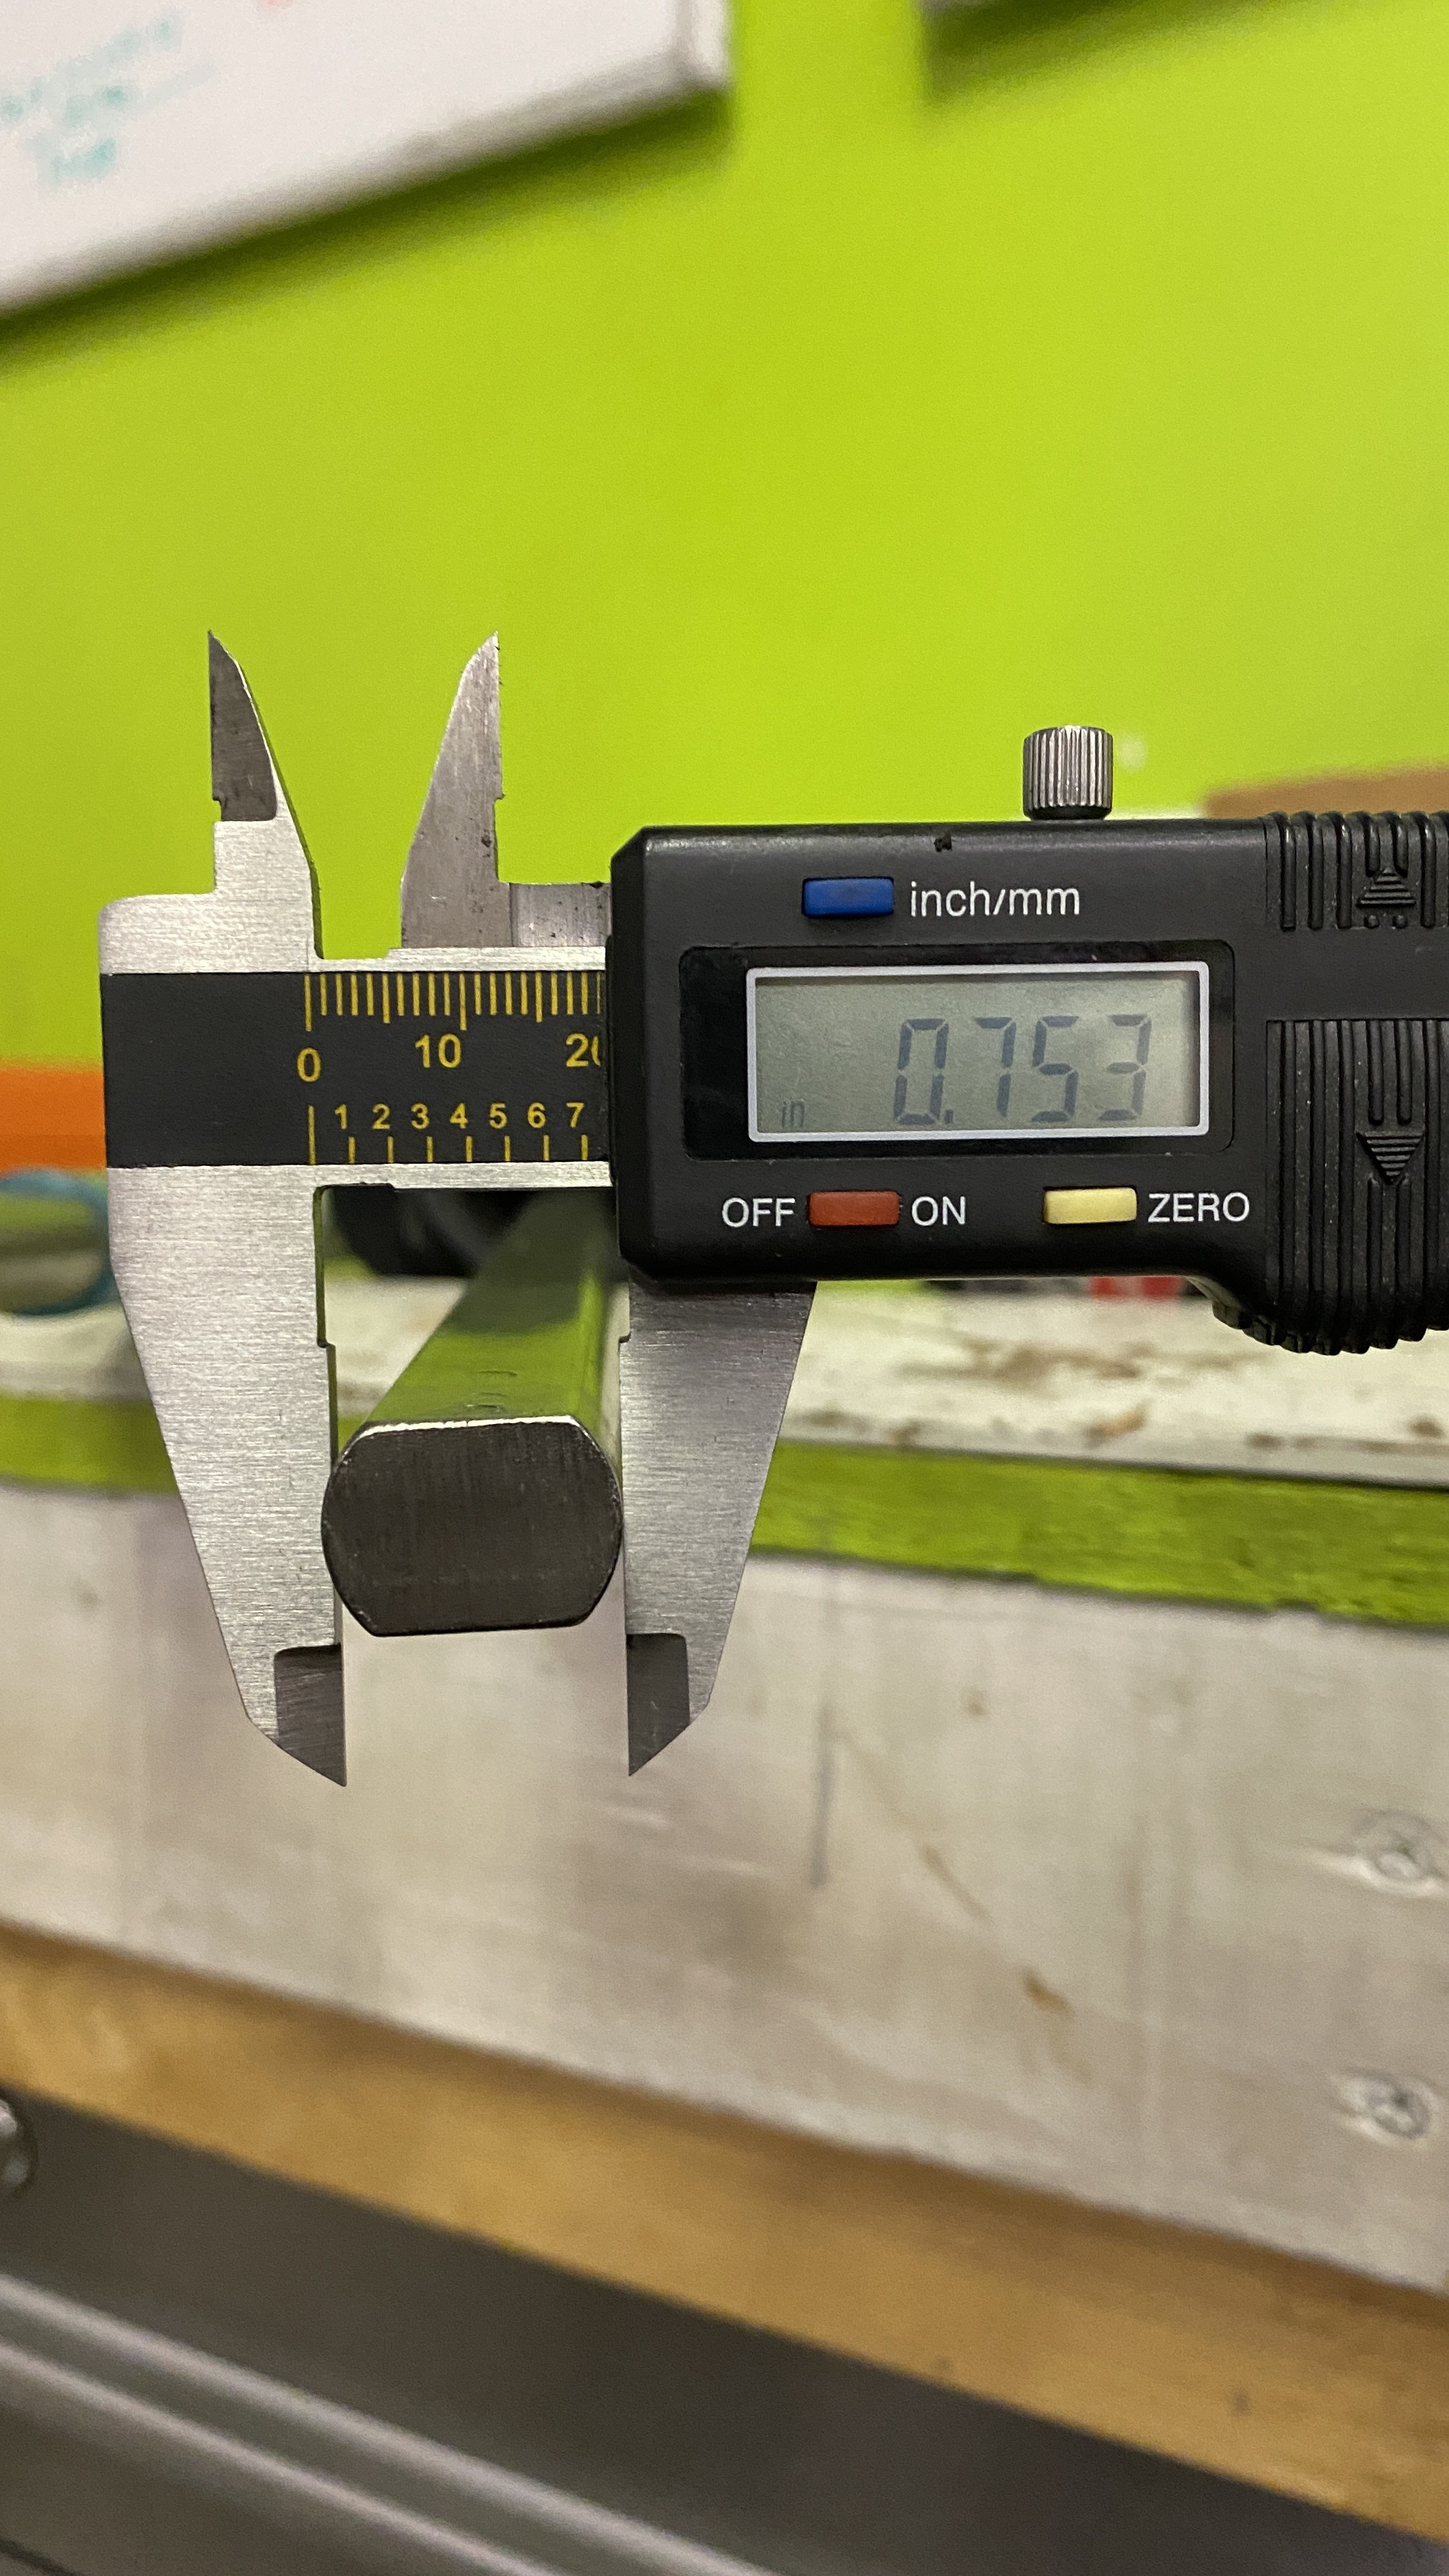
If anyone knows the spline count on the shaft of a Z4 rack, please let me know. I looked high and low and found nothing. it measures to 18mm on a caliper, but I had a hell of a time trying to get an accurate spline count. It is NOT the 17mm 54 spline that is commonly used.

-
14 hours ago, m42b32 said:
Thanks!!
I think I fixed the photos, let me know if that works now.
It works! Magnets are cool!


My name is Earl, and I have a Stainless Steel bolt fetish =)
in Members BMWs
Posted
Earl asked about his car last weekend again. Must be the weather.