Tkuhn
-
Posts
302 -
Joined
-
Last visited
-
Days Won
13
Reputation Activity
-

 Tkuhn got a reaction from Jdesign in A purists nightmare - E46 drift build
UPDATE!
Ill be honest with you guys I feel like this update will not be as in depth as it should. With my deadline for the weekend of May 19th quickly approaching a lot of work needed to get done and I slacked a bit on taking photos.
Chase Bays power steering resiviour, lines and cooler installed (Had this on my 330i previously.)
Rebuilt my vanos with new seals and the anti rattle kit from Beisan.
New radiator mounts strapped to the new CSF radiator.
Got the dash installed and with that came a lot of progress getting all the wiring under the dash and etc figured out.
Also installed this Parts Shop Maxx engine vitals gauge. The one i went with has settings for oil pressure and coolant temp along with voltage. Awesome little gauge for the price i must say. Also in this pic you can see where i removed the DSC button and the panel there and made a carbon panel to go into place.
Made floor plates thanks to the help of @Sam_Holzmann and another friend.
Now onto something I am not super proud of but with the price of black door panels in these cars I decided to clean them up and use interior paint to make them black LOL. I must say they turned out really well. Also re-wrapped the arm rest panels along with the A pillars (I dont have a photo) Was also able to transfer over the Harmon Kardon speakers and amp from my 330 into the car.
And got the car running!!
Had some serious time consuming hiccups with this. First was the expansion tank rubbing on the power steering pulley due to the thicker radiator. Really suerprised that CSF doesnt have a solution for that but we were able to shave some plastic and make clearance for the pulley.
Then there was some odd clacking coming from what sounded like the intake on start up and went away after awhile. Was a very intermittent problem as well. Also was throwing multiple misfire codes and misfire on start up codes.
After chasing the problem trying multiple different things we found that a hose came disconnected under the manifold causing a gigantic vacuum leak. Once that was fixed the car idled awesome and everything was looking great.
Now onto the wheels. To be completely honest the build was running out of time and money so i used the ole rattle can on my wheel faces.
And I sanded the lips to prep them for a friend who is able to polish much more efficently than I am able to.
With new valve stems and new hardware installed I was able to get the wheels together, get tires and have them mounted pretty quickly.
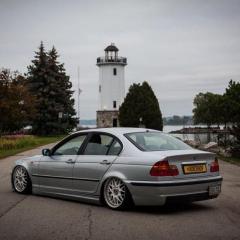
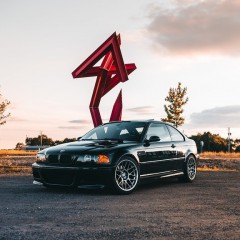
Wheels are SSR Vienna Courages, 18x8 +37, 18x9 +37 and to be honest I had no idea how they were going to fit the car because by the time I had my re drilled hubs on the car I had the wheels apart to refinish them.
Id say it worked out pretty damn well for guessing.
Next up was the daunting task of aligning the car which we did all in shop (its damn close to straight and even). With everything being completely adjustable in the rear and front it was quite interesting, but we got it.
Finished up some things in the engine bay like all the seals and etc. Also have the radium catch can installed but I have it routed not the way they intended as I dont have a CCv and it is meant to work with the CCV, Id like to get one and hook it up correctly in the near future though.
Took the car for a drive and ran into some issues... the m54b30 which was from my 330i had a flash tune from RK-Tunes. Everything was done correctly wiring wise other wise I know the car would nit have started. When driving the car it was rev limited at around 5200 RPM. Tried a few things including swapping a MAF with no luck. After doing some research I figured out that it may be because the cars ABS was completely removed and the cluster no longer has a module to talk to. With that being said I emailed Jordan at RK-Tunes knowing that with my past experiences along with a friends there was a good chance I would not get an email in the time frame that I needed to. So while talking to someone on a facebook page I came across the fact that he also does flash tunes. He runs a website that he sells his own products as well as comissions other peoples products that they have specially made for these cars but have not broken through to the big companies. His name is Mike Dodge from Seemslegitgarage.com . So he hooked me up with an all new DME, ews deleted and tuned to my specific needs for this chassis and build. I swapped the DMEs and drove the car and BAMMM were in business. While Jordan may be a great tuner he lacks in customer service and Mike promised me he prides himself on making sure he is there for customer support.
Still some finishing touches to touch on but the car is running, driving and now at home where i can work on it more frequently without driving to the shop.
Also a big thanks to @Earl for gifting me the Euro M3 style roof extension for the rear window!
-
 Tkuhn got a reaction from B C in A purists nightmare - E46 drift build
UPDATE!
Ill be honest with you guys I feel like this update will not be as in depth as it should. With my deadline for the weekend of May 19th quickly approaching a lot of work needed to get done and I slacked a bit on taking photos.
Chase Bays power steering resiviour, lines and cooler installed (Had this on my 330i previously.)
Rebuilt my vanos with new seals and the anti rattle kit from Beisan.
New radiator mounts strapped to the new CSF radiator.
Got the dash installed and with that came a lot of progress getting all the wiring under the dash and etc figured out.
Also installed this Parts Shop Maxx engine vitals gauge. The one i went with has settings for oil pressure and coolant temp along with voltage. Awesome little gauge for the price i must say. Also in this pic you can see where i removed the DSC button and the panel there and made a carbon panel to go into place.
Made floor plates thanks to the help of @Sam_Holzmann and another friend.
Now onto something I am not super proud of but with the price of black door panels in these cars I decided to clean them up and use interior paint to make them black LOL. I must say they turned out really well. Also re-wrapped the arm rest panels along with the A pillars (I dont have a photo) Was also able to transfer over the Harmon Kardon speakers and amp from my 330 into the car.
And got the car running!!
Had some serious time consuming hiccups with this. First was the expansion tank rubbing on the power steering pulley due to the thicker radiator. Really suerprised that CSF doesnt have a solution for that but we were able to shave some plastic and make clearance for the pulley.
Then there was some odd clacking coming from what sounded like the intake on start up and went away after awhile. Was a very intermittent problem as well. Also was throwing multiple misfire codes and misfire on start up codes.
After chasing the problem trying multiple different things we found that a hose came disconnected under the manifold causing a gigantic vacuum leak. Once that was fixed the car idled awesome and everything was looking great.
Now onto the wheels. To be completely honest the build was running out of time and money so i used the ole rattle can on my wheel faces.
And I sanded the lips to prep them for a friend who is able to polish much more efficently than I am able to.
With new valve stems and new hardware installed I was able to get the wheels together, get tires and have them mounted pretty quickly.
Wheels are SSR Vienna Courages, 18x8 +37, 18x9 +37 and to be honest I had no idea how they were going to fit the car because by the time I had my re drilled hubs on the car I had the wheels apart to refinish them.
Id say it worked out pretty damn well for guessing.
Next up was the daunting task of aligning the car which we did all in shop (its damn close to straight and even). With everything being completely adjustable in the rear and front it was quite interesting, but we got it.
Finished up some things in the engine bay like all the seals and etc. Also have the radium catch can installed but I have it routed not the way they intended as I dont have a CCv and it is meant to work with the CCV, Id like to get one and hook it up correctly in the near future though.
Took the car for a drive and ran into some issues... the m54b30 which was from my 330i had a flash tune from RK-Tunes. Everything was done correctly wiring wise other wise I know the car would nit have started. When driving the car it was rev limited at around 5200 RPM. Tried a few things including swapping a MAF with no luck. After doing some research I figured out that it may be because the cars ABS was completely removed and the cluster no longer has a module to talk to. With that being said I emailed Jordan at RK-Tunes knowing that with my past experiences along with a friends there was a good chance I would not get an email in the time frame that I needed to. So while talking to someone on a facebook page I came across the fact that he also does flash tunes. He runs a website that he sells his own products as well as comissions other peoples products that they have specially made for these cars but have not broken through to the big companies. His name is Mike Dodge from Seemslegitgarage.com . So he hooked me up with an all new DME, ews deleted and tuned to my specific needs for this chassis and build. I swapped the DMEs and drove the car and BAMMM were in business. While Jordan may be a great tuner he lacks in customer service and Mike promised me he prides himself on making sure he is there for customer support.
Still some finishing touches to touch on but the car is running, driving and now at home where i can work on it more frequently without driving to the shop.
Also a big thanks to @Earl for gifting me the Euro M3 style roof extension for the rear window!
-
 Tkuhn got a reaction from Ryan... in A purists nightmare - E46 drift build
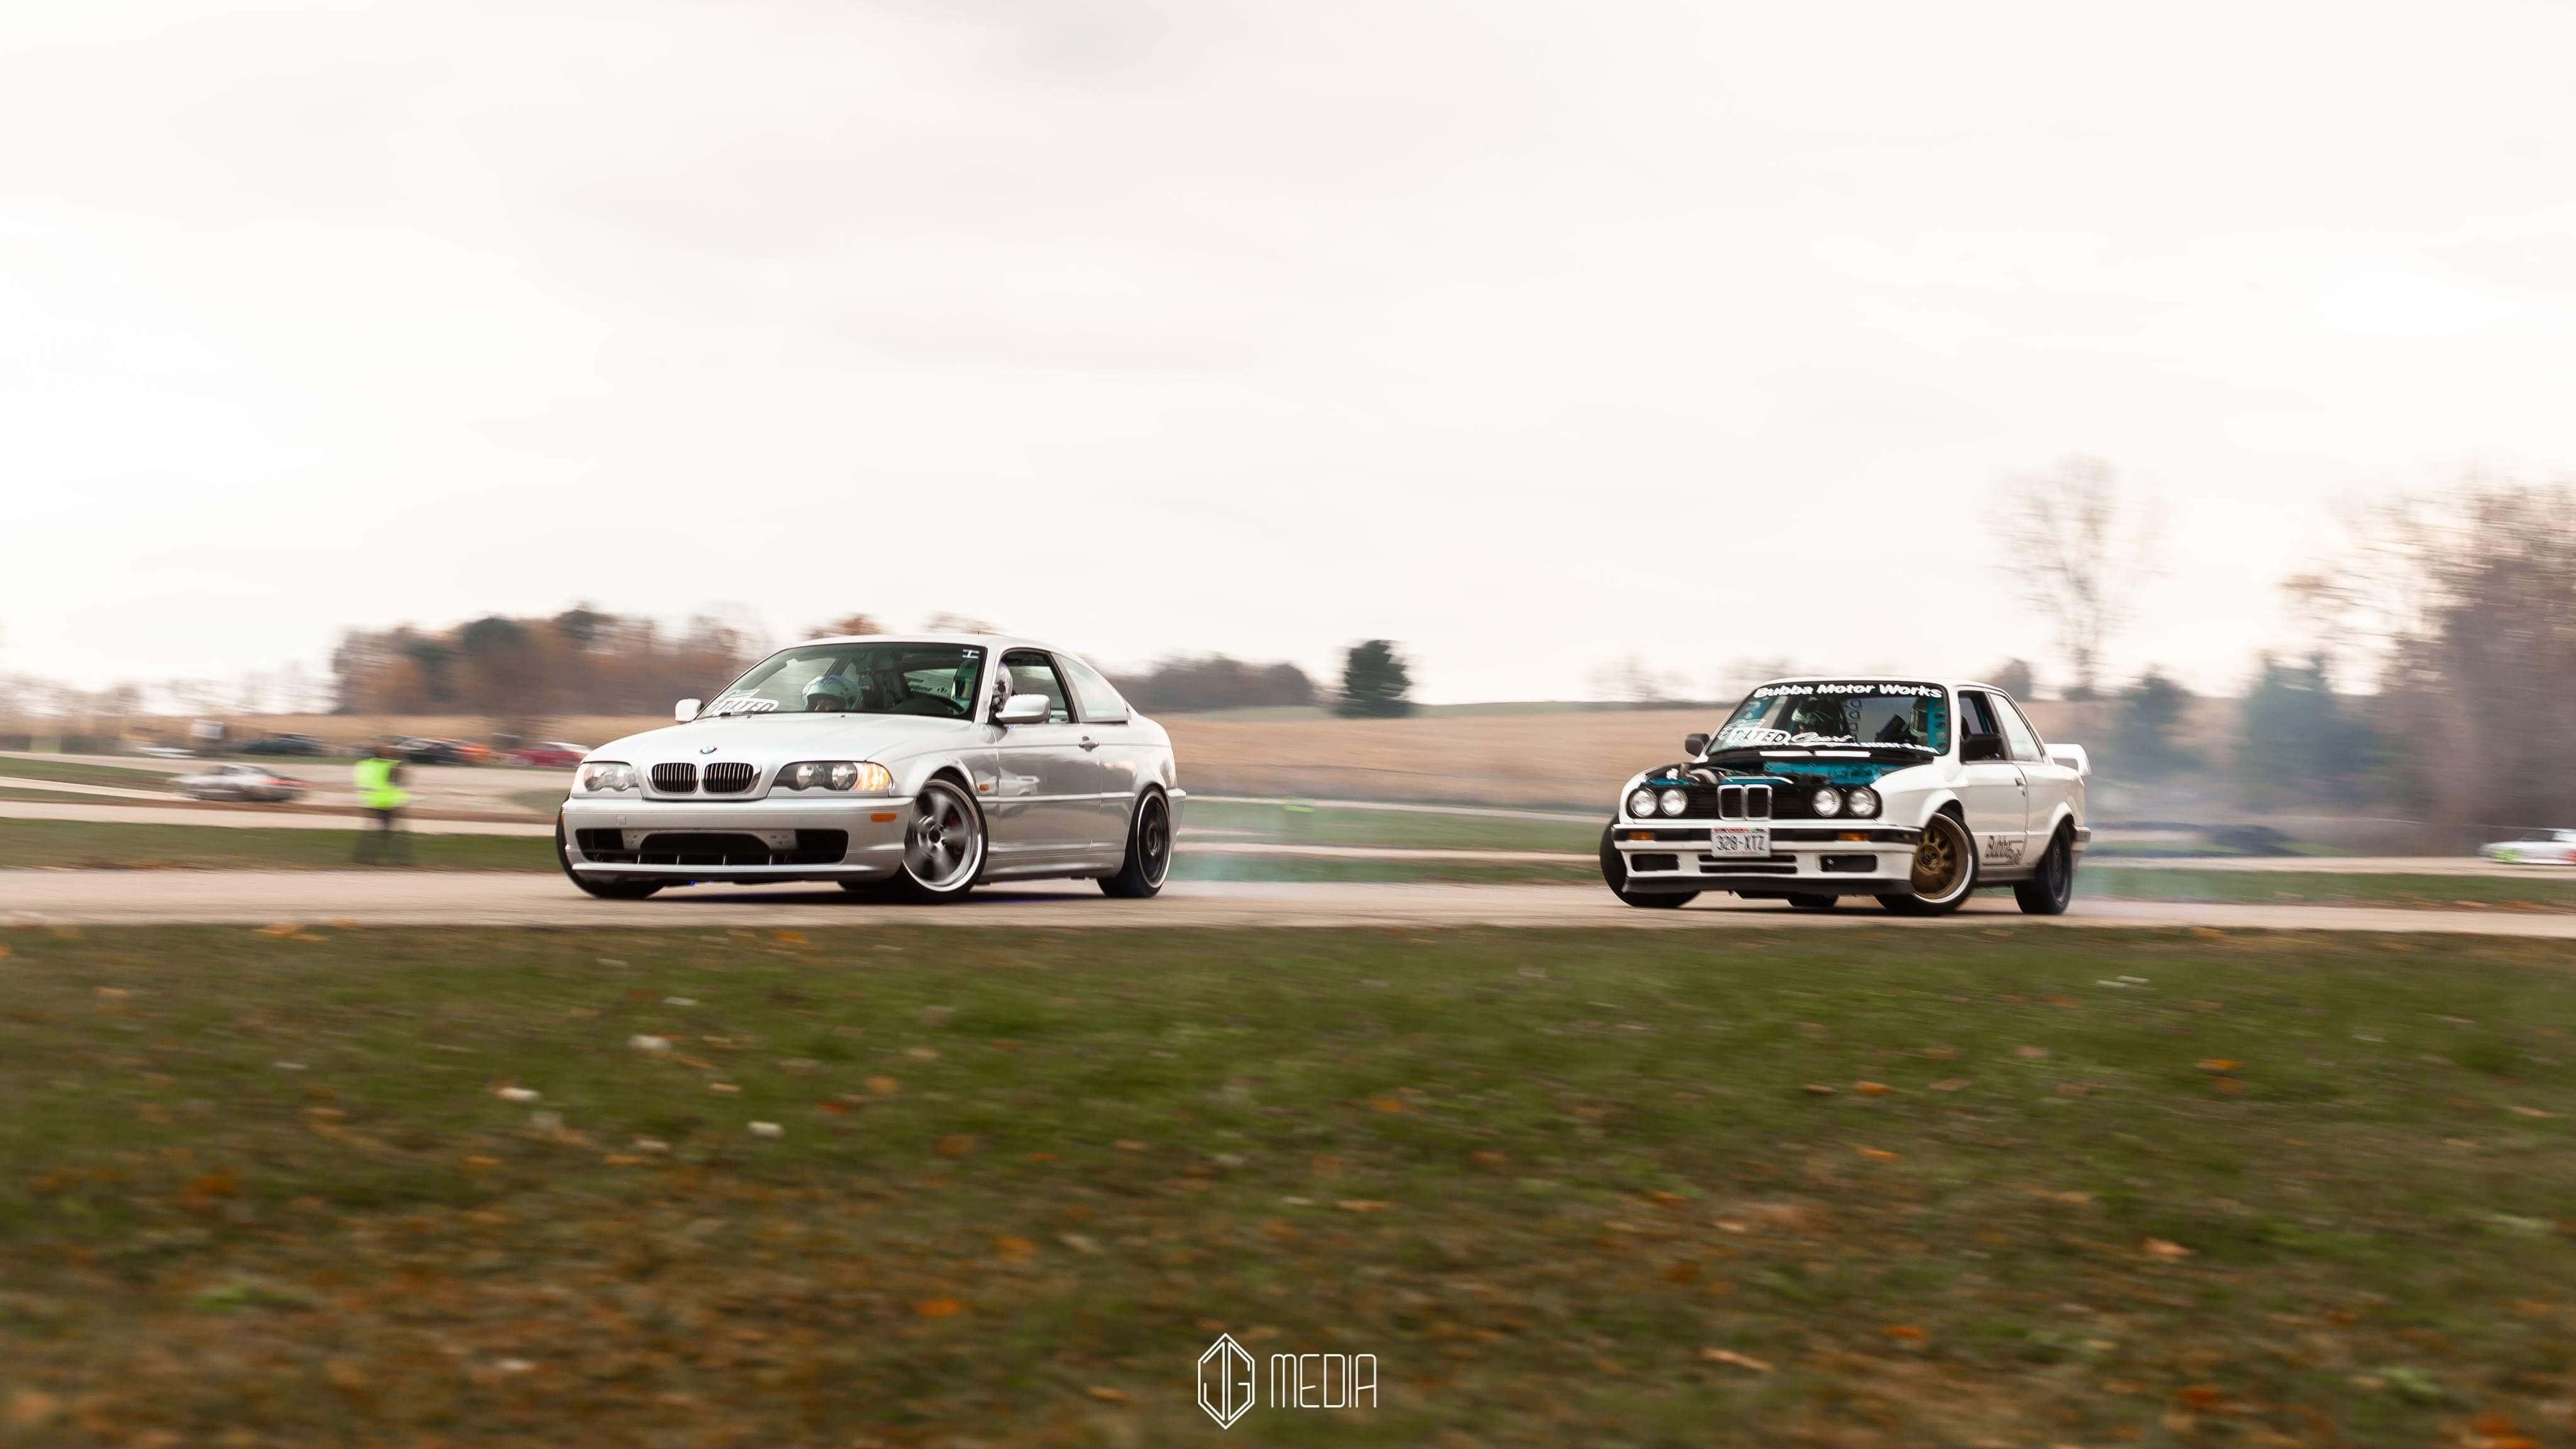
Continued update!
Busted out the brake lines for in the bay. Obviously the abs/dsc has been deleted. SO with that being said I used a custom kit that Chase at ChaseBays got me hooked up with. Everything was done with 3/16" nickle copper brake line. I love the way this stuff shines up. All the photos are of before polishing. I was able to hide the brakeline that runs from the master to the right front and keep it out of the engine bay, I was also able to get the left front line to stay inside of the compartment on the driver side rather than run out of the compartment and through the fender well.
And then the lines were ran from the bulkheads to the original mounting spots where the softlines will connect. Also made sure to route them so that the added angle of the MG Solutions maxx angle kit doesnt hit them. Oh and i previously cleaned out the wheel wells and sprayed in some new 3m rubberized undercoating.
Now that the rear end is all reinforced and braced I was able to get the subframe cleaned up, old bushings out and installed the new condor subframe bushings and diff bushings.
Also got some fun parts in for the rear end.
MG Solutions upper and lower rear arms.
Stance XR1 rear true coils (also have XR1s for the front)
Ill save the boring photos but the front knuckles are cleaned up and re-sprayed black along with starting to clean up and re-paint the used MG Solutions maxx angle steering kit that i pulled off my 330i. Lots of parts came in including motorsports hardware stud conversion for the car, m54 fuel filter, upper and lower bushings for the rear trailing arms, new wheel bearings for all 4 corners. Fuel lines to replace the m54tu ones (completely different), oil adapter fitting for the oil filter housing to put a gauge into the system, Parts Shop Maxx engine vitals gauge (coolant temp and oil pressure configuration), some split loom for the interior harnesses, CSF aluminum radiator, and a few other odds and ends.
So i mocked up the new radiator and front end to fab up a bit of protection for the radiator.
Also cut the stock tow hook thread mounts off the front and rear bumper mounts with plans to weld them up to the bash bars using the stock locations (still needs to be done)
Ordered N54 exhaust studs and new oem exhaust manifold nuts and got them installed as well.
And last weekend was able to drop in the engine and trans! Before popping the trans on I threw in a new clutch fork and throwout bearing. Last year when i put this engine and trans into the 330i I had replaced the fork pivot pin with the stainless steel one from condor as well as replaced the clutch. The flywheel was just machined when i installed those parts last summer. The clutch and flywheel looked great still so no need to replace them. While i was at the trans i replaced the whopped out shift carrier bushing with a new condor one and then installed a new turner motorsport rear shift bushing.
More progress to come! its crunch time and I am hoping to have the car done by the end of April with a few weeks to get some miles on it before Automotion.
-
Tkuhn got a reaction from Ryan... in A purists nightmare - E46 drift build
Holy shit I have been slacking on the updates. Lots of parts have come in and things are slowly coming together.
So here we go.
The bay is painted.
Once the car was back to my shop I dropped the rear end out of the car along with the fuel tank. With that came some bad news.
One of the subframe mounts was ripped out and another loose and plenty of cracks lol. So with the help of a good friend we were able to replace the torn area. and get the confor reinforcement kit welded in and then opened up the upper areas inside the chassis where the tops of the mounts were. We then created a tubing brace that connects all 4 of the subframe mounting points to the rear bar which was welded in to support the rear strut towers that was plated in preparation of the rear true coil set up.
I have alot more progress to share and will upload more when i get a chance!
-
 Tkuhn got a reaction from Jdesign in A purists nightmare - E46 drift build
With the hydro getting so much pressure so quickly it is better to have a little give in the lines. That's what I've read and been told as well. Could be just a myth but if I was to hardline anything it would be the interior part since the lines under the car need a flex point either way.
-
 Tkuhn reacted to suspenceful in A purists nightmare - E46 drift build
Agreed, awesome progress on this. Can't wait to see it on the road!
-
-
 Tkuhn got a reaction from nick.e46.330i. in A purists nightmare - E46 drift build
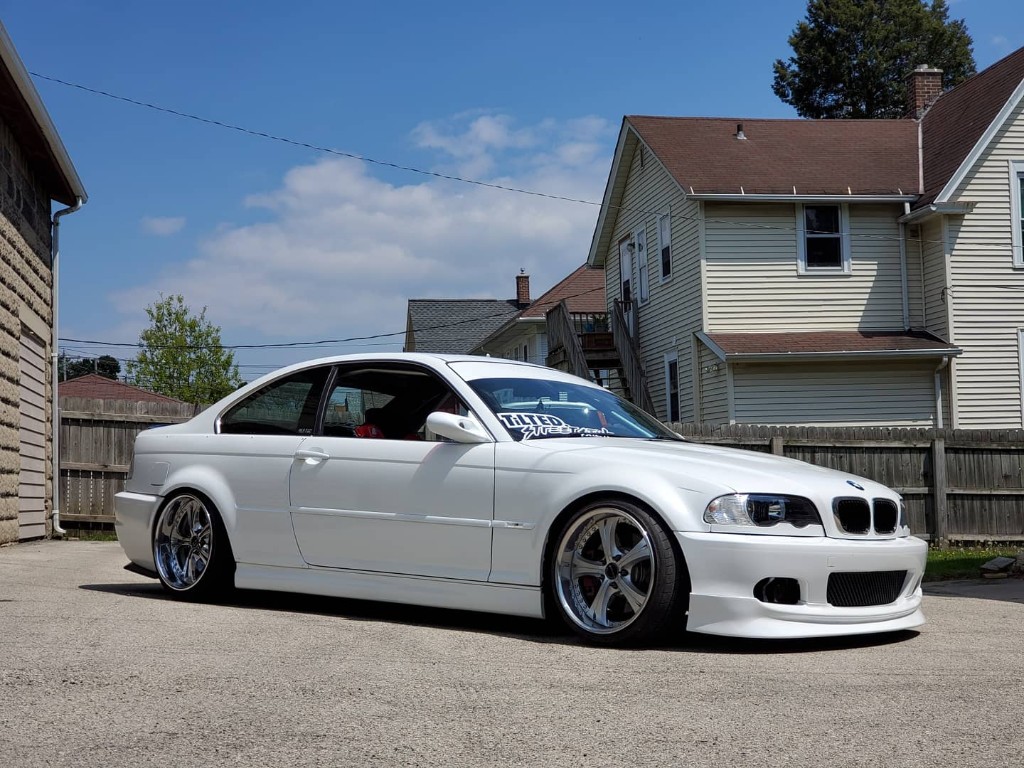
UPDATE
Taped off and painted the subframe/strut bracing. Man was it a pain in the ass and Im not completely happy with it but it will do for now. Mostly not happy with how there is no way to match the barely painted interior where I sprayed it silver.
Also got the dash skin installed with the steering column. I need to wait on fully finishing the dash as I have some wiring and other modifications to take care of yet. But its starting to look more like a car with the dash in! Also worth noting that this car came with grey interior and this dash is the one from my 330i. Really need (want) to find some black door panels but holy shit does everyone want an arm and left nut for them.
The rear trailing arms are completely finished as well.
Hubs were redrilled to 5x114.3, hoping to have the wheels done soon to show you all! Brand new upper ball joints and lower bushings were installed along with new wheel bearings. Had both arms powdercoated satin black and topped them off with 90mm motorsport hardware studs (might have been a little excessive on the length lol) and the final tough was some syncro design works RTABS. (such a quality looking and feeling product, super hyped on those!)
Also I cant take credit for the second caliper bracket install but they are weld on tabs, previous owner of my 330i did them. These are the rear arms from the 330, and it will also be getting the front knuckles and brakes from the 330.
Andd got the rear trailing arms, upper and lower rear arms along with the new Stance true rear coilovers.
Fabbed up this harness bar as well with the help of @SamHolzmann and @WildBill burned in the brackets that I made for the support rods. The support rods are from a nrg harness bar. Reason for making one is NO ONE offers a reasonably priced harness bar and the end goal for this car will be a caged (down the road of course) so this will do for now for sure!
Sam painted all of my calipers and brackets in the same color as the engine bay (we used a high heat primer) then I Drilled out the new rear rotors to fit the new lug pattern and got the rear calipers installed. I used the condor speed shop rear stainless brake lines, just need to run the other stainless lines for the standalone master on the ASD handbrake that i have from the 330.
And finally I was able to throw some of the left front suspension togeather. I repainted the MG Solutions angle kit, also repainted the knuckles. Still waiting on new hub bearings for the fronts and they will need to be redrilled to 5x114 as well. Needed to get this all togeather to see if I needed extended brake lines or if the stock length condor ones would fit (as i was informed they would with the angle kit and the 330i had stock lines). Well just as my luck goes they wont work. So those are in the process of being exchanged for the lengthened ones.
-
 Tkuhn got a reaction from jc43089 in A purists nightmare - E46 drift build
I have the rigid one. You can get it through home depo online, it's awesome. I use it on brake lines, fuel lines, and all the air ride set ups I've done. Haven't done stainless yet tho.
-
Tkuhn reacted to AsparagusMike in A purists nightmare - E46 drift build
Copper nickel... Great!
I did however have a challenge with them once in a while going crooked on me when I was making a flare just because they are quite a bit softer then steel. Although, when they are tightened down they slightly crush to make a good seal so I'm not really sure how big of a deal it is if the hole is slightly not centered.
Beautiful engine bay by the way, Cars looking great!
-
Tkuhn reacted to Jdesign in A purists nightmare - E46 drift build
Well I know what Im using when I redo my brakes!
-
-
Tkuhn reacted to patsbimmer1 in A purists nightmare - E46 drift build
The big upside is that it won't rust and fail catastrophically like steel lines will. Not to be confused with straight copper lines which can't stand up to automotive brake pressures. NiCopp is pretty neat stuff!
-
 Tkuhn got a reaction from ChrisO in A purists nightmare - E46 drift build
Continued update!
Busted out the brake lines for in the bay. Obviously the abs/dsc has been deleted. SO with that being said I used a custom kit that Chase at ChaseBays got me hooked up with. Everything was done with 3/16" nickle copper brake line. I love the way this stuff shines up. All the photos are of before polishing. I was able to hide the brakeline that runs from the master to the right front and keep it out of the engine bay, I was also able to get the left front line to stay inside of the compartment on the driver side rather than run out of the compartment and through the fender well.
And then the lines were ran from the bulkheads to the original mounting spots where the softlines will connect. Also made sure to route them so that the added angle of the MG Solutions maxx angle kit doesnt hit them. Oh and i previously cleaned out the wheel wells and sprayed in some new 3m rubberized undercoating.
Now that the rear end is all reinforced and braced I was able to get the subframe cleaned up, old bushings out and installed the new condor subframe bushings and diff bushings.
Also got some fun parts in for the rear end.
MG Solutions upper and lower rear arms.
Stance XR1 rear true coils (also have XR1s for the front)
Ill save the boring photos but the front knuckles are cleaned up and re-sprayed black along with starting to clean up and re-paint the used MG Solutions maxx angle steering kit that i pulled off my 330i. Lots of parts came in including motorsports hardware stud conversion for the car, m54 fuel filter, upper and lower bushings for the rear trailing arms, new wheel bearings for all 4 corners. Fuel lines to replace the m54tu ones (completely different), oil adapter fitting for the oil filter housing to put a gauge into the system, Parts Shop Maxx engine vitals gauge (coolant temp and oil pressure configuration), some split loom for the interior harnesses, CSF aluminum radiator, and a few other odds and ends.
So i mocked up the new radiator and front end to fab up a bit of protection for the radiator.
Also cut the stock tow hook thread mounts off the front and rear bumper mounts with plans to weld them up to the bash bars using the stock locations (still needs to be done)
Ordered N54 exhaust studs and new oem exhaust manifold nuts and got them installed as well.
And last weekend was able to drop in the engine and trans! Before popping the trans on I threw in a new clutch fork and throwout bearing. Last year when i put this engine and trans into the 330i I had replaced the fork pivot pin with the stainless steel one from condor as well as replaced the clutch. The flywheel was just machined when i installed those parts last summer. The clutch and flywheel looked great still so no need to replace them. While i was at the trans i replaced the whopped out shift carrier bushing with a new condor one and then installed a new turner motorsport rear shift bushing.
More progress to come! its crunch time and I am hoping to have the car done by the end of April with a few weeks to get some miles on it before Automotion.
-
Tkuhn got a reaction from Jdesign in A purists nightmare - E46 drift build
Hahahaha were no experts. Honestly im just putting alot of the things I learned from building my civic over the past 8 years into this car. Like keeping in mind to do things right the first time so theres no reason for me to redo things over and over haha. And im not even going as in depth with everything that I would like, but id rather have the car done to drive, enjoy and get some more seat time. Its extremely hard for me to not touch everything and make it over perfect in my eyes lol, in time the car will become more is my hopes!
-
Tkuhn got a reaction from B C in A purists nightmare - E46 drift build
Holy shit I have been slacking on the updates. Lots of parts have come in and things are slowly coming together.
So here we go.
The bay is painted.
Once the car was back to my shop I dropped the rear end out of the car along with the fuel tank. With that came some bad news.
One of the subframe mounts was ripped out and another loose and plenty of cracks lol. So with the help of a good friend we were able to replace the torn area. and get the confor reinforcement kit welded in and then opened up the upper areas inside the chassis where the tops of the mounts were. We then created a tubing brace that connects all 4 of the subframe mounting points to the rear bar which was welded in to support the rear strut towers that was plated in preparation of the rear true coil set up.
I have alot more progress to share and will upload more when i get a chance!
-
Tkuhn got a reaction from Jdesign in A purists nightmare - E46 drift build
Holy shit I have been slacking on the updates. Lots of parts have come in and things are slowly coming together.
So here we go.
The bay is painted.
Once the car was back to my shop I dropped the rear end out of the car along with the fuel tank. With that came some bad news.
One of the subframe mounts was ripped out and another loose and plenty of cracks lol. So with the help of a good friend we were able to replace the torn area. and get the confor reinforcement kit welded in and then opened up the upper areas inside the chassis where the tops of the mounts were. We then created a tubing brace that connects all 4 of the subframe mounting points to the rear bar which was welded in to support the rear strut towers that was plated in preparation of the rear true coil set up.
I have alot more progress to share and will upload more when i get a chance!
-
-
 Tkuhn got a reaction from Rekpoint in A purists nightmare - E46 drift build
Holy shit I have been slacking on the updates. Lots of parts have come in and things are slowly coming together.
So here we go.
The bay is painted.
Once the car was back to my shop I dropped the rear end out of the car along with the fuel tank. With that came some bad news.
One of the subframe mounts was ripped out and another loose and plenty of cracks lol. So with the help of a good friend we were able to replace the torn area. and get the confor reinforcement kit welded in and then opened up the upper areas inside the chassis where the tops of the mounts were. We then created a tubing brace that connects all 4 of the subframe mounting points to the rear bar which was welded in to support the rear strut towers that was plated in preparation of the rear true coil set up.
I have alot more progress to share and will upload more when i get a chance!
-
Tkuhn got a reaction from Jdesign in A purists nightmare - E46 drift build
Have had a few parts come in the past few weeks.
Got my chase bays brake bias valve and all the fittings needed to make it work. This kit is normally sold with PTFE lines but Chase hooked it up with all the bulkheads, tube sleves and nuts to get it done the way I have it planned.
Picked up some clear corners, red tails, some door trim and some M3 door sills.
And last but not least my Street Faction front bash bar came in. I ordered just the basic one because I have a few plans for modifications of my own that the website does not offer. Mocked it up and it fits great, going to have to figure out a different way to mount the bumper because the bar is too long to allow the stock bumper slides to push into the plastic mounts. I believe I have a solution to this and I will share it if it works out lol.
-
Tkuhn got a reaction from Rekpoint in A purists nightmare - E46 drift build
Have had a few parts come in the past few weeks.
Got my chase bays brake bias valve and all the fittings needed to make it work. This kit is normally sold with PTFE lines but Chase hooked it up with all the bulkheads, tube sleves and nuts to get it done the way I have it planned.
Picked up some clear corners, red tails, some door trim and some M3 door sills.
And last but not least my Street Faction front bash bar came in. I ordered just the basic one because I have a few plans for modifications of my own that the website does not offer. Mocked it up and it fits great, going to have to figure out a different way to mount the bumper because the bar is too long to allow the stock bumper slides to push into the plastic mounts. I believe I have a solution to this and I will share it if it works out lol.
-
 Tkuhn got a reaction from DrLeadFoot in A purists nightmare - E46 drift build
Trust me I'm about ready to also hahahah hopefully in a few weeks if time permits!
-
Tkuhn got a reaction from DrLeadFoot in A purists nightmare - E46 drift build
Quick little update.
Got all of the final welds ground down and the bay is ready for filler and sanding.
Also was able to wire up and finalize the driver side wiring for the headlight, corner, horn, coolant level and temp sensor. Pleased with the outcome and next will be the passenger side.
-
Tkuhn got a reaction from Jdesign in A purists nightmare - E46 drift build
Trust me I'm about ready to also hahahah hopefully in a few weeks if time permits!
-
Tkuhn reacted to nick.e46.330i. in my 330i
The engine is finally painted. It took longer than I wanted to but that’s because we ran out of propane and and when that happened I lost ambition. Haha. My buddy came out to my shop and put the primer down Saturday night. Then came out tonight to lay down base and clear.
Also since my last I got the spacers to space out my power steering pump.
I also put new seal on the vanos pistons and put the anti rattle kit in. I don’t have any pictures of the process as my phone died when I started.
Now when @Tkuhn has time he will be doing the wire tuck.