-
Posts
302 -
Joined
-
Last visited
-
Days Won
13
Reputation Activity
-
 Tkuhn got a reaction from Rekpoint in A purists nightmare - E46 drift build
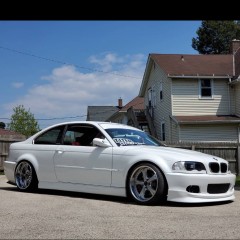
Picked up a M bumper this past week locally for a really good deal. It even came with the diffuser and crash bar, although I don't need the crash bar and its an aluminum one rather than carbon kevlar since it was off a 2001.
Here's a photo of it somewhat mounted. I have to do some work with the exhaust, and would really like to have the openings in the diffuser shaved. I definitely don't want a dual exhaust and would rather shave the openings and make a new opening farther to the left for the exhaust in the future.
I really like how it looks especially since I was between finding a M bumper or finding a lip for my non-m bumper (which is very difficult to do)
-
 Tkuhn got a reaction from B C in A purists nightmare - E46 drift build
Picked up a M bumper this past week locally for a really good deal. It even came with the diffuser and crash bar, although I don't need the crash bar and its an aluminum one rather than carbon kevlar since it was off a 2001.
Here's a photo of it somewhat mounted. I have to do some work with the exhaust, and would really like to have the openings in the diffuser shaved. I definitely don't want a dual exhaust and would rather shave the openings and make a new opening farther to the left for the exhaust in the future.
I really like how it looks especially since I was between finding a M bumper or finding a lip for my non-m bumper (which is very difficult to do)
-

-
 Tkuhn got a reaction from patsbimmer1 in A purists nightmare - E46 drift build
UPDATE
Finished up the shaved shifter trim by trimming around the handbrake and then painting. I used some paint that is pretty close to the dash trim color but its not perfect.
Next I finally found something to do with the hole in my dash that had a battery cut out in it (that was from the sedan).
Got this really nice usb charging port on Amazon. I chose this once since it has a power button feature, I wired it to the original power outlet wires so I didn't want it to always be on like the factory one.
Before
installed
Turned on
Next I did some repairs from damage.
Last season I ripped off the underglow and never got around to fixing it lol. So since I had to respray some undercoating where the cage bases are welded in it was a good time to fix the underglow.
Replaced 2 of the strips and resecured everything.
Next I decided to try and shave the M fenders.. luckily I only tried on the passenger one. Even though I went slow and tried to disperse the heat I still warped it 🙃. I tried to fix it with filler and its better, but still not good.
Here's the only 2 photos I took since I got really discouraged.
Thats it for now.
-
 Tkuhn got a reaction from jc43089 in A purists nightmare - E46 drift build
UPDATE
Finished up the shaved shifter trim by trimming around the handbrake and then painting. I used some paint that is pretty close to the dash trim color but its not perfect.
Next I finally found something to do with the hole in my dash that had a battery cut out in it (that was from the sedan).
Got this really nice usb charging port on Amazon. I chose this once since it has a power button feature, I wired it to the original power outlet wires so I didn't want it to always be on like the factory one.
Before
installed
Turned on
Next I did some repairs from damage.
Last season I ripped off the underglow and never got around to fixing it lol. So since I had to respray some undercoating where the cage bases are welded in it was a good time to fix the underglow.
Replaced 2 of the strips and resecured everything.
Next I decided to try and shave the M fenders.. luckily I only tried on the passenger one. Even though I went slow and tried to disperse the heat I still warped it 🙃. I tried to fix it with filler and its better, but still not good.
Here's the only 2 photos I took since I got really discouraged.
Thats it for now.
-
 Tkuhn got a reaction from Jdesign in A purists nightmare - E46 drift build
UPDATE
Finished up the shaved shifter trim by trimming around the handbrake and then painting. I used some paint that is pretty close to the dash trim color but its not perfect.
Next I finally found something to do with the hole in my dash that had a battery cut out in it (that was from the sedan).
Got this really nice usb charging port on Amazon. I chose this once since it has a power button feature, I wired it to the original power outlet wires so I didn't want it to always be on like the factory one.
Before
installed
Turned on
Next I did some repairs from damage.
Last season I ripped off the underglow and never got around to fixing it lol. So since I had to respray some undercoating where the cage bases are welded in it was a good time to fix the underglow.
Replaced 2 of the strips and resecured everything.
Next I decided to try and shave the M fenders.. luckily I only tried on the passenger one. Even though I went slow and tried to disperse the heat I still warped it 🙃. I tried to fix it with filler and its better, but still not good.
Here's the only 2 photos I took since I got really discouraged.
Thats it for now.
-
 Tkuhn got a reaction from Jdesign in A purists nightmare - E46 drift build
UPDATE
Was a pretty productive weekend. Absolutely loving having the car home again.
Picked up some M rear quarter and door trim, a passenger M fender (to finally complete my set) a M gas door and the inner door sill trim.
Painted the door still trim and then installed it.
Looks so much better with the carpet not just hanging out.
Then I got started on trimming the resr seat delete to fit the cage now.
Stared at it for awhile... cut out some cardboard and tested ideas... here's what I came up with.
Cut out the corners and used a hole saw to notch them and riveted on some tabs I made with spare ABS.
Then I riveted in the other sides of the tabs once the panels were all screwed in.
Happy with the outcome for sure!
Then I sprayed some silver on the damaged area from last season. Not perfect but its fine because it's getting wrapped over.
I moved on to some more interior stuff then, extended the wires for my window stitches.
Sanded and painted the center console insert.
And after i taped up the wiring i installed the piece to the console.
I decided to not make flat ABS door panels for the rear and instead cut up and fit the factory ones. 😁 And it worked pretty well!
Even got the front sections to clip in on both sides!
And made, installed nutserts and installed the trim I made to hold down the carpet in the rear.
Installed the sunroof delete, pretty happy with the way it fits.
I timmed away the wrap so I can peel it off later without pulling the sunroof back out so it looks like there's big gaps.
I also started on shaving the center shift bezel. This one is an auto one still though so I'd Ike to find a manual one at some point. I plastic welded in some abs blocks then layed some filler on it. Only have a pic of the pieces welded in.
Also got my handbrake bled so next up is finishing installing the center and dash pieces!
-
 Tkuhn got a reaction from P_Roloff in A purists nightmare - E46 drift build
Been thinking about more like an Imola red. But it wouldn't be Imola exactly, the color i found is carmine red. Red coupes have given me a real hard on latley...
Like this one here.
-
 Tkuhn got a reaction from P_Roloff in A purists nightmare - E46 drift build
No super exciting updates this weekend.
BUT
got the car and everything moved back home!
Windsheild goes in this week! But I found out the wrap color I have is backordered till June.... so that's awesome.
Have some decisions to make now.
-

-
 Tkuhn got a reaction from Rekpoint in A purists nightmare - E46 drift build
Not an update but excited to have another part come in!
S2rTuning sunroof delete!
Definitely seems like another quality piece to add to the car. Excited to see how the fit is this weekend. Really love that this is the only one I have found on the market that uses the existing mounting holes from the oem cassette to mount.
Fingers crossed that it fits well!
-
 Tkuhn got a reaction from Jdesign in A purists nightmare - E46 drift build
UPDATE
Decided to bite the bullet and chop up the rear quarters.
Now it is worth mentioning that I did feel bad after looking at how clean this thing is lmao BUT it was only for a half hour and after I asked some friends to tell me to stop being a bitch 😅
So here is the last photo of the rust free quarter hahaha
And setting up to cut.
Chop chopped
Bent up and welded the folds.
Then filled all the gaps.
Then moved on to the other side. Only 2 photos of this side.
And finally finished off the day sealing them up with seam sealer.
Also the new chase bays handbrake set up arrived 😁
Thats it for now, next up will be undercoating the wheel wells and hopefully mocking up the overs.
-
 Tkuhn got a reaction from Jdesign in A purists nightmare - E46 drift build
Weekend update!
Started by getting the passenger and drive carpet buckets in. The carpet I bought from my part out guy was cut in the front because it goes under the heater core. So having them in 2 pieces works out better honestly.
Next up was cutting the dash in the upper and lower corners to fit with the cage.
I did cut more than I would like on the top so maybe down the road I might buy another dash and trim it better.
I also had to trim a little off the defrost vents for the sides.
Then trimmed the vents to fit.
Driver side. (Its also worth noting that usually the LCM does not fit, although I have some e46 buddies that figured out how to make it fit because the thing is GIGANTIC behind the face. Somehow mine barely fit without modifications. But I'm not complaining lol)
Here is the passenger vent trimmed to fit along with the airbag cover. I have another airbag cover that I might trim a little tighter since I know how it needs to be cut now.
Next I installed the rear carpet piece and trimmed it to fit around the cage.
I then installed the center console and arm rest I found in a junkyard awhile back.
In this photo you can also see the prototype v1 of the window switch insert Sam made me.
Pretty excited with how it looks and will function.
Then I moved on to trimming the glove box. Some say you cant make it fit. But with some info from another e46 friend and some thought it worked out great!
Here's the clearance with it down 😁
And some final photos of the interior for the weekend.
I was able to order my sunroof delete and the new handbrake set up so hopefully they dont take too long to ship thanks to this pandemic.
I will need to extend the window switch wiring so that is one of the things on the docket for next weekend.
Until next time!
-
 Tkuhn got a reaction from Jdesign in A purists nightmare - E46 drift build
UPDATE!
Started the weekend off on Friday night by getting the cage back up on the rocker boxes and welding them in for good then welding the cage in for good as well.
That task took all night and was definitely frustrating. But it's done 😁. Then I hit everything with some sandpaper in preperation for painting.
Saturday morning I got to taping and making off the entire car. Which took alot longer than I planned lol.
Pro tip: tin foil is a lifesaver and cheaper than tape and easier than plastic.
Wiped the cage down with some prep solution and then played down 2 coats of self etching primer.
"Pro tip #2" : I used my shop vac to try and keep over spray to a minimum and it did seem to work decently.
Obviously next came color! I did 2 coats of color and then a third to finish off the last can in the areas that will be "higher traffic" like the door bars and a pillars. I do plan to put down clear vinyl on the door bars to keep them from scratching as well.
I will spare you the repetitive photos and jump right to the ones with clear which I did on sunday afternoon.
I am super excited at the way this turned out.
Every aspect was daunting for me just because I wanted to do it as well as possible, since we pride ourselves on good looking and also functional drift cars haha.
I chose to use rattle can for a few reasons. With this tight area and the fact that I wasnt doing the entire interior a actual 2 stage paint with a gun would have made a huge mess with the air pressure and the hose.
Secondly if it does get scratched, which I'm sure it will, touch up will be easier if necessary.
And thirdly I do like to pride myself on tricking people to think that it was done with a gun but it's just spray paint lmao.
Super excited to un-mask everything and get rolling on putting the interior back in along with a few other projects for the season yet!
-
 Tkuhn got a reaction from Jdesign in A purists nightmare - E46 drift build
UPDATE!
Got some really rewarding progress done this weekend 😊
Had the windshield removed during the week.
Then moved on go making my CAD rocker boxes a reality.
Next was the A pillar bars. Notching them was a real trial and error process but again super grateful to Sam for the help on these as well.
They fit really well and I'm happy with them.
Then I moved on to the door bars on the passenger side. Which turned out exactly how I envisioned them! Theres pleanty of ways to do a door bar but from day one this was what I wanted and I couldnt be happier.
Just need to add the verticals for more support.
And to further my excitement the door closes and fits perfectly with the seat and door panel!
Things are moving along so hopefully the other door bars go smoothly then final welding can commence.
-
 Tkuhn got a reaction from jc43089 in A purists nightmare - E46 drift build
UPDATE
Decided to bite the bullet and chop up the rear quarters.
Now it is worth mentioning that I did feel bad after looking at how clean this thing is lmao BUT it was only for a half hour and after I asked some friends to tell me to stop being a bitch 😅
So here is the last photo of the rust free quarter hahaha
And setting up to cut.
Chop chopped
Bent up and welded the folds.
Then filled all the gaps.
Then moved on to the other side. Only 2 photos of this side.
And finally finished off the day sealing them up with seam sealer.
Also the new chase bays handbrake set up arrived 😁
Thats it for now, next up will be undercoating the wheel wells and hopefully mocking up the overs.
-
 Tkuhn got a reaction from P_Roloff in A purists nightmare - E46 drift build
UPDATE
Decided to bite the bullet and chop up the rear quarters.
Now it is worth mentioning that I did feel bad after looking at how clean this thing is lmao BUT it was only for a half hour and after I asked some friends to tell me to stop being a bitch 😅
So here is the last photo of the rust free quarter hahaha
And setting up to cut.
Chop chopped
Bent up and welded the folds.
Then filled all the gaps.
Then moved on to the other side. Only 2 photos of this side.
And finally finished off the day sealing them up with seam sealer.
Also the new chase bays handbrake set up arrived 😁
Thats it for now, next up will be undercoating the wheel wells and hopefully mocking up the overs.
-
 Tkuhn reacted to B C in A purists nightmare - E46 drift build
love the updates man! Cant wait to see the overfenders on and wrapped
-
 Tkuhn got a reaction from jc43089 in A purists nightmare - E46 drift build
Weekend update!
Started by getting the passenger and drive carpet buckets in. The carpet I bought from my part out guy was cut in the front because it goes under the heater core. So having them in 2 pieces works out better honestly.
Next up was cutting the dash in the upper and lower corners to fit with the cage.
I did cut more than I would like on the top so maybe down the road I might buy another dash and trim it better.
I also had to trim a little off the defrost vents for the sides.
Then trimmed the vents to fit.
Driver side. (Its also worth noting that usually the LCM does not fit, although I have some e46 buddies that figured out how to make it fit because the thing is GIGANTIC behind the face. Somehow mine barely fit without modifications. But I'm not complaining lol)
Here is the passenger vent trimmed to fit along with the airbag cover. I have another airbag cover that I might trim a little tighter since I know how it needs to be cut now.
Next I installed the rear carpet piece and trimmed it to fit around the cage.
I then installed the center console and arm rest I found in a junkyard awhile back.
In this photo you can also see the prototype v1 of the window switch insert Sam made me.
Pretty excited with how it looks and will function.
Then I moved on to trimming the glove box. Some say you cant make it fit. But with some info from another e46 friend and some thought it worked out great!
Here's the clearance with it down 😁
And some final photos of the interior for the weekend.
I was able to order my sunroof delete and the new handbrake set up so hopefully they dont take too long to ship thanks to this pandemic.
I will need to extend the window switch wiring so that is one of the things on the docket for next weekend.
Until next time!
-
 Tkuhn reacted to Rekpoint in A purists nightmare - E46 drift build
Your soon to have m3 hood hinges !!
-
 Tkuhn got a reaction from jc43089 in A purists nightmare - E46 drift build
UPDATE!
Started the weekend off on Friday night by getting the cage back up on the rocker boxes and welding them in for good then welding the cage in for good as well.
That task took all night and was definitely frustrating. But it's done 😁. Then I hit everything with some sandpaper in preperation for painting.
Saturday morning I got to taping and making off the entire car. Which took alot longer than I planned lol.
Pro tip: tin foil is a lifesaver and cheaper than tape and easier than plastic.
Wiped the cage down with some prep solution and then played down 2 coats of self etching primer.
"Pro tip #2" : I used my shop vac to try and keep over spray to a minimum and it did seem to work decently.
Obviously next came color! I did 2 coats of color and then a third to finish off the last can in the areas that will be "higher traffic" like the door bars and a pillars. I do plan to put down clear vinyl on the door bars to keep them from scratching as well.
I will spare you the repetitive photos and jump right to the ones with clear which I did on sunday afternoon.
I am super excited at the way this turned out.
Every aspect was daunting for me just because I wanted to do it as well as possible, since we pride ourselves on good looking and also functional drift cars haha.
I chose to use rattle can for a few reasons. With this tight area and the fact that I wasnt doing the entire interior a actual 2 stage paint with a gun would have made a huge mess with the air pressure and the hose.
Secondly if it does get scratched, which I'm sure it will, touch up will be easier if necessary.
And thirdly I do like to pride myself on tricking people to think that it was done with a gun but it's just spray paint lmao.
Super excited to un-mask everything and get rolling on putting the interior back in along with a few other projects for the season yet!
-
 Tkuhn got a reaction from KaiserRolls in A purists nightmare - E46 drift build
Thanks!! And yes that was my plan. Specifically on the door bars.
-
 Tkuhn reacted to KaiserRolls in A purists nightmare - E46 drift build
Looks good. Could always toss some 3m clear vinyl on the high wear areas.
-
 Tkuhn got a reaction from P_Roloff in A purists nightmare - E46 drift build
UPDATE!
Started the weekend off on Friday night by getting the cage back up on the rocker boxes and welding them in for good then welding the cage in for good as well.
That task took all night and was definitely frustrating. But it's done 😁. Then I hit everything with some sandpaper in preperation for painting.
Saturday morning I got to taping and making off the entire car. Which took alot longer than I planned lol.
Pro tip: tin foil is a lifesaver and cheaper than tape and easier than plastic.
Wiped the cage down with some prep solution and then played down 2 coats of self etching primer.
"Pro tip #2" : I used my shop vac to try and keep over spray to a minimum and it did seem to work decently.
Obviously next came color! I did 2 coats of color and then a third to finish off the last can in the areas that will be "higher traffic" like the door bars and a pillars. I do plan to put down clear vinyl on the door bars to keep them from scratching as well.
I will spare you the repetitive photos and jump right to the ones with clear which I did on sunday afternoon.
I am super excited at the way this turned out.
Every aspect was daunting for me just because I wanted to do it as well as possible, since we pride ourselves on good looking and also functional drift cars haha.
I chose to use rattle can for a few reasons. With this tight area and the fact that I wasnt doing the entire interior a actual 2 stage paint with a gun would have made a huge mess with the air pressure and the hose.
Secondly if it does get scratched, which I'm sure it will, touch up will be easier if necessary.
And thirdly I do like to pride myself on tricking people to think that it was done with a gun but it's just spray paint lmao.
Super excited to un-mask everything and get rolling on putting the interior back in along with a few other projects for the season yet!
-
 Tkuhn got a reaction from patsbimmer1 in A purists nightmare - E46 drift build
UPDATE
Started the weekend off with running down to a buddies in Waukegan to pick up a set of DonMusk M3 over fenders. Which I have wanted for a long time and timing worked out plus I saved huge not having to ship from Poland.
going to take some work to get them fitted right, more so on the end of opening up my wheel wells. The overs themselves fit great.
Then I moved onto passenger side door bars.
And after that was getting the gussets in for the door bars on both sides.
With the gussets being completed that was the final touches of the true fab work.
Then on to final welding!
Only pic I really took of final welds. Turned out ok.
The next step to finish final welding was to remove all 4 rocker boxes and drop the cage down to get to the tops.
That was about it for the weekend. Next weekend I am hoping to get the cage back up and in place, then weld the boxes to the car and the cage to the boxes and finally the daunting task of painting. Lol
