-
Posts
2441 -
Joined
-
Last visited
-
Days Won
85
Content Type
Profiles
Forums
Events
Gallery
Store
Posts posted by m42b32
-
-
1 hour ago, HipMF said:
Saving this here so I can find it later.
https://bike.bikegremlin.com/1985/bicycle-bearing-grease-explained/
Interesting article, thats a pretty deep dive on grease. I've just been using park tool polylube 1000 basically everywhere. I haven't had any washout issues or things drying up, and its safe for carbon where that matters. Only place I don't use it is bottom bracket threads, those get proper anti-seize.
-
I've always really liked those wheels, definitely my favorite factory 18's on e9x's
-
That's awesome!! Congrats on the pickup!
Also, what site did you order the heritage 6's from, directly from MOMO? I've always really liked the look of those.
Edit: Found it! I'd have some on the way if they did a 16. I'm thinking these might still look good in 17 on the e30... hmmm
-
On 7/9/2022 at 9:23 PM, rampelsauce said:
No dualing wagons?
Sadly not this year...
-
3 hours ago, SteelBlue said:
Just running off of the factory AMP and headunit? **Reading your previous posts now**. The stock Premium system in my car sounds decent, but wouldn't mind some additional punch on the low end. Really don't want to alter the look of the rear decklid speaker housings, so maybe these in the kick panel would be a good option. Maybe replacing the tweeters as well.
I don't have a factory amp in my car so I used a small Sony amp that can work with the speaker level outputs from the continental head unit. I totally agree on not wanting to change the rear speaker look since most larger aftermarket speakers look like you landed a UFO on the decklid... so my plan for the rear 5x7's is to design and print something similar to the rear premium speaker housings (though maybe just a flat top instead of the angled outside edge). A main goal for this project is to have the end result be almost completely stock looking.
-
Slow progress is still progress!
After some extensive measuring I decided on some Polk DB+ 6.5" component speakers for the front and 5x7" coaxial speakers for the rear. While I had the front all pulled apart for the amp I decided to start there with the speaker upgrades. My car originally came with the basic 4 speaker sound system so I did not have the tweeter housings in the doors. The Polk tweeters have a nice basic black grill but are an odd rounded shape on the outside so they wouldn't necessarily be an easy fit in stock e30 tweeter pods. I didn't want to just surface mount the tweeters on the stock blanks so I decided to design and print some mounts of my own. I started with a basic model of a tweeter blank I found online and modified it to be mounted with a screw and perfectly fit the Polk tweeter at an angle that matched the stock ones. After a bit of trial and error I printed the final parts in ASA. To finish them up I sanded them down, sprayed with filler primer and sanded again to completely smooth them out, then a coat of texture paint followed by a final pass with SEM trim black. I mounted the tweeters from the back with hot glue so that they wouldn't be impossible to remove if needed, we'll see how that holds up in a hot car.


Good news for me is that cars with the base sound system still have the tweeter wiring going into the door, so these just plugged directly into that and fit perfectly! I'm super happy with how they turned out.

I also got the 6.5" woofers mounted in the kick panels. The speakers have the normal 4 mounting holes as well as an inner circle of holes that turn out to line up perfectly with the 5.25" speaker pattern (which I would assume is intentional). Because they'll be tight under the kick panels I printed a ~3mm spacer to keep the mounting screw heads off the speaker surround as well as keep the kick panel from interfering with speaker cone movement.

These Polk 6.5's are pretty shallow and also don't protrude too much beyond the mounting surface so zero modification to the chassis was required to fit them. I did however, have to modify the kick panel trim. I removed the sound insulation/speaker mesh and trimmed away the plastic ring around the speaker grill and the back side of the one screw hole. I also used a heat gun to flatten them out a bit as they had warped into a concave shape over time. The speaker sticks out maybe 5mm further than the original so these have to flex around them a little bit, but once installed they look completely stock and don't have any gaps. I may go back and replace the sound insulation at some point, but going to try without for now.

I don't have a pic of the kick panels installed but it looks completely stock. No need to space out the hood release on the driver's side and zero clearance issues with anything there. I am still working on the passenger side but so far it looks like the glovebox will clear without issues as well.
Next job is wiring in both crossovers and finding places to mount those!
-
Bad news, I can't make it either. I will be out of town for a family thing that weekend that I can't really skip
-
DId you buy the OEM sunglasses holder or one of the cheap aftermarket ones? I had the OEM one but a little tab broke in it after a few years and haven't decided if I should spend the money for OEM again or just try a cheap one. Definitely one of the best usability upgrades I did to my car (before I broke it).
-
That glacier silver trim is really cool! I didn't know that was an option, looks fantastic with black. If you can find some sport seats it is worth it, probably easier to find black ones vs. saddle too.
-
Nice! N52 e9x's are probably one of the best 'modern' BMW daily drivers (though I'm a bit biased). I had no idea the euro xenon's had no leveling units, I'd love to get rid of those since they're nothing but trouble.
-
22 hours ago, SteelBlue said:
Bumping this thread. How do the 19” style 225s ride? I’ve heard mixed opinions on 19’s on an E90. I really like the style 225, and while it was offered in an 18, it is apparently very rare. What are your tire specs?
Compared to my 17" snow tires they're a good bit harsher but I don't mind it. Current fronts are 235/35r19 and rears are 255/30r19. When I first got the car it had 255/35r19 on the rear and they fit no problem with the added sidewall, and if anything I think they looked a little better because they filled out the arches a bit more.
-
22 minutes ago, Bassboy3313 said:
Awesome! I'm in the process of making an enclosure from ikea lack tables for my maker select V2. I need to be able to print with ABS and ASA pronto! Lol. Can I ask where you got your plexiglass from?
Nice! Those Lack tables are pretty great for like $12 haha. I ordered it from here: https://www.printedsolid.com/products/v2-acrylic-sheets-for-prusa-lack-enclosure. They also have the V1 plexiglass that are a bit shorter.
-
14 minutes ago, Bassboy3313 said:
Looking great! Sort of off topic, but what enclosure do you have for your 3d printer?
Thanks! My enclosure turned into quite the project haha. It is based off the Prusa Ikea Lack V2 design (https://blog.prusa3d.com/mmu2s-printer-enclosure_30215/) so that I could order precut plexiglass, but I redesigned basically the entire thing. I changed the frame parts so that the entire top box can be removed, the wire passthrough for the power supply are a two piece threaded part that is a lot cleaner, added some features so I could lock down the top (makes it a lot easier to lift off the enclosure), and made some filler strips that seal off the perimiters of the plexiglass and top/bottom of the doors. I also did a filament spool holder and feed inside the enclosure instead of on top to keep dust off the filament. Next improvements are an internal light and possibly a filtered exhaust fan.

-
159.6k
Well, that lasted long. New head unit is awesome but I did exactly what I always do and jumped head first down the rabbit hole. I've decided to go for a total rework of the stereo system to try and get some good sound volume/quality while remaining as stealth and original looking as possible. I'm not going for trim rattling bass or audiophile sound quality, just something enjoyable while cruising around.
First project is a temporary solution until I figure out the rear speakers. When I pulled the existing speakers out last time I noticed that the speaker surround was being crushed by the factory speaker grille and probably preventing it from moving freely (you can see the wrinkles in the picture in my last post). I designed and printed some 5mm spacers that go between the speaker and grille to give it the appropriate clearance. I printed them in ASA to get some good heat and UV resistance.
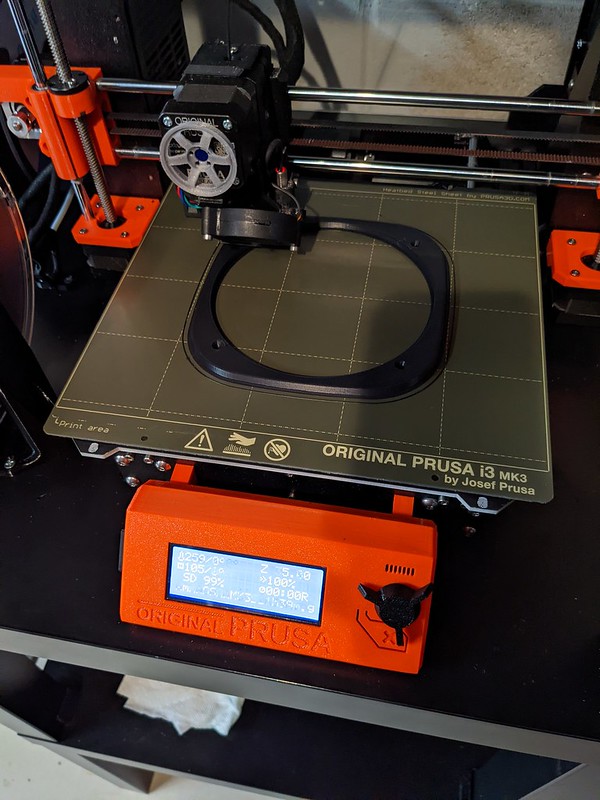
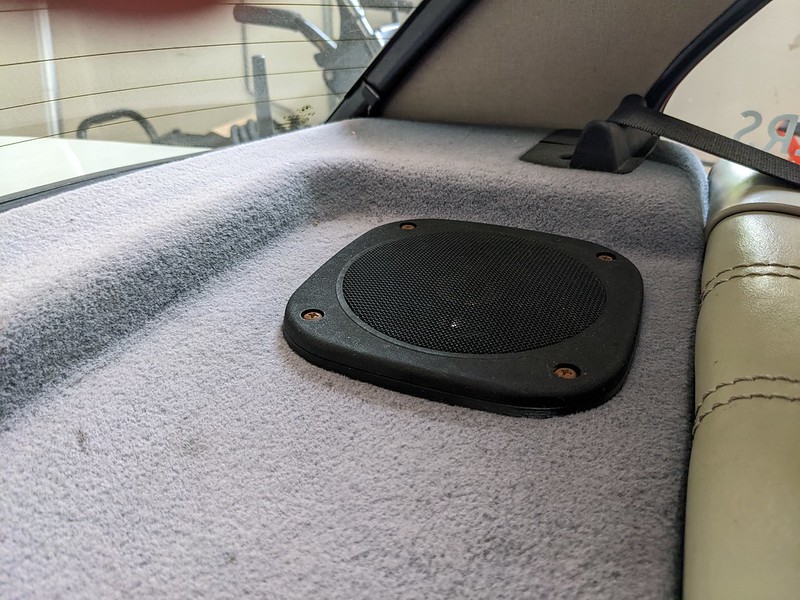
Reassembled and you'd never know its there, fits the grille profile perfectly.
With that done I moved on to an amplifier. The biggest issue with the Continental head unit is that it has no RCA output or signal wire ouput for an amp. Fortunately, there are amplifiers that can work off "high level inputs", which is a fancy way of saying the speaker outputs from the head unit. I came across this Sony XMS400D amp that is intended to integrate with factory stereo systems and can work with high level inputs. To get around not having an amp signal wire, it can sense incoming audio signals and turn on automatically.
The only things remaining from the ABS system is the wiring and the computer. Turns out, the amp is smaller than the ABS computer and can be made to fit perfectly into it's mount! I whipped up a piece of aluminum flat stock to adapt the amp mounting tabs to the ABS computer mounts. Worked perfectly!

Had to basically cut out 90% of the wiring I just did with the head unit to integrate the amp but in doing that I was also able to sort out a mistake I had made. I had the constant 12v and switched 12v sources swapped, the head unit worked fine but wouldn't save the time/some settings. The amp basically just splices into the speaker wiring and has a few extra inputs for power/ground and a switched ignition source. It comes with ~40" of wire on each harness which is more than enough, I only needed to lengthen the 12v power wire to get over to the passenger side and through the firewall to reach the positive battery terminal. I also did twisted pairs on each of the speaker channels to help combat any noise. This is how the factory speaker wiring is done so I figured it wouldn't hurt. The only problem I ran into is that I broke the locking tab on one of the connectors which was annoying, but a few zip ties later it shouldn't be able to work itself out. Mounted the amp, routed/wrapped the wire harnesses in tesa tape like factory, and it's ready to go! I'm stoked that it will be totally hidden. I still need to gut the ABS wiring, but for now it's zip tied out of the way with the unplugged airbag module wiring lol.

The continental head unit can put out about 25W RMS per channel, which is actually pretty decent for a head unit, but this amp can do 45W RMS on each channel (with 100W peak), so nearly double the output. Even with the old 5.25" coaxial speakers in the car the sound is very noticeably improved. Much clearer/louder at the same volume number, and definitely has a bit more bass. Really happy with the improvement so far... speakers are next.
-
-
-
159.5k
Finally got this car out for the summer last weekend and took a nice drive through the Holy Hill area. While enjoying my cruise I was reminded of how much I hate the current state of the audio system in this car. At some point prior to my ownership it had an Alpine head unit and some Sony rear speakers installed by a Best Buy. While the individual parts weren't necessarily bad, the install was clearly terrible because random speakers would come and go any time you hit a bump. Sometimes you'd have all 4, sometimes it would switch left and right, if you got really unlucky you'd have seemingly nothing till the next expansion gap. I had enough and ordered the Continental head unit to start rebuilding the stereo into something workable.
Getting the old Alpine head unit out without the special tools was a little frustrating but I eventually succeeded with a pair of feeler gauges down each side in just the right spot. With the head unit out I found this messy pile of crap behind it:

The picture doesn't really capture it well but there were quite a few cut/loose wires, some random spliced in connectors that served no purpose, what looked to be an old ipod connection that was only half-way cut out, and a lot of electrical tape and crimp connectors. Since the factory connectors were long gone I just cut back everything until I was left with as much of the factory wiring that I could save. My car has the base 4-channel system with no amp so I soldered in the new head unit connectors using this diagram:
New head unit installed and working! Looks so much better than the old one and having bluetooth audio (once I figured out how to get it working) is a great upgrade.

The annoying news was that I only had sound from 3 of the 4 speakers. The driver's rear wasn't doing anything, so I pulled out the speaker and found what was probably real source of my problems:
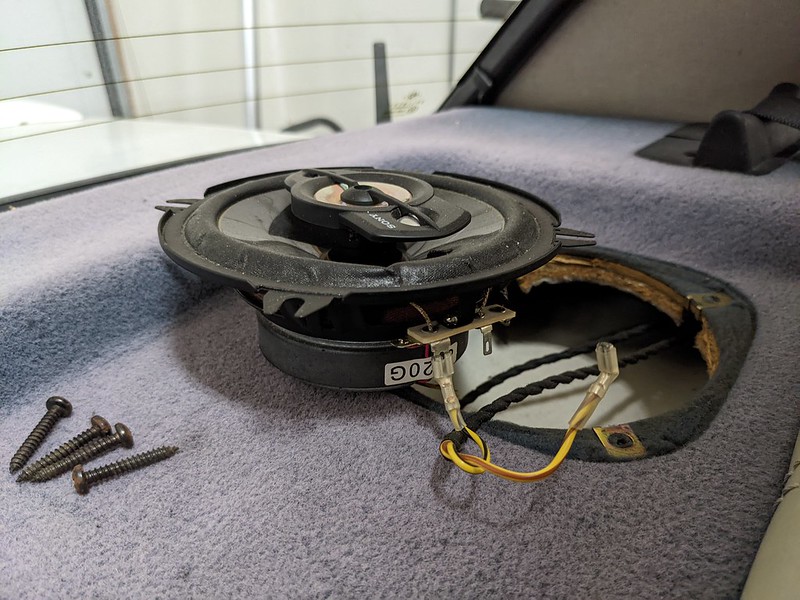
It pulled out just like this, the connector had fallen right off with zero resistance. In fact, all of the connectors on both rear speakers were loose like that. I tightened up the connectors with a pliers and reattached them and what do you know, I have all 4 speakers working now! I'm not sure why it took me so long to dig into this but I'm pumped that it's working properly again.
-
Bump! Sell me your junk.
Also I realized I put this in the for sale section, if one of you fancy pants moderator guys can move this to the wanted section that would be awesome
-
Looking for a cheap set of E30 door panels and rear interior panels. I don't care what color they are or what condition the vinyl is in as long as they're structurally sound (no speaker holes or blown out clip pockets/mounting points).
-
I'd agree with jdesign at $1k-ish, more if you have the corresponding door panels. They are a dark gray like the outsides of the bolsters and a plain (not plaid) cloth insert like the inside of the bolsters. Could probably list for more with the way the market is and see what offers you get. If you cleaned them super well it would help a lot too.
-
5 hours ago, Jdesign said:
Hobbyist is basically the same as a collector plate but allows modifications to a car that is a minimum of 20 years old.
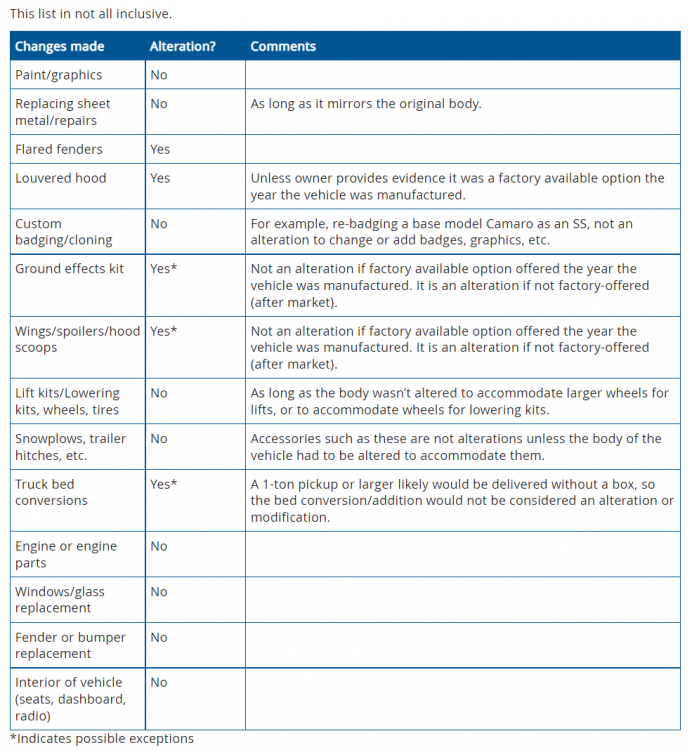
Just to clarify this comment: collector plates also let you modify the car, but has a couple limitations on visual changes. You can do anything you want to the engine (including swaps), suspension, interior, wheels. Only real limitations are keeping the body 'stock': For example, you could put IS lip/spoiler on a non-IS e30, but couldn't put big flares and a vented hood on it. Here is the list from the DMV for acceptable alterations to a car registered as a collector. It's sort of confusing because the "no" means you can, and the "yes" means you cant.
Honestly, you could probably just call the DMV to get a concrete answer on the emissions. It sounds horrible, but the last time or two I had to call they were surprisingly helpful.
It makes me feel old having this conversation about an e46...
-
How's the condition of the map pockets/door pulls? I might be interested in those if you still have them
-
I believe those seats were an option on 318is's (rear seat is a coupe seat in your picture) and M3's, not sure if it was available in the US but definitely in Europe. It is called "Uberkaro".
-



BIKES!
in General Off-Topic
Posted
Free is the best price! I can understand the noodley feeling especially coming from a MTB, road bikes have always felt a little fragile in comparison to me.
I recently got a bug to rebuild my old Trek 560 into something I'd get some good use out of as I hadn't ridden it in years. I live within a mile of the bugline trail network and decided it would be silly not to have a bike path cruiser. Between parts I had kicking around and a few smaller bits I needed to buy I think it came out awesome for not much money.
Got it out for a ride this morning and it's fantastic. 28c tires (frame won't allow anything bigger) and wide-ish flat bars are super comfortable and I've always been a single speed fan so it's fun to have one of those again too.