
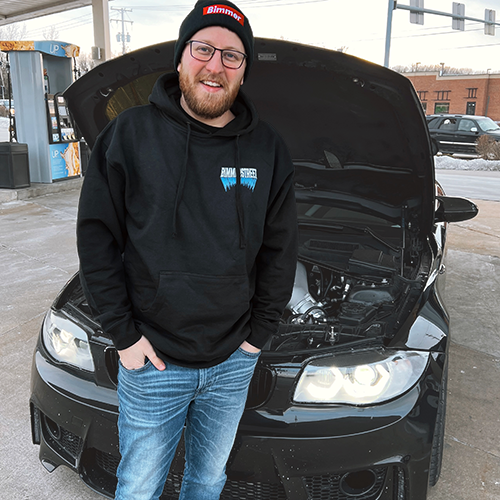
suspenceful
-
Posts
1734 -
Joined
-
Last visited
-
Days Won
44
Content Type
Profiles
Forums
Events
Gallery
Store
Posts posted by suspenceful
-
-
5 hours ago, GunMetalGrey said:
I don't do drag racing, but this seems like a pretty solid time for something on street tires at WIR for your first event.
Time to get @suspenceful on the road with you and do some 59.99 rolls!I told him I'm down to swap keys!
PS: that's a nice fender roller

-
17 hours ago, patsbimmer1 said:
That's pretty awesome. I drilled a hole in my back garage and it's exactly 4". Based on your pictures I can't imagine there's much you couldn't do on this lift. Good buy!
Nice! So far, it's been great. I've been working under it almost every day since installing it... lol.
Are you looking into getting one?
-
On 6/17/2019 at 11:23 AM, Boris3 said:
Thanks. Her's has the ZKW lights? I think the ballasts on these aren't interchangeable with the AL/Bosch.
No, hers are the AL ones. Thanks for clarifying.
-
My girlfriend might be interested in some of the parts in these. Her bulbs flicker on and off sometimes, both sides. Not sure if it's the bulb or ballast.
I'll run it past her.
-
On 6/14/2019 at 5:59 PM, YoungCR said:
I liked the custom hydraulic lines to get those out of the way, great idea.
Thanks! I can't imagine having to roll the cart out, connect the lines and trip over that crap every time you want to use it.
On 6/14/2019 at 7:53 PM, patsbimmer1 said:I've been debating this. How thick was your concrete and how much did you end up paying? Were you able to work out any discount for the review?
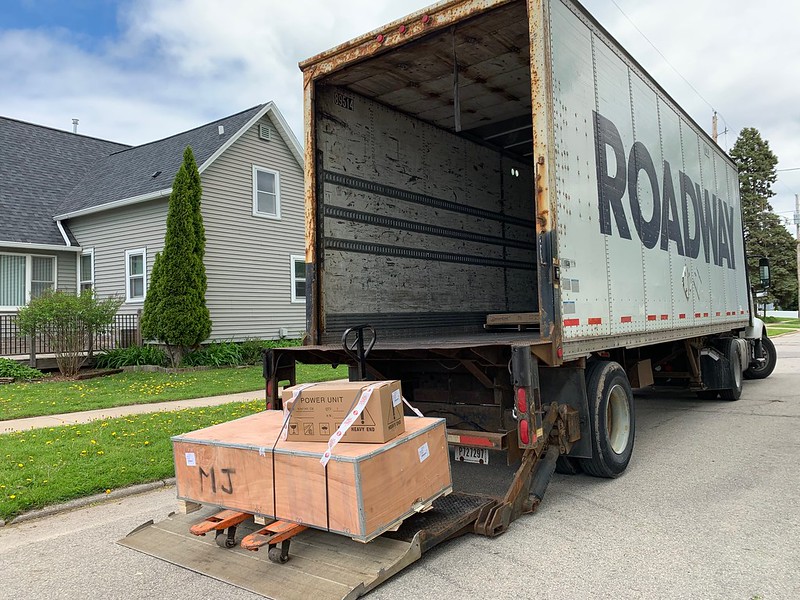
My concrete is 4" thick, the minimum requirement. No discount for the review. Jegs has it on sale for $1699 and after using a $100 discount code I found (SAVEMORE), it was $1599 + tax with free shipping.
https://www.jegs.com/i/Dannmar-Equipment/296/1375659/10002/-1
MaxJax usually charges $100 for liftgate service and $40 for residential delivery. Jegs must eat that charge because I didn't have to pay anything extra to get it dropped off at my house. Shipping guy called me a few minutes before he arrived so I ran home and had him put it right in my garage.
- patsbimmer1 and Jdesign
-
 2
2
-
38 minutes ago, B C said:
Great garage, Jake! how friendly is that lift for very low cars? looks like driving onto boards may still be required for some
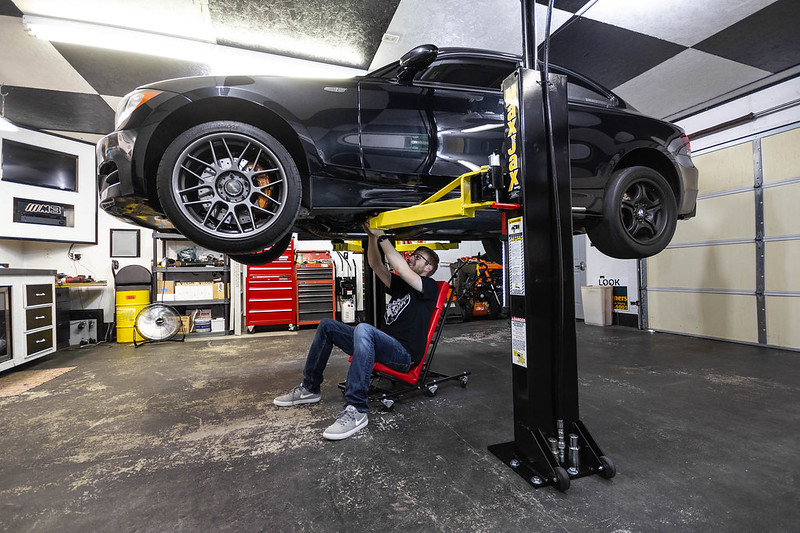
The minimum pad height is 3.5", so as long as it's that or higher, you should be fine. Fits under my lowered 135i, but I can see needing to jack it up or driving on some boards for very low cars.
For comparison, the Atlas lift I had at the shop would not go under my 135i. Very close, but needed to jack the car up first. I'm so glad it fits under the MaxJax arms without an issue.
-
For more information, I wrote a comprehensive blog post about it: https://my1series.com/2019/06/13/how-to-install-maxjax-lift-in-home-garage-review-mods/
-
As I continue to work on my BMWs, I find myself constantly adding things to the garage to optimize my work space. Since buying the house four years ago, I transformed the 750 sq/ft garage into my ultimate hangout space. In my mind, the only thing missing was a lift. Until I found out about the MaxJax lift system. I have no affiliation with MaxJax, but everything about this lift as been great so far and I want to share my experience.
 I had a tough time finding a 2-post lift that would fit in my garage with 8 ft. 7 in. (105″) garage ceilings. All of the 2-post options I found had a minimum column height of 9 ft. or 10 ft., which wouldn’t fit without modifying the ceiling. I didn’t want a scissor lift or a 4-post lift. Then I found the the MaxJax, which has short, portable columns.In its highest position, the hydraulic cylinders rise up to 89″ with a lift height of 45″ (or 48″ with 3″ adapters)! This allows plenty of clearance between the columns and the ceiling, while offering 4 ft. of working space under the car. The only limitation is the height of whatever vehicle goes on the lift.
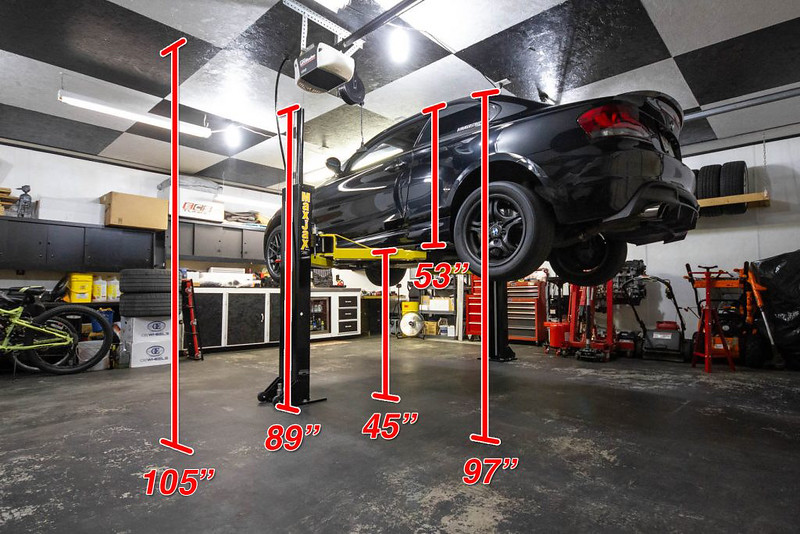 Standard MaxJax Features
-
Low ceiling height friendly
-
Regular 110v electrical plug (no 220v required)
-
6,000 lb. lifting capacity
-
Semi-portable lift columns
-
Adjustable base-plate width
-
4″ minimum concrete required

Installation Guide & Video
The included installation guide is pretty comprehensive, but I made an in-depth video showing you how to install the lift in your home garage. I also demonstrate how to route the hoses off the ground to keep the mobile power cart out of the way.4″ of good concrete is required to install this lift. I used the standard anchors that are included with the kit, but some people prefer the epoxy anchors instead. I mounted the columns 125″ apart from each other, measured from the inside edge. This width has allowed me to lift multiple vehicles with various jacking points.
 This adjustable creeper is perfect for working under the MaxJax, since it doesn’t lift high enough for you to stand under it. This short oil drain tank comes in very handy when changing oil or other fluids. I’ve used these short tripod stands when doing suspension work or to help support the car. It is the perfect lift for the at-home DIYer.
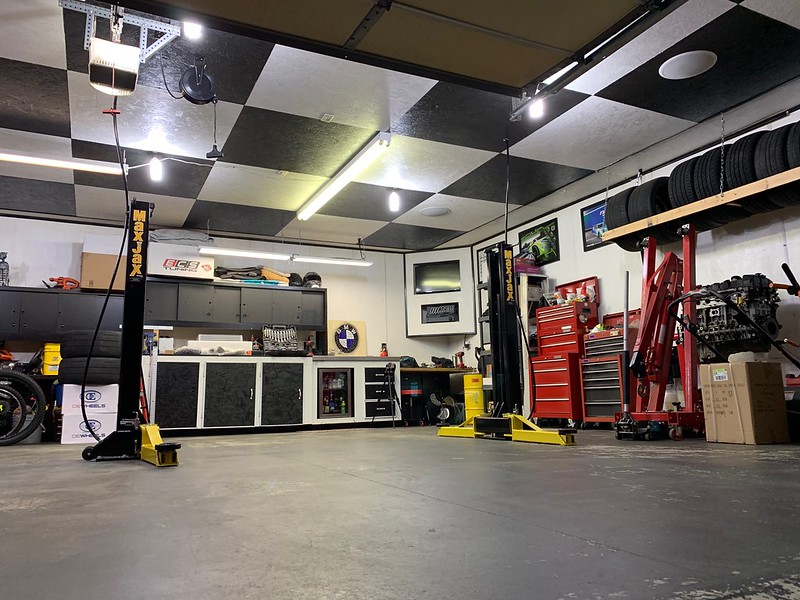 I also have a more detailed write-up on my blog that explains the most efficient installation process, with links to all of the tools and accessories that you'll need. Read it here: https://my1series.com/2019/06/13/how-to-install-maxjax-lift-in-home-garage-review-mods/I would love to hear your thoughts and comments!
 -
-
Was nice bumping into you at WIR! Car looks and sounds great.
-
13 minutes ago, Nick_F said:
looking for a more experienced opinion just to settle the madness. About 6 weeks ago when the weather was crazy and it would rain then freeze then snow then thaw I was coming around a corner and slid into a curb. Damage now includes a bent rear subframe. So they are going ahead and ordering a used one off of a car that was involved in a front end collision. Would it be worth it for me to get new bushings and have them replace them before they install it? Insurance wont touch the bushings but is covering the subframe.
Solid or Whiteline rear subframe bushings are a common upgrade for these cars. I would do them while it's out. Doesn't increase NVH from what I've read, but really improves handling.
-
Not a huge update, but I installed some LUX H8 LED angel eyes. Upgrading the angel eye bulbs are one of my favorite appearance modifications you can do for these cars. They’re relatively cheap, easy to install and greatly improve the look of any BMW.
I have the same set in my 135i and they've been holding up great for years. Very white, very bright, I wouldn't go with anything else. For anyone interested in the process, I wrote a step-by-step installation guide with more photos, etc.
Check out my blog post: https://bmw335i.com/2019/05/31/how-to-install-bmw-angel-eyes-stock-vs-led-comparison-335i-330i-328i/


-
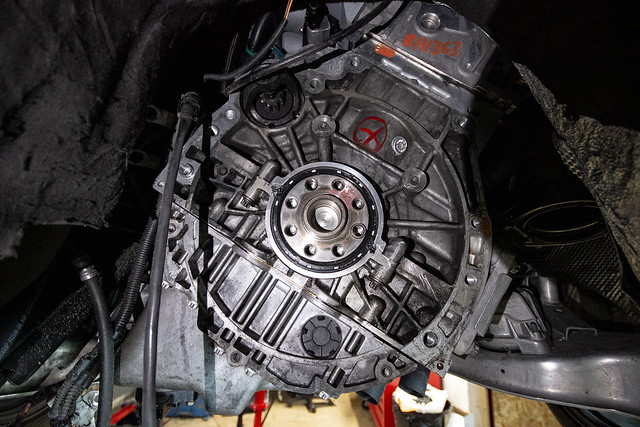
FYI - the two top transmission bolts on the 135i are the PITA to get to as well. Lee used a combo of extensions and a impact with some juice to get them off. Mitch's setup looks similar.
You can see it during the timelapse part of my clutch install video.
-
-
4 hours ago, B C said:
That gapper is awesome! I need one!
I would have been interested to see knock/timing retard for both 0-60 runs. I'd have to imagine a little bit of timing may have been pulled on the old parts.
Once I get a tune setup on this thing, I'll be able to monitor that info. But yeah, I'm sure the old stuff wasn't functioning up to par.
-
Had a tough time selling my X5 too, people that buy X cars don't usually care about their spec. Well-specd enthusiast cars aren't as sought after. They just want an SUV, otherwise they will get the X5M. That was my experience anyways, but with an X5 and at a higher price point.
Either way, GLWS!
-
This week I changed the spark plugs and ignition coils and wanted to shed some light on the process. I filmed an in-depth video and wrote a guide to help others properly replace, gap and install their new plugs & coils.
Ultimate N54 Spark Plug Guide: https://bmw335i.com/2019/05/22/bmw-n54-spark-plug-replacement-gap-guide/
My old plugs were gross and some of them were coated black. Smelled like fuel, so I'm guessing my index 7 injectors are leaking

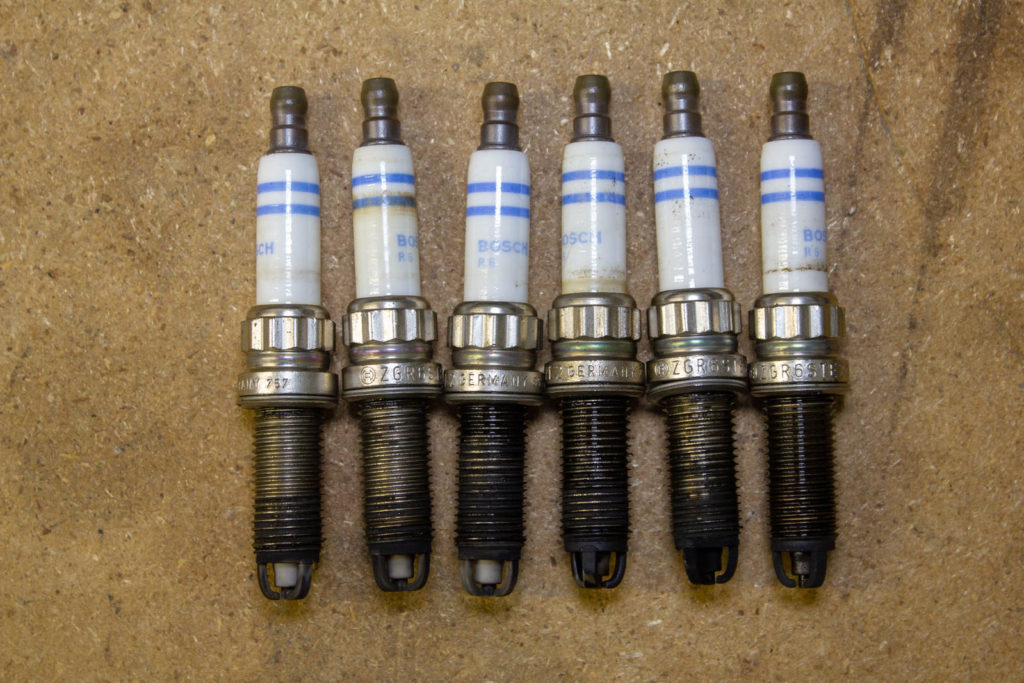
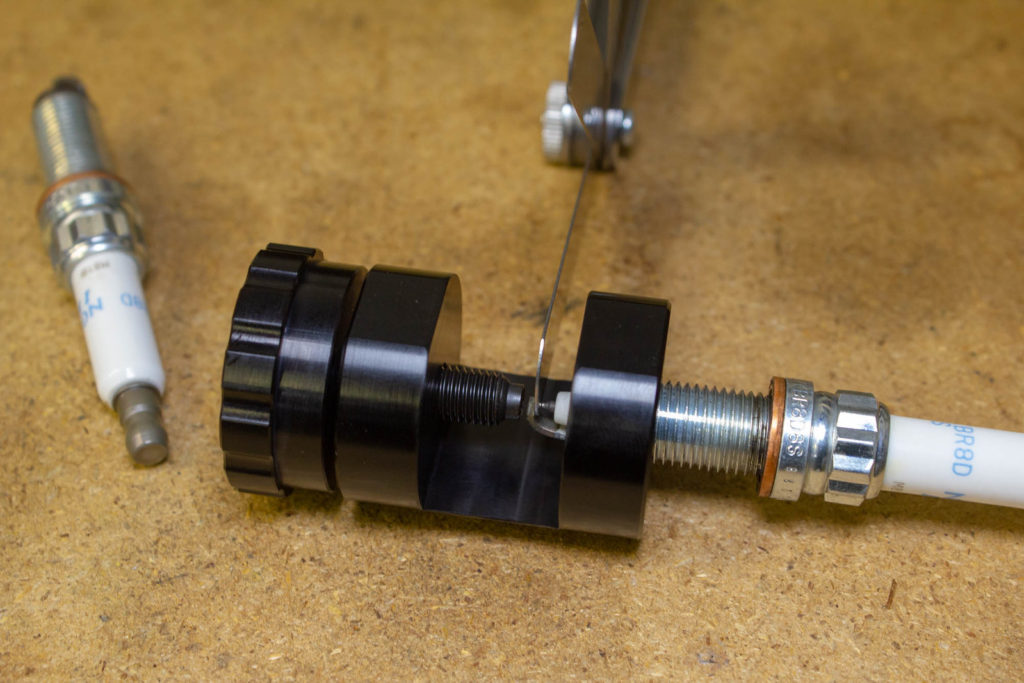
But anyways, I got Burger Motorsports' new spark plug kit which includes 2-step colder NGK spark plugs, a spark plug removal socket, a spark plug gapping tool and a feeler gauge. I also got some Bav Auto high performance ignition coils to try out. They seem great so far!
I'm in love with the BMS spark plug gapper tool, wish I had it a long time ago. Can't wait to use it every time in the future for both my 335i and 135i. If you're curious how it works, I walk through the process in my video above.
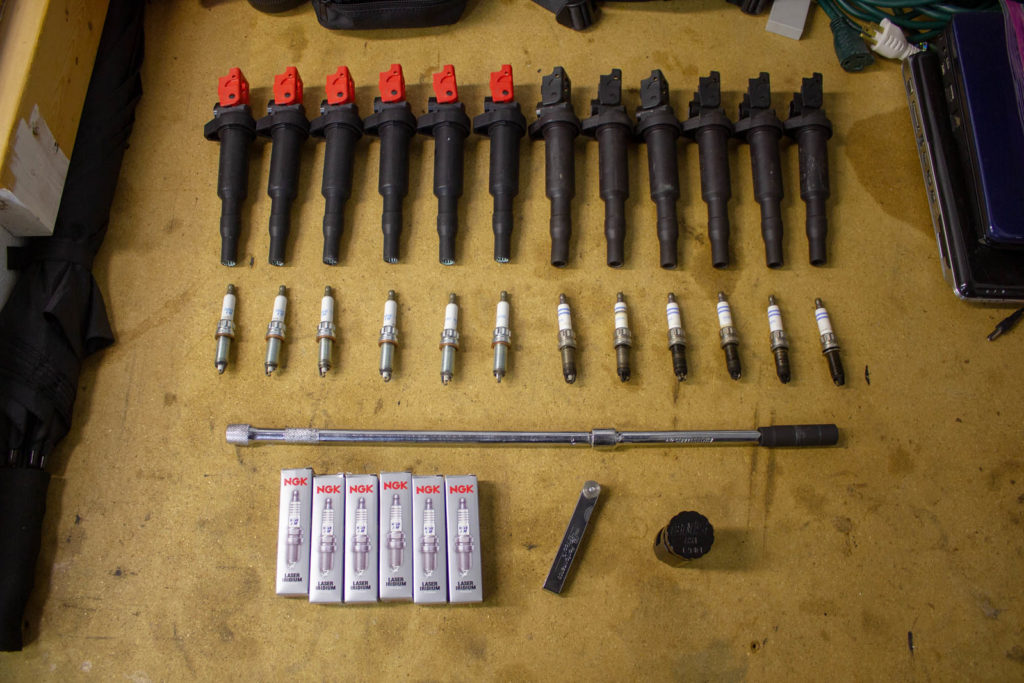
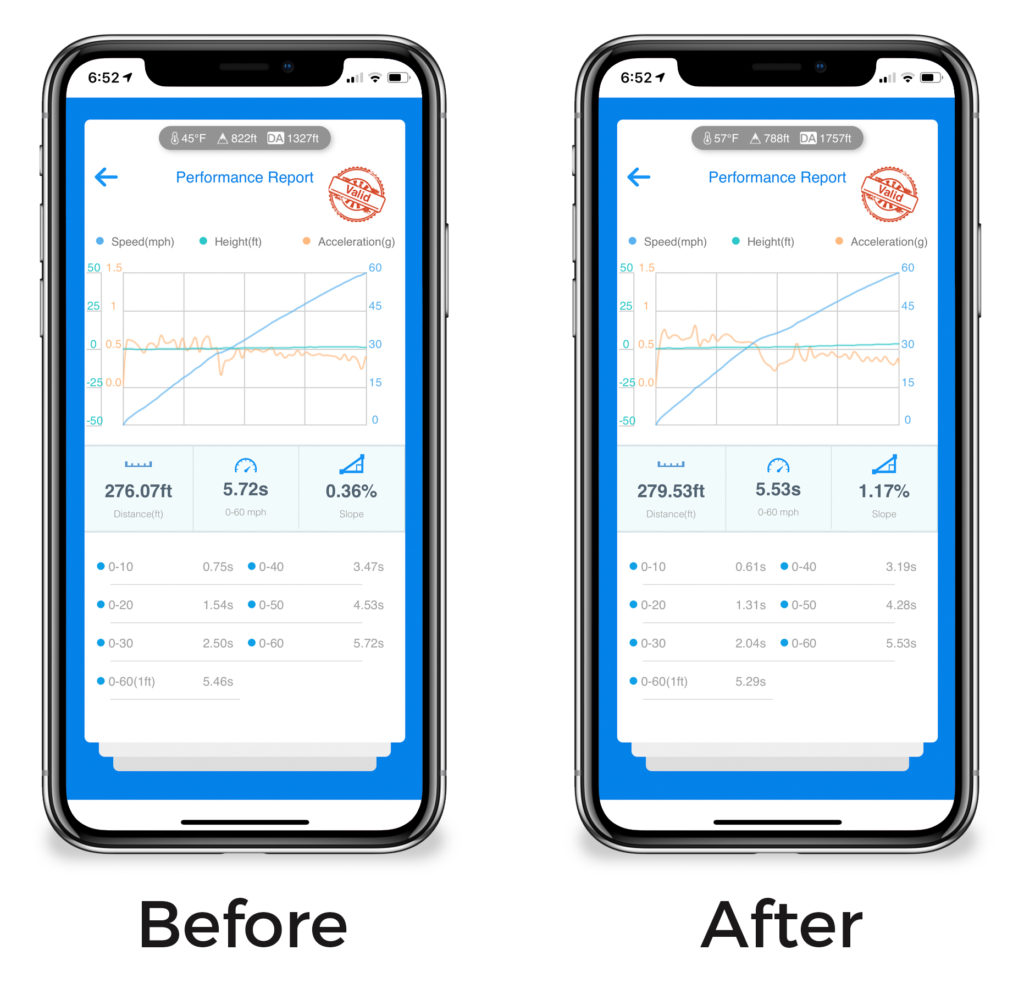
I even used my Dragy to get some real-life performance results before and after swapping the plugs & coils! I did a 0-60mph run before and the best result I could achieve was 5.71 seconds. After installing the upgraded parts, I went out for another run and was able to knock it down to 5.53 seconds!
I guarantee if you watch the video or read my complete blog post, you'll learn something that you didn't know before. Either way, let me know what you think!
-
-
Same location, two different lenses


Follow me on Instagram for more photo content: https://instagram.com/jakespence
-
1 hour ago, SteelBlue said:
not going organic for your clutch? guess you dont care about the environment smh
It was gluten free though, non-GMO.
-
17 hours ago, B C said:
Any improvement in the 1-2? Or is it too early to tel?
twin discs are definitely noisy but really the only option to hold big power. Good vid!
I haven't been able to do a 1-2 shift at full power yet, but it's been good so far. Once the clutch is fully broken in, I'll try a NLS 1-2 redline shift and if it works, I'll be thrilled.
3 hours ago, GunMetalGrey said:I vote to change "epic" in your thread title to "epoch"
This literary pun is far less amusing when typing it, but it's Friday and that's just where I'm at.I just had to Google that word...
2 hours ago, patsbimmer1 said:What distinguished point in his life would this be the beginning of? Are we witnessing some kind of re-birth? A falcon rising from the ashes? Or is this a distinguishing moment for the e90 at which point it will continue from here in fame or infamy!
This is all too much for my brain to handle on a Friday...
-
Welp, my Spec Stage 3+ clutch started to slip after only 5k miles at 750whp so I was forced to search for another new clutch. The Spec clutch was only rated at 671 tq, I thought it would be capable of holding more power. My search of 1000+ tq rated clutches led me to research twin disc options for the N54.As some of you might be aware, there is a new twin disc clutch option for those of us with manual N54's. Xtreme Performance Clutch (or XClutch) is an Australian company that specializes in clutches for performance vehicles overseas. With the recent group buy, I decided to give their clutch a shot given the price is much cheaper than the Motiv or MFactory twin discs.For more detailed information, check out my complete blog post about this topic. I also included a video at the bottom of this post that shows the noise and pedal engagement.I ordered the ceramic version of the clutch, which is capable of holding more torque and is meant for track-driven cars. There is also an organic version for those of you who might not need the 1350 tq rating.I received the clutch a few days after ordering and was very impressed with the quality! It includes the clutch & flywheel assemblies, metal throwout bearing, pilot bearing, flywheel bolts, machined alignment tool and locktite.


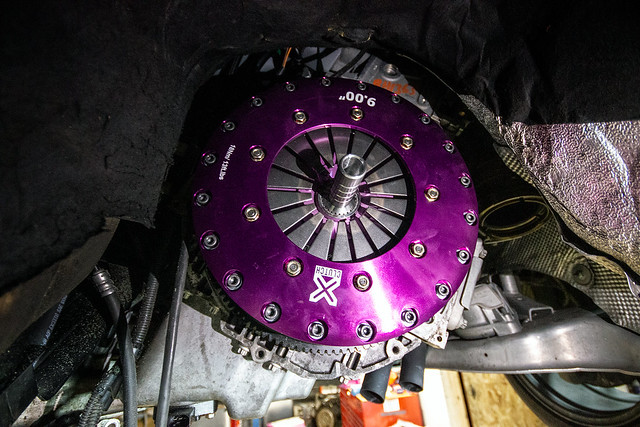 The recommended break-in mileage is 1000 kilometers (621 miles). I noticed that the driveability gets better and all noises quiet down a little after putting on some miles. It will never be as quiet or as smooth as a stock clutch... but it's much more capable than the stock clutch.
Noises:
If you install the metal throwout bearing that is included with the kit, it will produce a metallic whirring noise when the clutch is depressed. This does not bother me, but it might bother some of you who don't like noise. Please watch my video at the bottom of this post to hear the noise.The metal throwout bearing included with the kit is recommended and more robust, but this is the OEM-style throwout bearing if you'd like to avoid the noise: https://bit.ly/2Hy6rX3As with any SMFW or twin disc, you will have low RPM gearbox chatter. While idling and while driving at high load/low RPM, you can hear it. If this bothers you, you will have to stick with an OEM-style DMFW clutch setup. Otherwise, you can raise the idle via MHD to 900 RPMs or so to reduce the chattering.Driveability:I knew the ceramic version of the clutch would be a little more difficult to drive than the organic version, so please take that into consideration when reading my review or purchasing the clutch.The pedal is stiffer/heavier than stock, but not by much. It's effortless to depress, which is good. Engagement doesn't happen until the top of the pedal during release. My stock clutch and my Spec Stage 3+ clutch both engaged a lot closer to the floor, so this took some getting used to. Installing the clutch stop helped, but still has a large area of dead space in the pedal. Again, watch my video at the bottom of this post to see how much dead space there is.Once the engagement starts, the window is fairly small. You don't have a lot of slipping area, and this can result in a shuttering take-off until you learn the clutch. I've heard that the organic version is a little more forgiving in this sense. The clutch itself is very grabby, just like it should be. I have no concerns about it holding any power I'm capable of making right now (750whp+). -
On 5/10/2019 at 8:28 PM, Drgt5683 said:
Wow great video !
i could’ve sworn I almost bumped into you the other day at menards . I wanted to say something tho you looked like you were on a mission so I just continued on , keep up the great work I’ll be doing this soon to mine at 148k . I do think it was done roughly 80k so not quite as bad as that puppy was tho wowza yuck 🤢 😂
Maybe! Say hi next time, always cool to bump into other local BMW guys. I probably always look like I'm on a mission

Hopefully yours isn't as bad as mine!
-
Are you comfortable removing the DME from the car and shipping it somewhere? I know of a few guys who can unlock it for you and send it back.
-
1 hour ago, B C said:
yow!
I didn't watch the video yet but what sort of driveability improvements do you end up with after that? mostly just sharper response?Smoother idle, better cold start, restored performance (more power, smoother powerband).

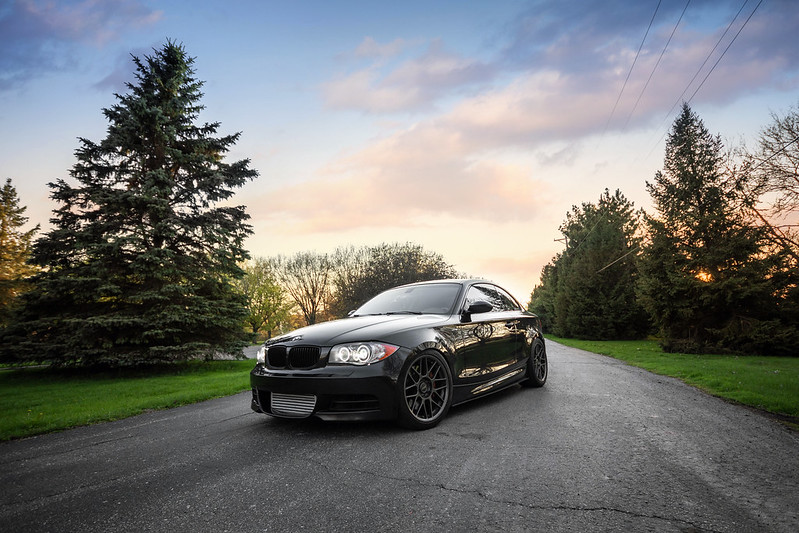
Jake's Epic BMW 135i Build Thread! (5+ Years of Ownership)
in Members BMWs
Posted
I made it to the drag strip the other day and want to share the results! I am now one of four manual N54-powered vehicles in the 10s... in the world!
2560 DA
Log: https://datazap.me/u/suspenceful/1090-1369-mph?log=0&data=1-4
Adjustments I made to the car:
Dragy results from the same pass: