

Andrew
-
Posts
89 -
Joined
-
Last visited
Content Type
Profiles
Forums
Events
Gallery
Store
Posts posted by Andrew
-
-
Great work Andrew! Marcus showed me a pic and I thought it was professionally done! Looks much better than a lot of the reupholstery jobs ive seen
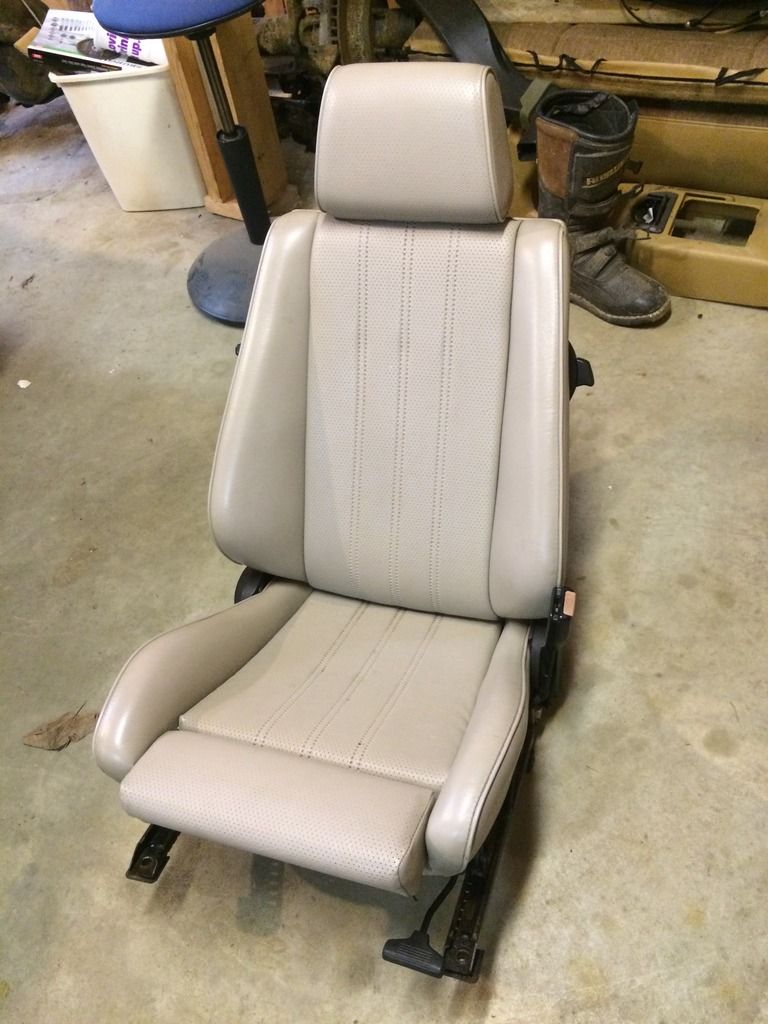
Thank you! It's kind of a pain, since the replacement upholstery isn't a perfect fit and is missing some holes, but it went back together better than I expected... though I kind of fear one of these moments happening after hitting a bump.
-
Looks great! Any chance the old vinyl is salvageable? I could use some for repairs although I still wanna try one of these kits someday.
I didn't destroy the old vinyl during deconstruction, so i think you can use it. The original upholstery looked really good on the outside, but man, the 25 years of shit you cant see... I can send you pics of the pieces of interest.
-
This project still lives! It moves at a glacial pace i know. I'm pleased with this next modification...
I put this (cardinal red vinyl upholstery kt from zoomzoomzoom-ing on ebay)...
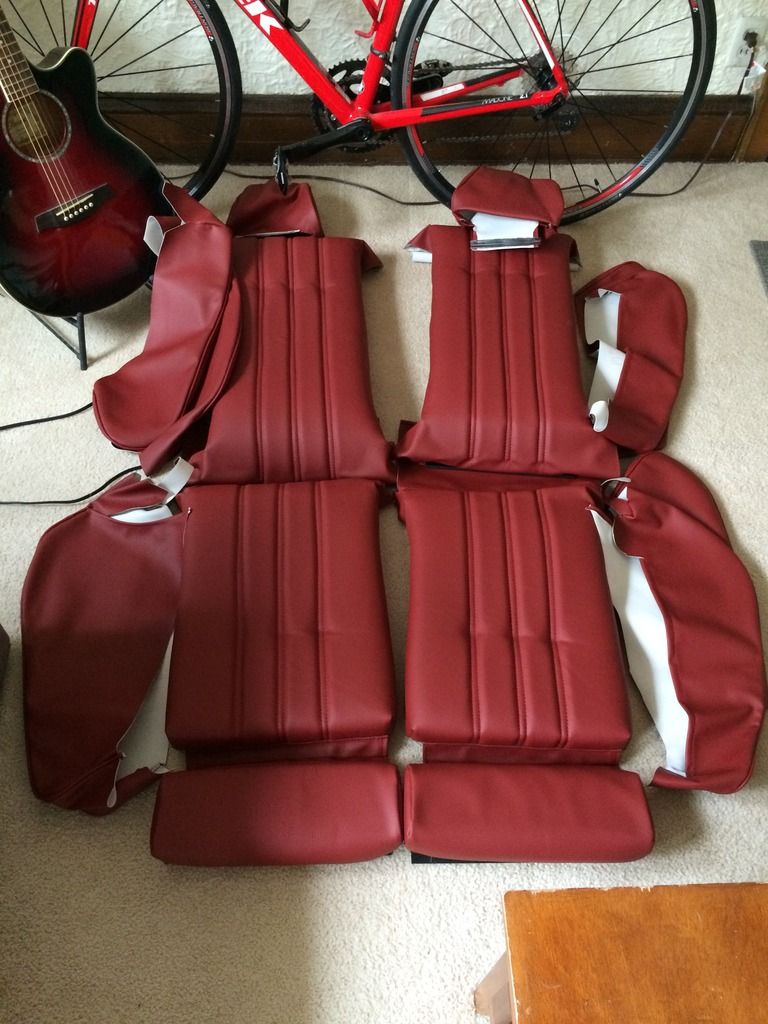
On this...
And got this!
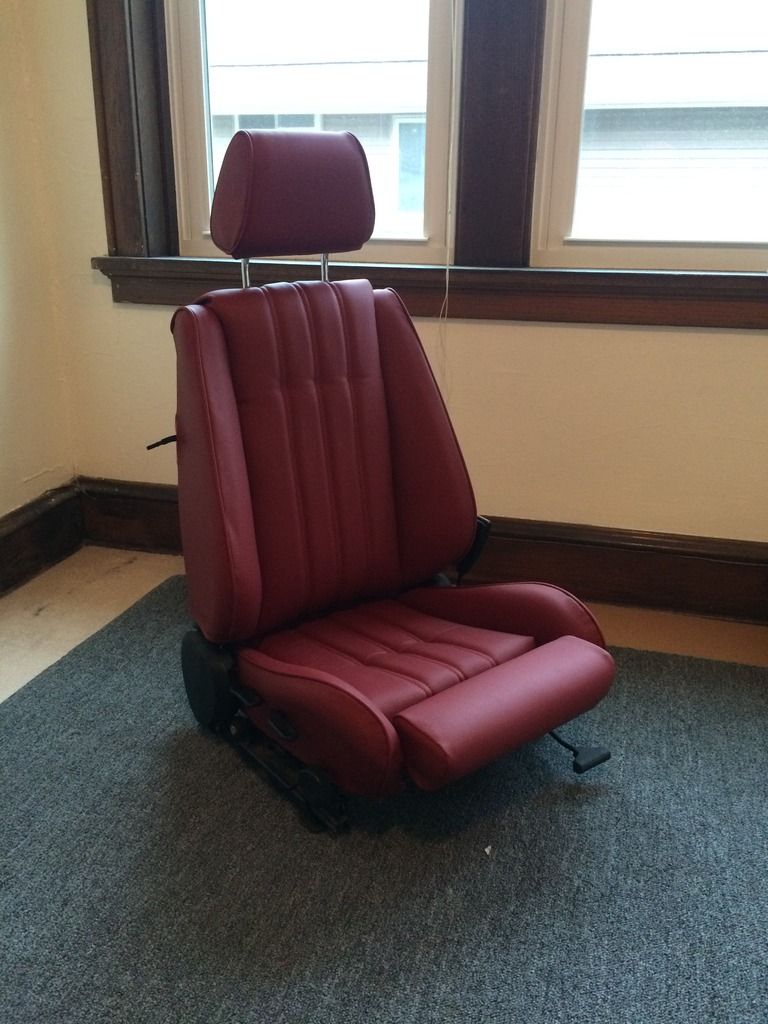
The drivers seat is the last piece to the cardinal red puzzle Hopefully done next weekend. These are not fun to put on by the way...
-
Thanks all for the replies. I think i'll try re-dying, but I am afraid of the dye rubbing off on everything...
Its one thing to re-dye the seats the same color. But when doing a entire different color it tends not to work well. You wont get everything covered and there will be different shades throughout the seat. I went from grey to beige (out of a 430 italia) and got not so good results. This is with doing correct prep work. in the end I just got my seats recovered in the correct color leather. $1350 is what I got charged for labor and material. Using a nappa leather. Seemed pretty cheap for what the end product was. Going back to get my lower dash and center console covered in the same thing soon.
Who recovered the seats for you? I'm looking for a well regarded local auto upholsterer as another option.
-
I need my beige sport seats to be cardinal red. Does anyone have experience with re-dying seats? What are recommended products/processes? I'm debating doing a leatherique re-dye vs Ebay vinyl upholstery kit.
-
I think I have driven it enough now to conclude that an alignment was all that I needed. I am an idiot for not getting it aligned immediately after finishing my front end rebuild.
-
Your 1 series interpretation looked really good. What can I do to motivate you to make an E30 version

-
This car is ridiculous. Not sure how I missed this thread, but I just read the whole thing. Can't wait to see it finished!
-
I saw a guy at last years US Grand Prix with this shirt and I would love an E30 WI Bimmers version. Who has the skills/means to make this a reality?

Idea stolen from here http://blipshift.com/products/bro
-
The FCAB holes are to the outside right? You can check your toe in with a tape measure when the car is on the ground, this is really the only adjustment in the front. I usually go about an 1/8th - 3/16ths inch toe in at the outside of the tire.
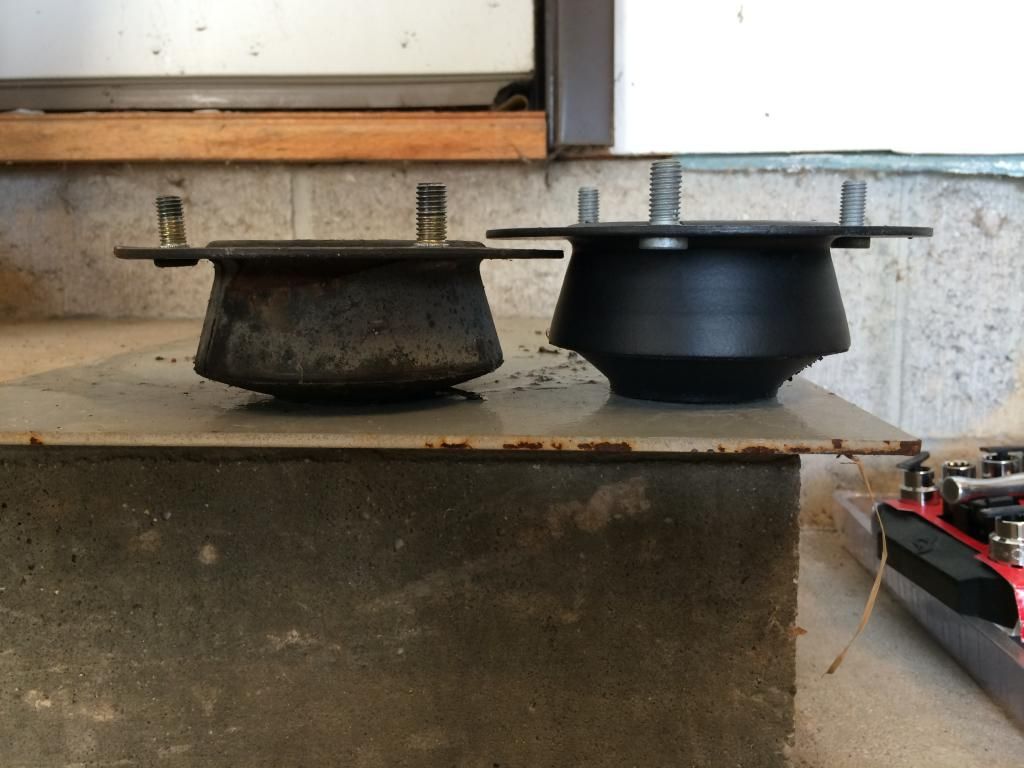
So i was impatient and bought new strut mounts, and I was going to throw them in this morning, but they are taller (by 6 mm) than what came out of the car!!! Did the old ones get shorter with age or are the new ones the wrong part?
-
Nice schematic!

Did you loosen the strut nut?
Thanks:) I have loosened the strut nut. It does not seem to impact the deflection I am seeing.
There will be some deflection because the bottom of the strut is not directly centered over the ball joint. This will cause the bottom of the strut to move in an arc which changes the angle relative to the top mount.
Are you sure it is not attributed to alignment? You used offset FCABs right? Is the change in caster causing the difference in feel?
I was not originally thinking that it should be at the top mount, I thought it should be pure rotation at the bearing, but I agree that if there are two dissimilar axis of rotation, it has to arc. I guess my next question is, is my deflection at my bearing due to this arc normal?
My return to center could absolutely be attributed, possibly entirely, to alignment, since i have not had an alignment done (you'd think i'd have that done immediately, but i didn't) Yes i have offset FCABS, but I thought an increase in caster created a stronger self aligning force, which would tend to increase return to center. I've read that excessive toe out can cause poor return to center, maybe my FCABS introduced a lot of toe out? As soon as I get it back together i'm getting an alignment.
-
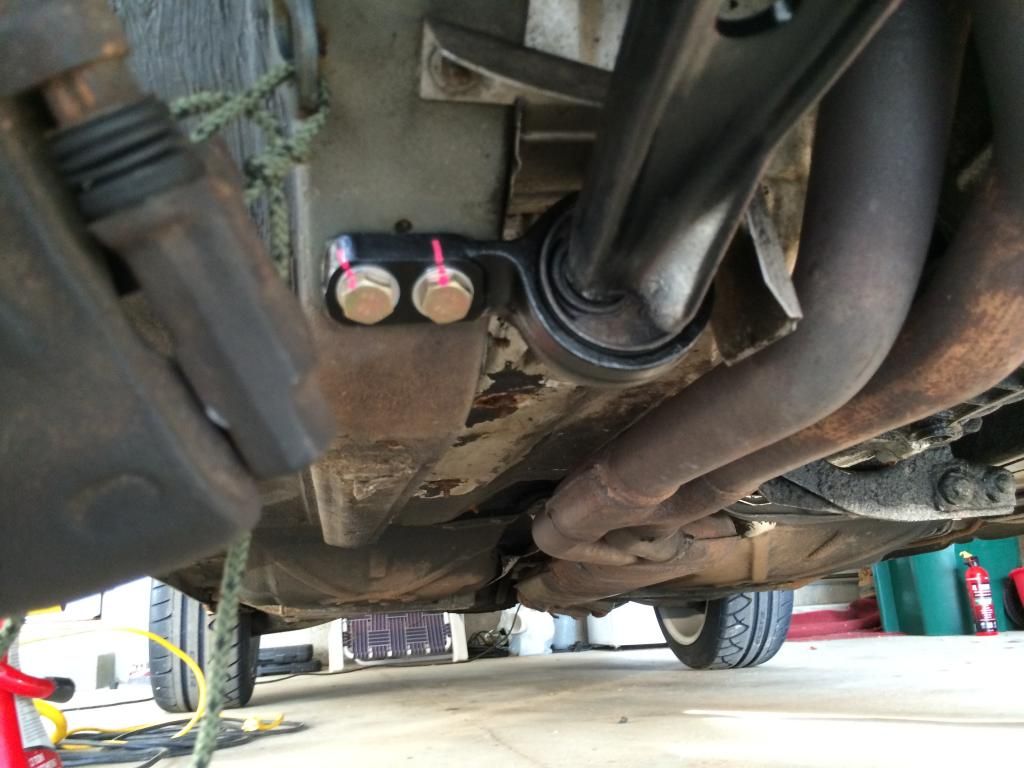
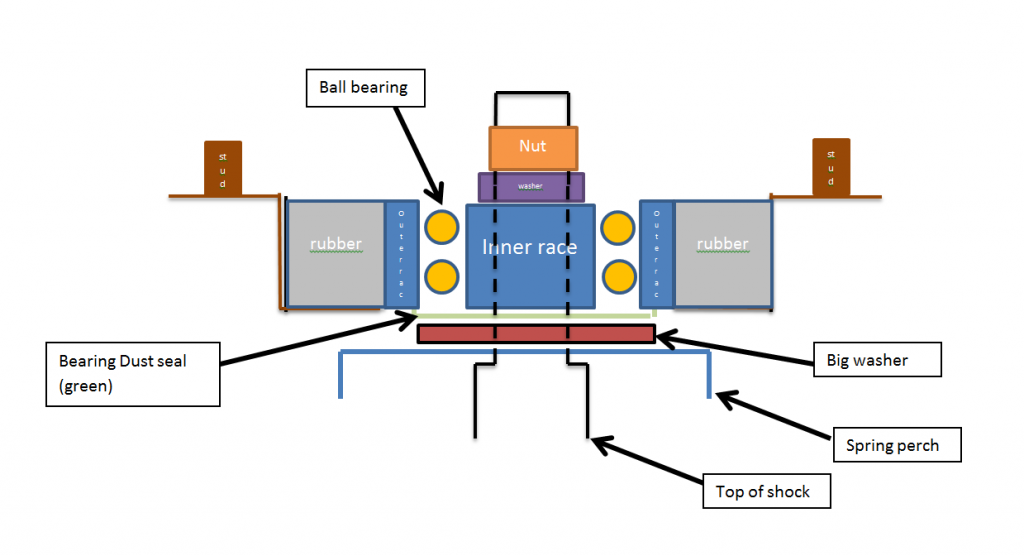
I'm trying to diagnose why my car has poor return to center after rebuilding the front suspension, and the strut bearings are my current suspect. I have reassembled the strut in the order depicted by my schematic. The only mistake I made was the orientation of the dust seal washer. The dust seal washer is now oriented as depicted below.
Now on to the lovely video. I dont understand what is causing the rubber to deflect. I also don't know if this deflection is due to the car being partially disassembled and loaded in a non-normal fashion. Maybe if the car was resting under its own weight on the ground on its wheels at normal ride height, this wouldn't happen. I also don't know if this deflection is severe enough to cause my return to center issues. https://www.youtube.com/watch?v=fWj2-0SLSNQ
-
Alright guys, she's back on her feet! Partial car photos only at this time:) I'm saving full vehicle pics for after I finish the IS lip, shadowline, and give her a bath:) More importantly, the test drive revealed that I have some wicked auto-steer AKA anti-return to center, meaning, if I steer a direction, the car tends to steer HARDER in that direction as opposed tending to self center. Now, this doesn't happen right off center, but I dont have to get near steering lock for it to happen either. Its not uncontrollable, but it is definitely NOT RIGHT. I replaced a whole ton of stuff on the front end (iv'e unbolted and reinstalled every component related to the front suspension, including removing the front subframe), and haven't had an alignment yet, so that may be part of it. What type of misalignment would cause this "auto-steer"? Eyeballing it, It looks like i have lot of toe in... Could i have reinstalled something wrong to cause this?
On a positive note, the front end feels really solid and responsive; no more crashing over bumps!!!!!!!!!! No creaking when steering! The majority of this was the ball joints, they were realllly bad. The solid motor mounts affected shifting precision more positively than i ever expected; very cool. I think my passenger side motor mount was broken before, which would explain the clunkiness between shifts. The solid motor mounts definitely increase vibration though. My new diff seems to have fixed the major grinding/whining that I had, but there is still something rubbing back there, likely parking brake shoes...
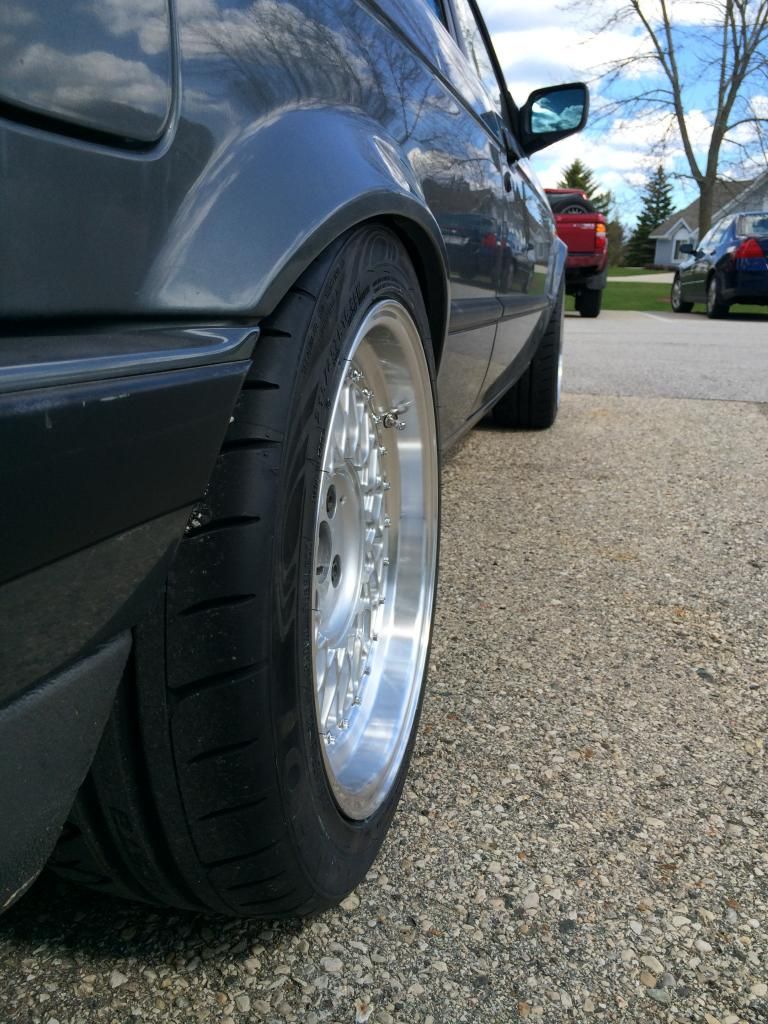
And a pic... Also, these tires pick up road grit like crazy. They are sandblasting my wheel wells something serious.
-
I thought my grinding/noise was a poorly adjusted ebrake shoe until i ran the car on jackstands, put my head under the rear, and heard the sound was coming from the diff. I have a different diff in the car now, soon i will see if i improved things...
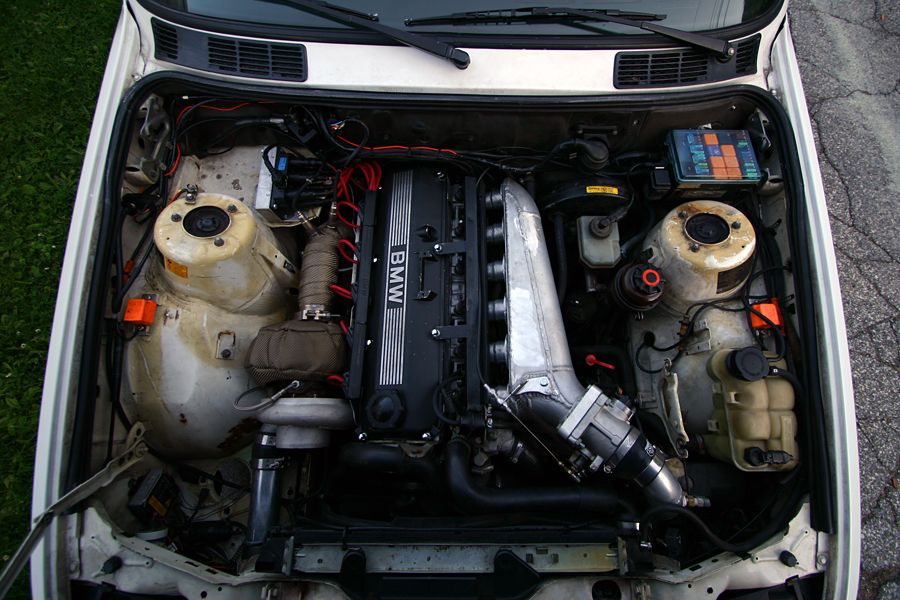
I also have a irrationally massive hatred for the stock m20 intake manifold. I dont care if i mess up any finely tuned Helmholtz resonance that the stock manifold provides, I want it out. It just doesnt look right to me and clutters up what could be a beautifully clean and simple engine bay. Sign me up for any ITB development prototypes:) I was also having turbo thoughts just last night to justify a manifold like this
-
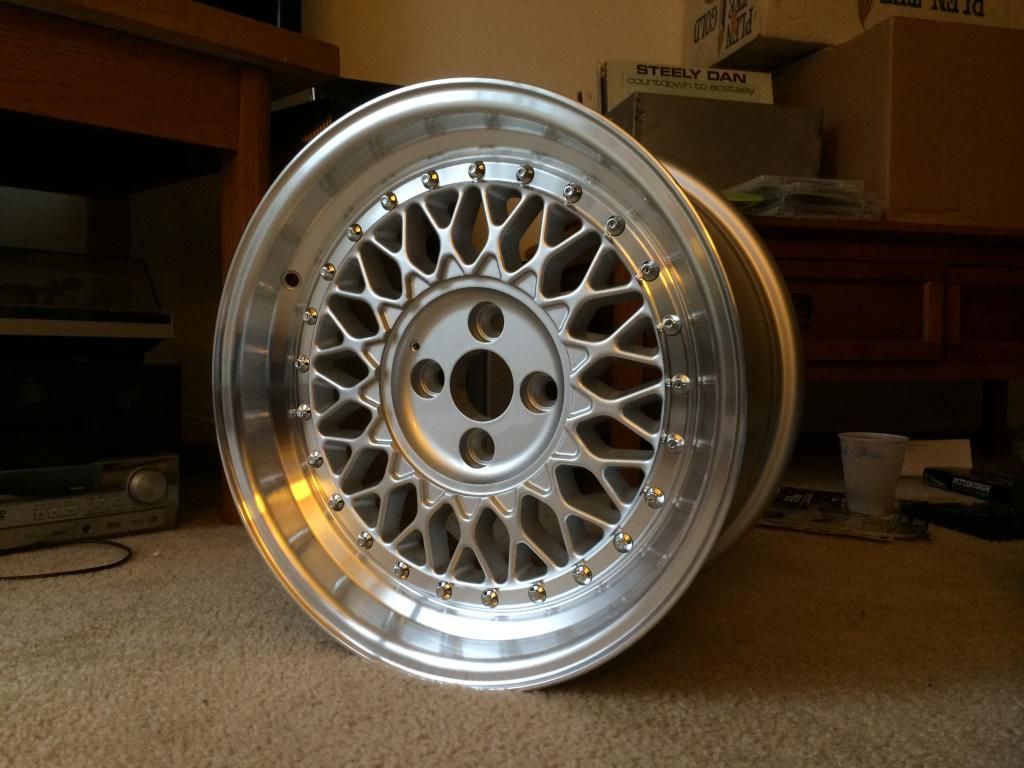
What wheels are those that you chose to go with? Look to be one piece with beauty hardware possibly?
They are ESM 002r 16x8.
-
I didn't mean to concern you, I think it is more of a longevity issue. If the bushing is constantly twisted it may not last as long. Did you use standard bushings or e36 m3 ones?
They are E30 M3 offset bushings. The install was sooo easy with my fancy home made tool, i knew it was too good to be true. Hopefully there will be no ill effects:)
-
S4.10? or grandma 4.10?
The new rubber and new front end stuff means we need to get out and hit some twisties soon
Its an open diff, and twisties must be driven with extreme prejudice this year.
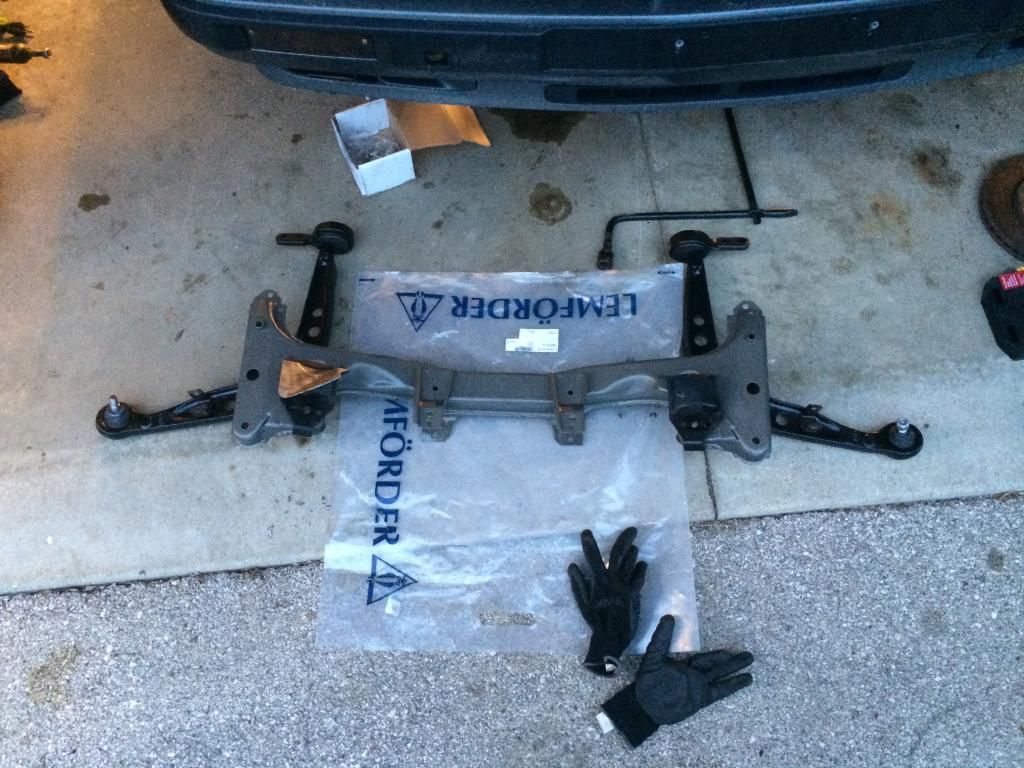
Subframe looks fantastic!
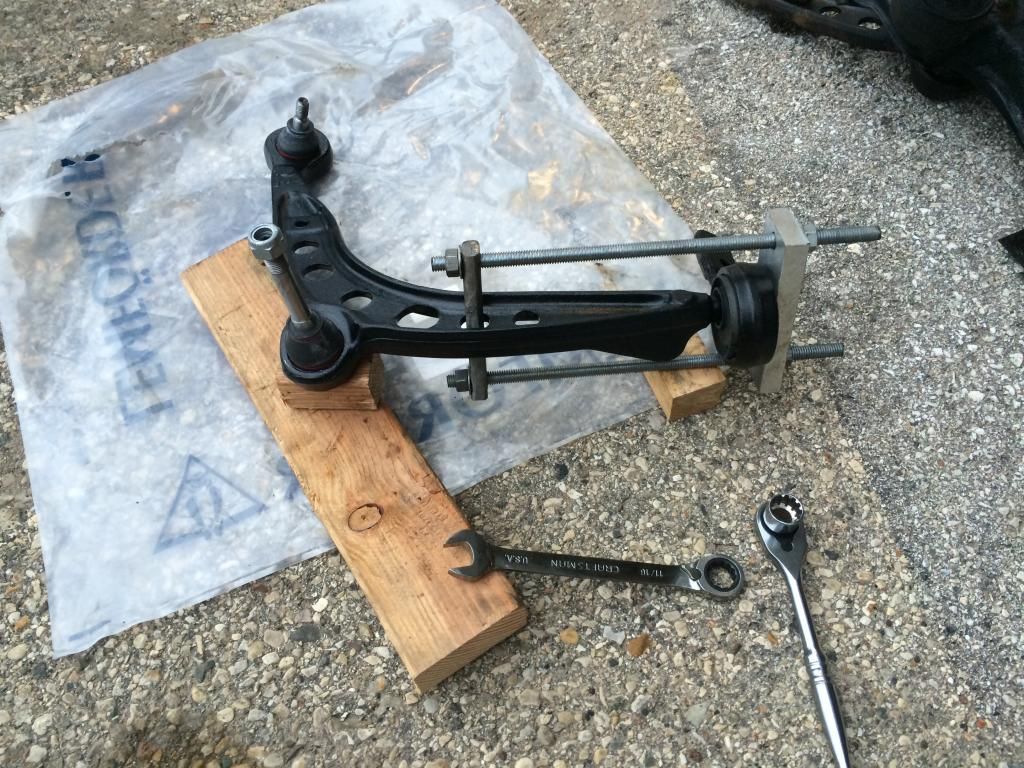
Your CAB install tool looks exactly like mine did, I didnt use very good threaded rod because the threads were buggered up by the time I was done with it.
Where did you get the bushings pressed into the lollipops at?
You dont need the hooked portion of the heat shield bracket but I dont see a reason to lop it off.
I didn't want to battle with pressing them in, so i bought the bushings pre installed in the brackets. Expensive, yes, but sometimes i will pay for no hassle.
-
I have always installed the bushings by hand after lubing them with dishsoap, (It is still not easy to get them on though). From my understanding the car needs to be set down right away so that they dry with them at the proper angle with the weight of the car on the suspension so that they are not twisting/flexed when the car is at normal height. How are you determining the correct angle to install them at?
Soo i just read the installation procedure in my trusty Bentley manual and it describes the necessity to press the bushing on the arm and let the car rest on the ground in a loaded condition within 30 minutes, as you stated, otherwise you will crash and die (maybe). I did not use BMW's special lube, nor did i use any lube; i just installed them in a generally correct orientation. I wish i would have read the install directions before installing (who does that?). Now i'm kinda concerned. I cant believe that any torque caused by the bushing will be that significant compared to other forces on the wheel, and i cant believe that the bushing wouldnt slip after a few miles. We'll see.
-
-
Getting closer...
This tool made CAB installation a breeze. If anyone wants to borrow it, lemme know.
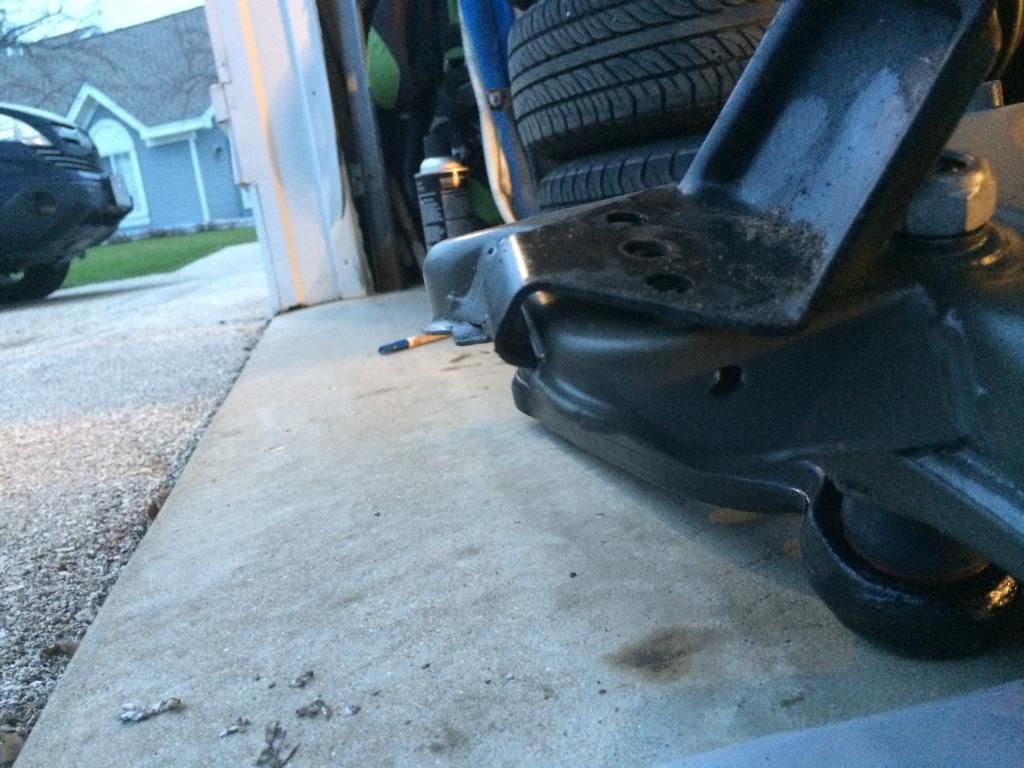
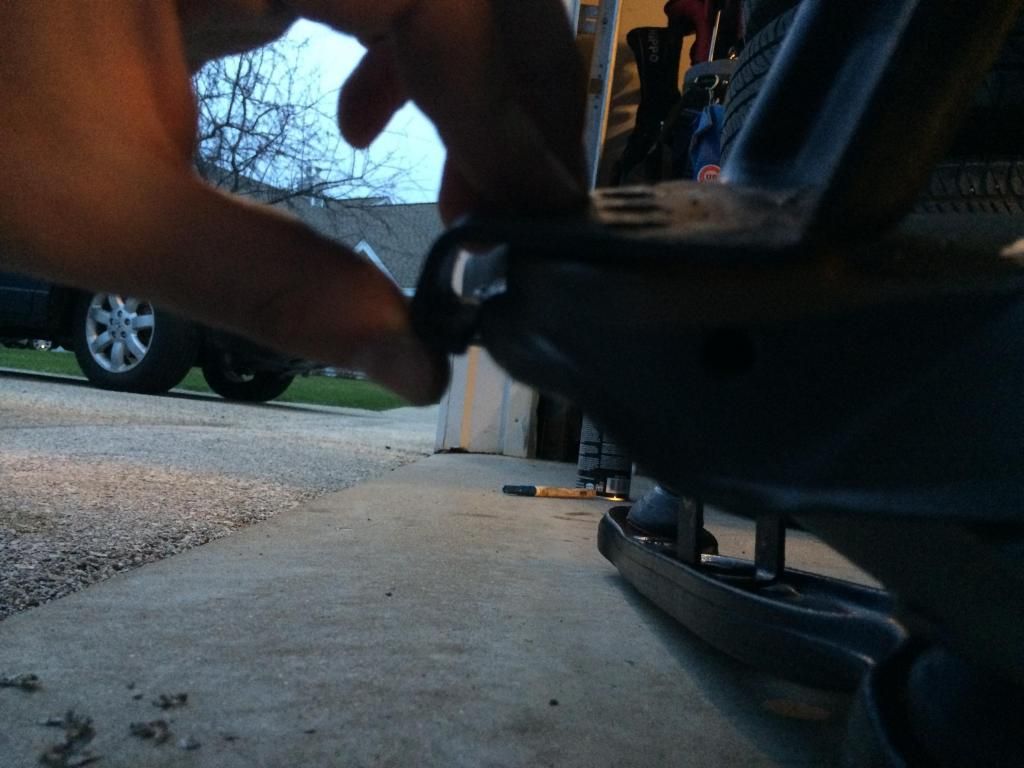
Question: Are these motor mount heat shield bracket wraparound hook things important, or can i cut them off (just the hook part that wraps around)??? They cant be hooked around the subframe after I welded in my reinforcements. Is the only purpose of this part to hold the heat shield?
-
I claim victory for the evening. The front subframe is out. I dropped it with the control arms still attached to avoid battle with the 22mm inner ball joint nuts
A reinforced subframe is going back in, along with new control arms, M3 offset CAB's, and new Bilstein sports. I think i have a broken motor mount, so i might as well put new ones in. My swaybar bushings look pretty sorry too...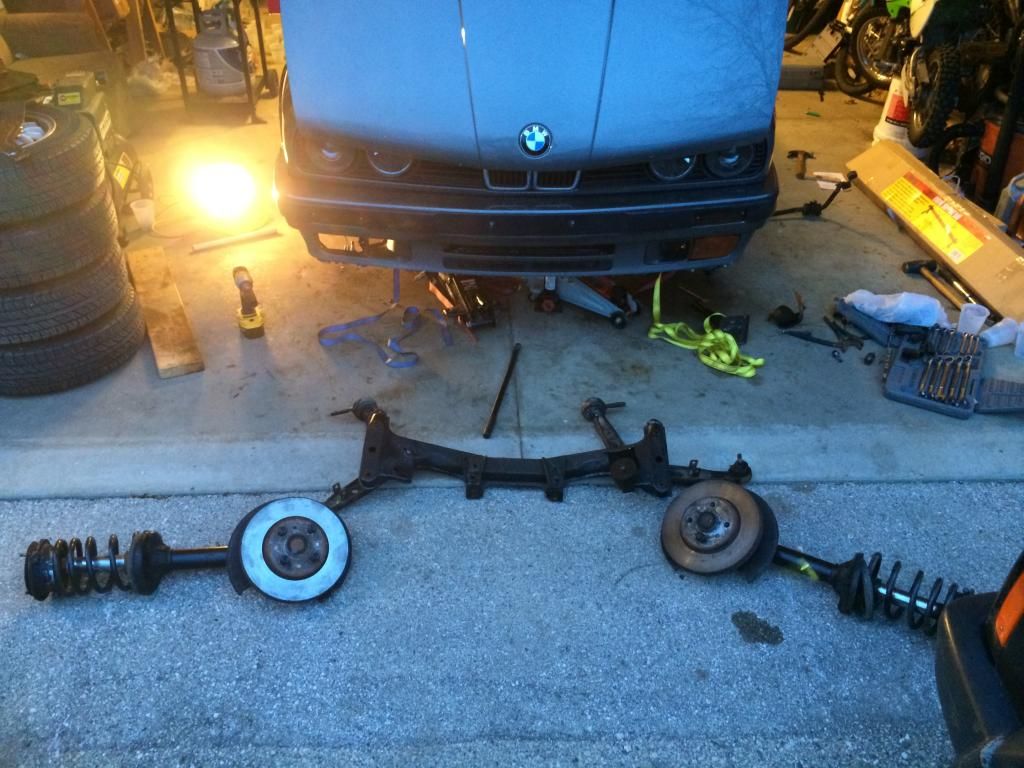
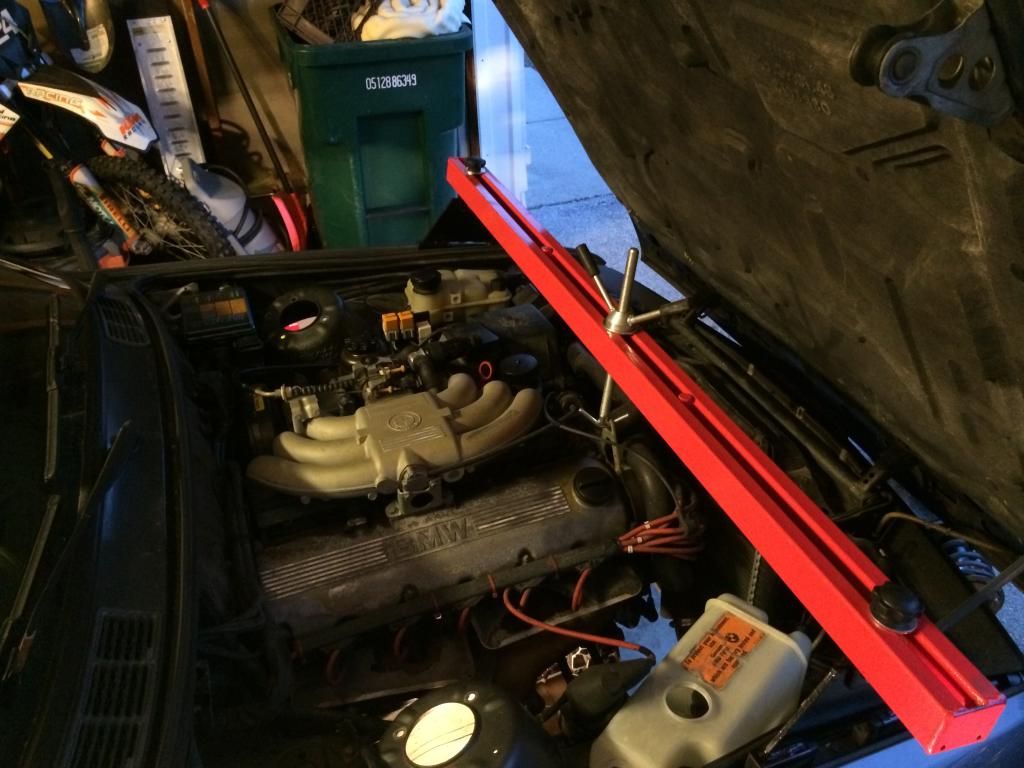
If you're wondering what's supporting the engine, it's this:
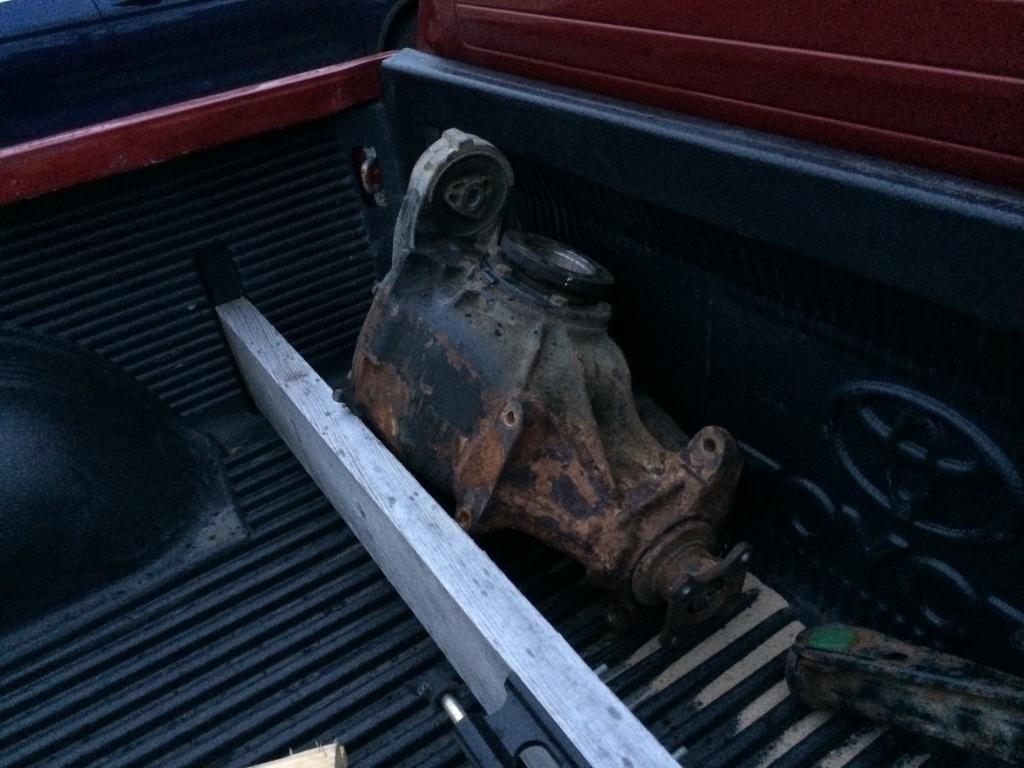
This strange damage/repair job is why I have a new subframe

This 4.10 followed me home from Appleton. My current diff is making awful machining noises...
-
I've got new wheels on the way and I'm wondering where you guys go to get tires mounted and balanced? Do you trust any tire shop to not scratch your nice shoes? What are some competent shops in the Milwaukee area that I can trust to do a good job?
From searching this site, Big Bear Tire in Oconomowoc seems to be competent. I'm hoping I don't have to travel that far to have good work done...
-
I want to do this. Will the all seasons you had on the car be acceptable Zach?
-
Second on the subframe, looks awesome! Is that powder coated?
As far as the seats, I know your driver seat needs a rebuild. If you'd be willing to fix it yourself you could then just recover the seats too. When I plan to build a set of hybrid e30/e28 sport seats I'm gonna use kits from this seller. http://www.ebay.com/usr/zoomzoomzoom-ing They have good reviews from guys on other forums that have used them and the prices are decent too.
I considered having a friend powdercoat it, but i ended up spray painting it with engine enamel. Are you planning to get a kit like this http://www.ebay.com/itm/BMW-E30-325i-318i-325IS-M3-SPORT-SEATS-CARDINAL-RED-UPHOLSTERY-KITS-CONVT-NEW-/350963052092?pt=Motors_Car_Truck_Parts_Accessories&hash=item51b7072e3c, and do the upholstery work yourself? Can i do this myself without sewing skills and equipment? Does it cost much to have someone do it? The first review i found of this seller was negative, although it was because of the seat mechanicals, not the upholstery. http://forums.bimmerforums.com/forum/showthread.php?1817261-eBay-e30-sport-seats-review-zoomzoomzoom-ing
Just don't change the body color. Love Delphingrau!!!The color is here to stay. I love Delphin.

The Dirty Dolphin build thread
in Members BMWs
Posted
Pretty much done. I like.
Also, I bought this other red thing a couple months ago... They look good together:)